Mostrando entradas con la etiqueta embossing. Mostrar todas las entradas

martes, 17 de mayo de 2016

Tarjeta con mucho embossing - A card with a lot of embossing

¡Hola! Ya estoy de vuelta con otra tarjeta primaveral... en ésta he usado mucho embossing, una de mis técnicas favoritas y la temática de dos retos en los que participo, el de 3flowers: "A embosarlo todo se ha dicho"  y el de Seven Hills Crafts.
Hi there! I'm back with another springtime card... in this one I used plenty of embossing, one of my favourite techniques and the theme of two challenges that I'm participating in; the one at 3flowers and the one at Seven Hills Crafts


En primer lugar, utilicé una carpeta "Next Level" de We R Memory Keepers para hacer embossing en seco (o repujado) en el panel de fondo. 
First I used a "Next Level" embossing folder by We R Memory Keepers to dry emboss the background panel.


Después usé mi plegadora para darle textura (embossing manual) a una cartulina de color kraft, de la que recorté los tres conos con unas tijeras.
Next I used my scoring board to score a piece of kraft cardstock (old fashioned scoring embossing) from which I then cut the three cones with a pair of scissors.


Por último usé polvos de embossing de Hero Arts color platino para estampar (embossing en caliente) el sentimiento en una franja de papel vegetal.
Lastly, I used Hero Arts' Platinum Embossing powder to heat emboss the sentiment on a strip of vellum.


Corté las bolas de helado con un troquel del divertido set "Fruit People Dies" de Paper Smooches. Después las cubrí con una generosa capa de "Rock candy" Stickles, un truco que aprendí de Kathy Rac de The Daily Marker
I used one of the dies from the fun set "Fruit People Dies" by Paper Smooches to die cut the ice cream balls. Then I covered them with a generous layer of "Rock candy" Stickles, a trick that I learned from Kathy Rac from The Daily Marker.


Os dejo con un último vistazo a mi tarjeta... ¡hasta pronto!
Here's a last look at my card... See you soon! 

sábado, 19 de marzo de 2016

Tarjeta para el Día del Padre - A Father's Day card

Hoy os muestro la tarjeta para el Día del Padre, que mis peques y yo le hemos hecho al papi de casa (en Finlandia se celebra el segundo domingo de noviembre, así que mi padre no recibirá la suya hasta entonces). Así es la tarjeta por fuera:
Today I'm showing you the Father's Day card that my children and I have made for the daddy of the house (in Finland Father's Day is celebrated on the second Sunday of November, so my father will have to wait until then). Here's the outside of the card:


...y así es por dentro:
...and here's the inside:


El reto 57 de 3flowers, que nos pedía un trío de metálicos (oro, plata y bronce) fue la inspiración para esta tarjeta de monstruitos, que también aprovecho para presentar al reto mensual de Yoy Scrap, dedicado a los papis. Vamos a ver esos tonos metálicos, tan difíciles de fotografiar...
The 3flowers challenge number 57, in which they asked for a card with three metallic colours (gold, silver and bronze/copper), was the inspiration for this card, which I'm also presenting to the monthly challenge at Yoy Scrap, dedicated to our fathers. Let's have a closer look at those metallic tones, which are so difficult to photograph...


Como podéis ver los he usado para el podio, una pieza creada a mano, con papel de imitación a madera del set "Wood" Necessities de MME y polvos de embossing. Los divertidos monstruos son de Avery Elle y tenía muchas ganas de estrenarlos. Están estampados sobre cartulina Neenah y coloreados con rotuladores Copic.
As you can see, I've used them for the podium, a piece created by hand with paper from the "Wood" Necessities collection by MME and embossing powders. The fun monsters are from a set by Avery Elle and I was itching to use them. I've stamped them on Neenah cardstock and coloured them with Copic markers.


Aquí se puede apreciar un poco mejor, tanto el brillo del embossing metálico, como el de los ojos de las criaturas, cubiertos por una capa de Glossy Accents. Las letras son de Mama Elephant y las he estampado con tinta Archival negra, que me encanta.
In this picture you can see the shine of the metallic embossing, as well as of the layer of Glossy Accents applied to the eyes, a little bit better. The letters, stamped in black Archival ink, which I love are from Mama Elephant.


Todavía os quedan unos días para participar en los dos retos, así que adelante. ¡Qué tengáis un buen fin de semana y unas buenas vacaciones de Semana Santa! 
You have a couple of days to participate in both challenges, so please go ahead. Have a great weekend and Easter vacation!

miércoles, 9 de septiembre de 2015

Tarjeta CAS con mucho embossing - A CAS card with a lot of embossing

Después de mi última tarjeta me quedé con ganas de trabajar más con el clean and simple y como había un par de retos interesantes en la blogosfera, aproveché para crear un par de tarjetas que os iré enseñando estos días... Aquí tenéis la primera:
After my last card, I felt like working some more with the clean and simple style and since there were a couple of interesting challenges in the blogosphere, I seized the opportunity to make some cards that I will be showing you these days... Here's the first one:


Basé el diseño de la tarjeta en este boceto del reto 139 de CAS(E) this sketch:
I based the design of the card on this sketch from the CAS(E) this sketch challenge #139:


y lo combiné con el reto 47 de AAA cards cuya temática esta vez es el "embossing espectacular". Si os apetece todavía tenéis un par de días para participar.
and combined it with AAA cards' Challenge #47 whose theme this time is "spectacular embossing". If you feel like it, you still have a couple of days left to participate before it ends.


Utilicé una plantilla de gotas de Prima Flowers, tinta Versamark y polvos de embossing blancos para crear un fondo discreto pero divertido. Es difícil captarlo bien en la foto, sobre todo con la luz de una lámpara, pero tiene una textura y un brillo muy chulo.
I used a raindrop stencil by Prima Flowers, Versamark ink and white embossing powder to create a discreet but fun background. It's difficult to capture it in a photograph taken by the light of a lamp, but the texture and shine is really nice.


También embosé el sentimiento: "You saved the day" (Tú salvaste el día) en blanco y lo completé con la palabra "friend" (amigo/a) cortada con el abecedario de Die-namics "Little LC letters". 
I also embossed the sentiment: "You saved the day" in white and completed it with the word "friend", die cut using the "Little LC Letters" die set from Die-namics.


Estuve dudando si añadirle brillo a las letras con Glossy Accents o un poco de Wink of Stella transparente, pero decidí dejarlo así para no restarle más protagonismo al fondo.
I had my doubts about adding a touch of shine to the letters, either with Glossy Accents or clear Wink of Stella, but decided to leave it as is so as not to deduct from the background.

Os dejo con un último vistazo a la tarjeta entera y un ¡hasta pronto!
Here's a last look at the complete card. See you soon!


jueves, 21 de mayo de 2015

Otra tarjeta para CAS-ual Fridays - Another card for CAS-ual Fridays

Estoy de vuelta para enseñaros mi segunda tarjeta para el reto de CAS-ual Fridays. Están celebrando su cuarto bloganiversario y el reto consiste en usar los colores de su logo: negro, blanco, turquesa y naranja en un proyecto.
I'm back to show you my second card for the challenge at CAS-ual Fridays. They are celebrating their fourth blogoversary and the challenge consists in using the colors of their logo: black, white, turquoise and orange for a project.


Para esta tarjeta usé una técnica que aprendí en un curso de tarjetería online (puedes leer más sobre ello AQUÍ) que consiste en troquelar formas pequeñas, pegarlas de forma temporal sobre un soporte y troquelar de nuevo usando un troquel más grande. Después se adhieren almohadillas adhesivas a los elementos y se pegan sobre la base de la tarjeta...
For this card I used a technique that I learned from an online card course (you can read more about it HERE) which consists in die cutting small shapes, adhering them temporarily to a base and die cutting them again with a larger die. Then, you attach 3d foam squares to the shapes and glue them to the card panel...


...lo mejor es intentar que los elementos pequeños coincidan en el contorno de la forma grande. Aquí se ve perfectamente que se trata de un corazón, verdad?
...the best thing is to try to make the small elements coincide with the outline of the larger shape. Here you can perfectly see a heart, can't you? 


Para el texto pegué un trozo de cinta de doble cara Sookwang de 5cm de ancho, que es muy fuerte y resistente al calor, en un trozo de cartulina negra antes de pasarlo por la troqueladora (el troquel es de Lawn Fawn). Después lo "embosé" con tinta Versamark y polvos de embossing transparentes para darle brillo y un poco de volumen.
For the text I adhered a strip of  2" double-sided Sookwang tape, it's very strong and heat-resistant, to a piece of black cardstock before running it through my Big Shot (the die is from Lawn Fawn). Then I embossed it with Versamark ink and clear embossing powder to give it some nice shine and volume.

Espero que os haya gustado esta sencilla y colorida tarjeta...  ¡Hasta la próxima!
I hope you liked this simple and colorful card... See you next time!


Felíz cuarto bloganiversario, CAS-ual Fridays! 
Happy fourth blogoversary, CAS-ual Fridays!


miércoles, 15 de abril de 2015

Tarjeta "Hola estrellato" - "Hello stardom" card

El viernes pasado, Rocío del blog 3flowers retos de tarjetas nos propuso un reto en el que había que crear una tarjeta aprovechando recortes de papeles e incluir costura. Me pareció un reto fantástico ya que soy de las que aprovecha hasta el último centímetro de los papeles de scrapbooking...
Last friday, Rocio from the blog 3flowers retos de tarjetas (3flowers card challenges) came up with a challenge in which we had to make a card using paper scraps and sewing. I thought it was a fantastic challenge since I'm one of those persons who doesn't let even an inch of scrapbooking paper go to waste...

Aquí tenéis mi tarjeta:
Here's my card:


He utilizado tres de las estrellas del set de troqueles "Puffy star stackables" de Lawn Fawn (me encanta) para cortar papelitos de diferentes colecciones favoritas. El texto "hello" también es de Lawn Fawn ("Scripty hello") y lo he cortado de cartulina blanca que después he embosado con plata...
I've used three of the stars in Lawnfawn's "Puffy star stackables" set of dies (I just love it) to cut papers from different favorite collections. The sentiment is also from Lawn Fawn ("Scripty hello"). I die cut it from white cardstock and embossed it in silver...


Para que el resultado no fuera demasiado caótico, elegí estampados discretos en colores suaves... Usé hilo blanco y plateado para adherir la mayoría de las estrellas a la base de tarjeta de kraft y añadí unas puntadas al borde de la estrella grande de vellum.
So that the result wouldn't be too chaotic, I chose discrete patterns in soft colors... I used white and silver thread to attach most of the stars to the kraft card base and added stiching to the border of the large vellum star.


Utilicé almohadillas de pegamento para añadir todavía más volumen a las estrellas y por eso también participo en el reto Lawnscaping No. 103 "Dimension".
I used 3D foam squares to add even more dimension to the stars so therefore I also participate in the Lawnscaping Challenge No. 103: "Dimension".


Espero que os haya gustado mi tarjeta estrellada... Hasta pronto!
I hope you liked my starry card... See you soon!

miércoles, 4 de marzo de 2015

Otra tarjeta negra con mucho colorido - Another black card with a lot of color

Hace unos días combiné el reto de 3flowers, en el que había que usar solo cartulina blanca y negra, polvos de embossing y tintas para realizar una tarjeta colorida y el de La pareja creativa en el que nos pedían que hiciéramos un papel (fondo) decorativo con la ayuda de sellos o plantillas. El resultado fue una tarjeta negra con un fondo de embossing en colores vibrantes.
A few days ago I combined the challenges of 3flowers, in which we could only use white and black cardstock, embossing powders and ink to make a colorful card and La pareja creativa who asked us to make our own background paper using stamps or stencils. The result was a black card with a colorful embossed background.

Esta es la segunda tarjeta que surgió de esa sesión creativa...
Here is the second card that resulted from that creative session...
Una tarjeta "slider" (deslizante) muy colorida con un mensaje "secreto".
A very colorful slider card with a "secret" message.

Añadí los tres enamel dots (me los pedía la tarjeta) para poder participar en el reto de House of cards de este mes. No os lo perdáis...tenéis hasta el 2/4 para participar. Además, a través de una serie de entradas en su blog, nos van a enseñar a hacerlas en casa y darnos un montón de inspiración.
I added the three enamel dots (the card really needed them) in order to be able to participate in the March challenge of the House of Cards. Don't miss out... you have until April 2 to link up. They will also be showing us how to make them ourselves and give us a lot of inspiration through a series of blog posts.


A continuación os dejo un tutorial paso a paso por si os apetece recrear la tarjeta... A lo mejor hay formas mejores de hacer algo así, pero en lugar de buscar en internet, lo descubrí por mi misma... y funciona!
Below you can see the full step by step tutorial in case you want to reproduce this card yourselves... There are probably better ways of making something like this, but instead of searching online, I figured it out on my own... and it works!


1. Aplicar los polvos anti-estáticos por toda la superficie a embosar. Así los polvos de embossing no se pegan a las huellas dactilares o a cualquier suciedad del papel.
1. Apply the anti-static powder on the surface that you're going to emboss. That way the embossing powder won't stick to finger prints or any possible dirt on your paper.

2. Sujetar la plantilla (la mía se llama "Petit pois" de Kesi'art) con washi tape, cinta de carrocero o similar pero aseguraros de que no pegue demasiado para no dañar el papel. Aplicar tinta de embossing generosamente encima de la plantilla con toques ligeros.
2. Attach the stencil (mine is called "Petit pois" and it's by Kesi'art) with washi, painter's tape or similar, but make sure that it's not too sticky so that you don't tear your paper. Apply a generous amount of embossing ink on the stencil by lightly pressing down.

3. Retirar la plantilla con cuidado y cortar un trozo de una pajita en ángulo para poder espolvorear pequeñas cantidades de polvo de embossing por zonas. Limpiarla bien antes de cambiar de color o cortar un trozo para cada color de polvo. Podéis ver un vídeo de Jennifer Mcguire del proceso AQUÍ.
3. Carefully remove the stencil and cut a piece of a straw in an angle so that you can apply small amounts of embossing powder in the chosen areas. Clean the straw well before swithing to another color or cut a piece of straw for each color. You can see Jennifer Mcguire's great video of the process HERE.

4. y 5. Espolvorear en franjas (o creando un efecto arcoiris, de dos tonos, un degradado... las posibilidades son infinitas) 
4. and 5. Sprinkle the powder in stripes (or creating a rainbow effect, using only two tones, creating an "ombre" effect... the possibilities are endless)

6. Inclinar el papel y dejar que los polvos se caigan (sin mezclarse mucho) en otra superficie entintada. Yo hice tres tarjetas y estos sentimientos con los mismos polvos antes de verterlos en un pequeño frasco para hacer proyectos de embossing con mis hijos: 
6. Carefully tilt the paper on to another inked surface to take advantage of the excess embossing powder. I made three cards and all these sentiments with the same powder before pouring the mix into a small jar for embossing projects with the kids:


Golpear suavemente el papel con los dedos para deshacerse del exceso de polvos y derretirlos con la pistola de calor.
Flick the paper gently with your fingers to get rid of any excess powder and melt it with a heat gun.

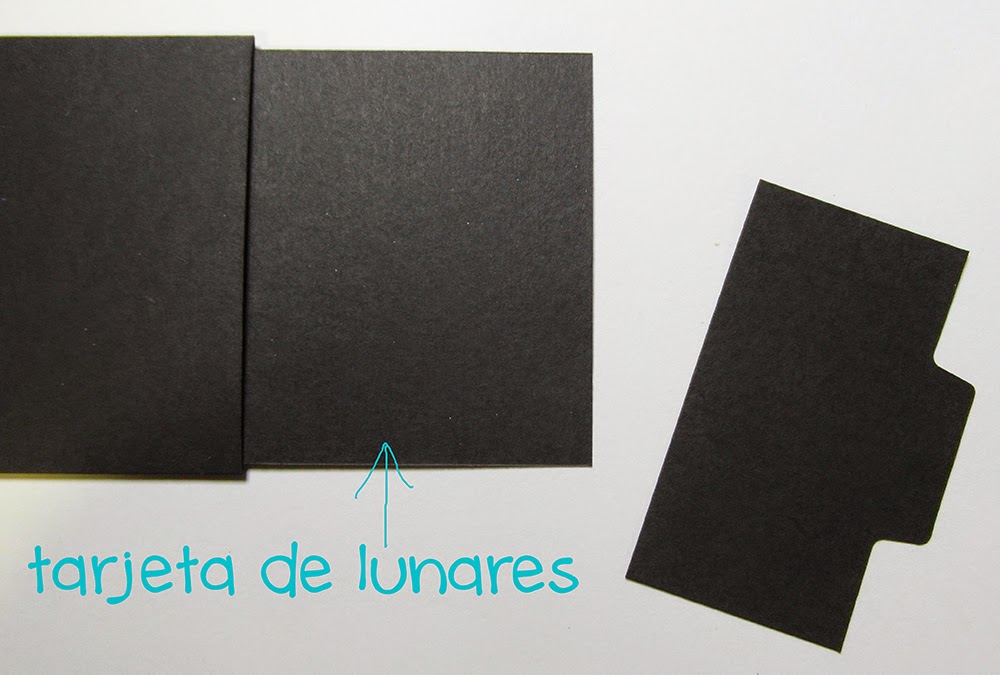
Una vez embosado el fondo de lunares , recortarlo a 9,0cm de ancho por 17,5cm de largo y preparar el mecanismo slider de la siguiente manera: recortar una cartulina negra de alto gramaje a un tamaño de 18,5cm de ancho por 22,5cm de largo. Con una plegadora (o una regla y un "hueso plegador" o una aguja de punta romba) hacer dos pliegues por el lado largo, uno a 2,5cm del borde y otro a 12,5cm del borde.
Once the dotted background has been embossed, cut it down to 3.5" wide x 6.9" long and prepare the slider mechanism in the following manner: cut a piece of black heavy weight cardstock to 7.3" x 8.9". Use a scoreboard (or a bonefolder and a ruler) to score twice on the long side , first at 1" from the border and then at 4.9". 


Sujetar el troquel de círculos (el mio es de Die-namics y mide 7,8cm de diámetro, pero también valdría cualquier otra forma mientras no sea demasiado grande) a la parte exterior de la tarjeta con cinta washi para que la apertura quede a 1,5cm del borde lateral y centrado por arriba y por abajo (más o menos a 1cm del borde). Tenéis que plegar el papel para que pueda pasar por la Big shot:
Fasten the circle die (mine is from Die-namics and has a diametre of 3.1", but any shape would do if it isn't too large) to the outside panel of the card with washi tape so that the opening is placed at 0.6" from the edge and centered (about 0.4" from the upper and lower edges). You have to fold the paper in order to make it fit through the Big shot: 


El siguiente paso es ponerle un tirador al panel de lunares. Yo usé el troquel "File tabs" de Sizzix, pero cualquier forma puede valer, incluso un círculo... Exageré un poco el ancho del tirador pero quería asegurarme de que no se rompiera al tirar por el ;)
The next step is to make a pull tab for the dotted panel. I used the Sizzix die "File tabs", but any shape will do, including a circle. I exaggerated the width of the tab a bit, but I wanted to make sure that it wouldn't come off easily when pulled;)


A continuación coger una tira de celofán/plástico fino (de cualquier envoltorio) de unos 9cm de largo y pegarlo al panel de lunares por detrás con cinta de doble cara:
Now take a piece of cellophane/thin plastic (from any packaging) about 3.5" long and glue it to the backside of the dotted panel with double-sided tape:


No es necesario medir el plástico, simplemente poner otra tira de cinta de doble cara en el lado derecho de la parte exterior de la tarjeta y presionar el celofán contra el pegamento a la altura correcta. Cuando tiramos por el tirador el plástico se tensa y actúa de tope... Cortar el exceso de plástico que sobrepasa de la tarjeta.
There is no need to measure the cellophane, just put a strip of double-sided tape to the right side of the exterior of the card and press the plastic against it at the right place. When you pull the tab, the plastic is tensed and acts as a stop... Cut the excess.


Antes de pegar las solapas, cerrar la tarjeta con los dedos y comprobar si funciona el mecanismo... (aquí ya le había pegado un marco circular de cartulina blanca a la apertura): 
Before gluing the flaps, close the card with your fingers and check if the slider mechanism works... (here I had already glued a white cardstock frame to the opening):


Ahora viene la parte más divertida... crear el mensaje para la parte oculta y decorar la tarjeta por fuera. Yo usé un sello de una rana que coloree con tinta de pigmento Colorbox y una capa de Wink of Stella transparente, un sello de Sizzix que pone "Friend", un troquel de bocadillo (no me acuerdo de qué marca es) y el texto "hello", un troquel de Lawn Fawn...
Now comes the best part... creating a message for the hidden part and decorating the exterior of the card. I used a frog stamp which I colored with ColorBox pigment ink and a layer of clear Wink of Stella, a Sizzix stamp with the word "Friend", a speech bubble die (I don't remeber the brand) and the word "hello", a die by Lawn Fawn...


Aquí tenéis la primera versión que hice en español, pero que me quedó un pelín pequeña. Tuve que usar un troquel de círculo más pequeño y aún así, casi no queda espacio alrededor de la apertura)
Here's the first version that I made in Spanish, but it turned out a bit too small. I had to use a smaller circle die and even so, there is almost no room around the opening.


Os vuelvo a enseñar la tarjeta acabada... un estilo de los años sesenta, tipo Op art que me encanta! 
Here's another look at the finished card... a sixties Op art style which I love!


Espero que os hayan quedado claros los pasos... Esta tarjeta es más fácil de hacer de lo que parece y os animo a probar! Si tenéis cualquier duda, la ponéis en los comentarios y os contestaré enseguida... Hasta la próxima!
I hope you have understood all the steps... This card is easier to make than it seems and I encourage you to try it! If you have any doubts, just post a comment and I'll answer you asap... Until the next time!

domingo, 1 de marzo de 2015

Tarjeta negra con mucho colorido - A black card with a lot of color

El ultimo reto de 3flowers, publicado el 20 de febrero, vuelve a ser una gran inspiración para mí... Había que usar solo cartulina blanca y negra, polvos de embossing y tintas para realizar una tarjeta colorida. Aquí tenéis la mía:
The latest challenge of 3flowers, published on February 20, once again became a big source of inspiration to me... We could only use white and black cardstock, embossing powders and inks to create a colorful card. Here is mine:


Desde el principio tenía claro que me apetecía darle más protagonismo al negro que al blanco aunque lo más importante de la tarjeta sería conseguir muchos colores vibrantes.
From the beginning I wanted to give more importance to the black color than to the white although the main focus of the card would be the many vibrant colors that I wanted to achieve.


En noviembre del año pasado gané el reto "Libro alterado" de Cuquicosas con esta propuesta (podéis ver mi entrada con un tutorial paso a paso AQUÍ):
In November of last year I won Cuquicosas' challenge "Altered book" with this design. (you can see my post with a step by step tutorial HERE):


Me apetecía repetir la divertida técnica que aprendí viendo este vídeo de Jennifer Mcguire para crear el fondo de mi tarjeta.
I wanted to repeat the fun technique that I learned watching this video by Jennifer Mcguire to create the background of my card.


Usé una recién adquirida plantilla "Chevron mask" de Studio Calico, tinta Versamark y polvos de embossing de Ranger y de Zing para obtener este resultado tan vibrante y colorido.
I used a recently purchased stencil called "Chevron mask" by Studio Calico, Versamark ink and embossing powders by Ranger and Zing to get this vibrant and colorful result.


Troquelé las palabras "siempre" y "tú" de cartulina blanca usando los nuevos y maravillosos troqueles de La pareja creativa. Con esta tarjeta también participo en su reto de marzo en el que hay que crear un papel (fondo) decorativo con la ayuda de sellos o plantillas.  
I die-cut the words "always" and "you" out of white cardstock using the new and wonderful dies of La pareja creativa. With this card I also participate in their March challenge in which you have to create your own decorative background using stamps or stencils.


El pequeño corazón fue troquelado en cartulina negra y cubierta con tinta Versamark, polvos de embossing rojos, Wink of Stella transparente y Glossy accents.
The small heart was die-cut out of black cardstock and covered with Versamark ink, red embossing powder, clear Wink of Stella and Glossy accents.

Volveré muy pronto con la segunda tarjeta (+tutorial) que cree para este reto...
I'll be back really soon with the second card (+tutorial) that I made for this challenge...

martes, 16 de diciembre de 2014

Segundo reto "no-reto" navideño de 3flowers

Estos "no-retos" navideños de 3flowers están siendo muy divertidos... y eso que no tenía pensado hacer más tarjetas navideñas después del pedido de 50 tarjetas que preparé para Finlandia en noviembre :)  Haz clic aquí si quieres ver mi propuesta para el primer no-reto en el que había que usar estrellas y papel de periódico.

Los elementos a usar en el segundo no-reto son: madera y reno. Todavía estáis a tiempo de participar! Aquí tenéis el enlace.

También participo con la misma propuesta en el reto "Tarjetas" de Gargamell Scrap en el que el único requisito era estampar y como podéis observar lo he hecho por partida doble...

...aquí tenéis mi tarjeta. ¡Tadáaaa!


He cortado el reno de una vieja caja de cartón prensado usando un troquel de Bigz llamado simplemente "Reindeer". El papel con textura de madera es de la colección "Krafty Christmas" de Dovecraft. Hace la función de paisaje ya que las vetas parecen dunas o montículos de nieve después de una tormenta invernal.


He estampado sobre el reno usando un sello de Kaisercraft y tinta dorada de la marca "ColorBox" (un nuevo descubrimiento con el que estoy encantada). El copo de nieve del bocadillo de madera lo he estampado con tinta de embossing Versamark y polvos rojos de la marca Zing.

Por último un poco de twine dorado y un lacito rojo cortado con un troquel "Movers and shapers" de Sizzix (Mini bunny and bow set) y cubierto con una capa de Glossy accents para darle un poco de brillo y relieve...


Me ha quedado una tarjeta con influencias japonesas con la que estoy bastante contenta... a ver qué os parece :)


domingo, 30 de noviembre de 2014

3flowers - último reto del año: tarjeta 2014

¡Qué reto más difícil y estimulante nos propusieron desde 3Flowers como último reto del año! Había que crear una tarjeta en la que era obligatorio incluir los números 2, 0, 1 y 4 en el orden que quisiéramos (menos mal!). Otro requisito era que no fuera una tarjeta navideña... Voilá:


Me puse a pensar en los números como letras o palabras (en inglés, porque por desgracia en español no funciona) para incorporarlos a un texto:
4 = four = for (para)
2 = two = too/to (también/hasta-para)
1 = simplemente una "i" o un uno romano ;)
0=la letra "o" (se dio la casualidad que la "o" y el cero de los troqueles que usé (Die-namics High rise alphabet) son exactamente iguales :)

Mi hijo Matías de tres añitos lleva meses pidiéndome una tarjeta (le encantan las manualidades y siempre me quiere "ayudar") y como tenía por casa unos packs de papeles preciosos casi sin estrenar, no me lo pensé dos veces...


Uno de los papeles de la colección "Story time" de Studio Calico era este:


Ya estaba! Había encontrado la frase perfecta! En realidad la expresión es un poco más larga y es algo típico que se dice a los hijos en países de habla inglesa:


"Te quiero hasta la luna y de vuelta, hasta el infinito y más allá, por siempre y hasta la eternidad."


Me pareció perfecta (aunque tuve que acortarla un poco) y me puse manos a la obra,..elegí unos cuantos papeles y busqué pegatinas, sellos, y troqueles que me pudieran encajar bien para crear esto:


Usé un montón de diferentes técnicas: estampación normal...


...embossing, letras troqueladas de papeles estampados y lisos, espacio negativo, glossy accents, etc. 


Espero que os haya gustado... ¡Hasta la próxima!