viernes, 23 de febrero de 2018

¡Hoy estreno web y me despido de Blogger! - Saying hello to a brand new website and goodbye to Blogger

¡Hola! Hoy estoy super feliz porque por fin puedo estrenar mi web: www.bagatelasdepapel.com, con dominio propio y un montón de novedades... Empezando por el logo, que ha rondado mi cabecita desde que estrené este blog en el 2014 y me hice uno temporal, para salir del paso...
Hi there! Today I'm ecstatic, because I can finally invite you to my new website: www.bagatelasdepapel.com, a bilingual blog which will make life a lot easier for my English speaking followers. Another novelty is the brand new logo...


Pero mis gustos han cambiado y quería algo más colorido, moderno y minimalista, que reflejara mi amor por las tarjetas interactivas. Mi hermana Luisa me ayudó a convertir un simple boceto y una idea en un logotipo de verdad.
The old hand-drawn logo has served its purpose for more than three years, but i wanted something colorful, modern and minimalistic, which also expressed my love for interactive cards. My sister Luisa, helped me to turn a sketch and an idea into a real logo.

Las letras b, d y p rotan alrededor de un tornillo (o encuadernador, que es más de scrap) igual que lo hacen los discos giratorios de mis tarjetas interactivas...  
The letters b, d and p rotate around a brad, in the same way as the revolving disks of my interactive cards...


Unos conocimientos básicos de Adobe Flash, me ayudaron a crear esta intro de 11 segundos, que incluiré en mis vídeo tutoriales a partir de hoy.
Some basic knowledge of Adobe Flash enabled me to create this 11-second-long intro, which I will be using in my video tutorials starting today.

Sin más, os invito a visitar mi nueva web en la que os esperan, un sorteo y unos sellos digitales gratuitos, además de un vídeo tutorial bastante chulo... ¡Hasta pronto!
Without further ado, I invite you to my new website where you'll find a giveaway, some cute free digital stamps and a fun video tutorial. See you there!

miércoles, 14 de febrero de 2018

Tres tarjetas interactivas para La Pareja Creativa- Three interactive cards for La Pareja Creativa

¡Hola! Hoy os invito a pasaros por el blog de La Pareja Creativa para ver tres tarjetas amorosas interactivas que he creado con mucho cariño...
Hi there! Today I'm sharing three interactive cards with lots of love at La Pareja Creativa's blog.

Aquí tenéis una de ellas... haced clic en la foto para ver el resto ;) ¡Hasta pronto!
Here's one of them... check out the rest by clicking on the image. See you!


lunes, 29 de enero de 2018

Un montón de marcapáginas - A bunch of bookmarks

¡Madre mía, hace un mes y medio que no publico en el blog! Creo que es mi récord, desde que lo abrí en el 2014. La verdad es que desde que soy profe en Tarjeteamos, tengo menos tiempo para proyectos personales, pero no cambiaría la experiencia por nada en el mundo... ^_^

Bueno, vamos al lío, que escribir no es lo mío ;) Os invito a pasaros por el blog de La Pareja Creativa, ya que hoy estoy por allí con un montón de marcapáginas...

Aquí os dejo un pequeño adelanto... ¡Feliz lunes!


miércoles, 13 de diciembre de 2017

Etiquetas navideñas para La Pareja Creativa - Christmas tags for La Pareja Creativa

¡Buenos días! Hoy me paso por aquí brevemente para invitaros a visitar el blog de La Pareja Creativa, en la que comparto seis etiquetas para los regalos navideños. Aquí están las dos primeras, y haciendo clic sobre la imagen, podréis ver el resto...
Hi there! Today I'm just stopping by to invite you to visit La Pareja Creativa's blog, where I'm sharing six Christmas tags. Here are two of them. Click on the image to see the rest... 


viernes, 1 de diciembre de 2017

Tarjeta de cumpleaños metálica para el reto de diciembre de La Pareja Creativa

Increíble pero cierto... ¡ya estamos en diciembre! El reto mensual de La Pareja Creativa va sobre metálicos y por eso he creado esta tarjeta por el cumple de mi cuñada, con tres tonos de metal:


Siempre resulta difícil captar el brillo en una fotografía, pero creo que se aprecia bastante bien aquí. Utilicé el descatalogado stencil Bokeh con tinta Versamark y tres polvos de embossing (el dorado de la marca Simon Says Stamp, el plateado de Lawn Fawn y el cobre de Ranger) para decorar el panel principal, troquelado con el segundo troquel más grande del set Cuadrados Cosidos.


El troquel Feliz Cumpleaños Banderín, sigue siendo uno de mis favoritos... es tan delicado y elegante y con varias capas de embossing luce un montón.


No me enrollo más, voy a ver los proyectos de mis compañeras y a descubrir a quién le ha tocado el premio mensual... ¿Me acompañáis haciendo clic en la imagen del reto?


miércoles, 29 de noviembre de 2017

Tarjeta navideña con muchos die cuts para La Pareja Creativa

¡Hola! Hoy me paso por aquí muy rapidito para invitaros al blog de La Pareja Creativa, donde comparto una tarjeta navideña con copos de nieve DIY. ¿Me acompañáis a verla en detalle? ^_^ 
Hi there! Today I'm stopping by to invite you to LPC's blog to check out this card that I made with DIY snowflakes... See you there? ^_^


miércoles, 15 de noviembre de 2017

And the winner is... (resultado del sorteo de una plaza para el primer curso de Tarjeteamos)

¡Buenos días!

Hoy voy a anunciar a la ganadora de la plaza para el primer curso online de Tarjeteamos; Queridos Reyes Tarjeteros, que sortee aquí en mi blog...


Recibí 33 comentarios con felicitaciones y un montón de ideas interesantes que contestaré durante el día de hoy. Sin más inri, aquí tenemos a la ganadora:


¡Muchísimas felicidades, Sira! Esperamos que te lo pases pipa y aprendas un montón de cosas con nosotras. Para recibir tu premio, por favor escríbenos a: hola@tarjeteamos.es 


Tomamos nota de tu sugerencia... ^_^

¡Gracias a todas por participar! Los sorteos de mis compañera Isa y Susana también han finalizado, al igual que el sorteo en el blog Diario de Navidad (los nombres de las ganadoras serán publicados a lo largo del día), pero os recuerdo que el de Nunusite y Little Crafty Pill siguen hasta el 17 y 18 de noviembre.


El curso empieza el lunes día 20 y espero que os apuntéis, porque realmente vale la pena... ¡Hasta pronto! 


sábado, 11 de noviembre de 2017

Una tarjeta navideña interactiva para el Diario de Navidad - An interactive Christmas card for DN

Hola, no suelo publicar los fines de semana, pero hoy es un día especial ya que me han invitado a pasar por el Diario de Navidad. Es el broche final a una semana emocionante en el que nuestro proyecto Tarjeteamos ha visto la luz.
I usually don't post during the weekends, but this is a very special occasion since I've been invited to the blog Diario de Navidad (Christmas Journal). It's a great ending to an exciting week in which our creative project Tarjeteamos (online card classes in Spanish) has been launched.


Os invito a acompañarme porque además de descubrir qué ocurre cuando tiramos de la flecha (y ver un vídeo tutorial completo), podréis participar en el sorteo de otra plaza más para nuestro primer curso online. Os lo cuento todo en el Diario de Navidad. ¡Hasta ahora!
Come along and check out what happens when you pull at the arrow (full video tutorial). You can also have the chance to win a spot at our first online course, I'll tell you all about it at Diario de Navidad (sorry the post is in Spanish and so is the online course). I'll edit the tutorial with a voice-over in English as soon as possible.


jueves, 9 de noviembre de 2017

Sorteo de una plaza para el curso online "Queridos Reyes Tarjeteros" de Tarjeteamos

¡Buenos días! Muchas ya sabéis que el lunes lanzamos nuestra web de clases online de tarjetería creativa, Tarjeteamos. Para agradecer la buena acogida, hemos decidido sortear una plaza para nuestro primer curso, en cada uno de los blogs del equipo... 


Para optar a la plaza que sorteo en mi blog, sólo tenéis que dejarme un comentario, por ejemplo contestando a la pregunta: ¿Qué curso os gustaría ver en Tarjeteamos? Aunque ya estamos trabajando en futuros proyectos, cualquier propuesta es bienvenida. Tenéis hasta el 14 de noviembre (las 23.59 hora española) para participar y en el caso de que ya hayáis comprado el curso y os toque una de las plazas, os devolveríamos el dinero. 

A continuación un breve vídeo para que nos conozcáis mejor:


Nuestro patrocinador, La Pareja Creativa, también sorteará una plaza en su cuenta de Facebook, así que estaos atentos a nuestras redes sociales para enteraros bien: Facebook e Instagram.

Os dejo con los enlaces a los blogs de mis compañeras Isa (Happy Cardmaking) y Susana (Molt Craft) para que las visitéis y tengáis el triple de posibilidades de que os toque una plaza a: Queridos Reyes Tarjeteros 

¡Hasta pronto!

miércoles, 8 de noviembre de 2017

Tarjeta tipográfica para La Pareja Creativa - A word art card for LPC

¡Hola! Hoy me toca inspiraros en el blog de La Pareja Creativa y lo hago con una de esas tarjetas que me encanta crear... con muuuchas letras y otras formas troqueladas. No he usado ni un solo sello. 
Hi there! Today it's my turn to inspire you at La Pareja Creativa. I've made a card with lots of letters and other die cut shapes, but no stamps.


¿Os acercáis a verla? Mañana volveré con una entrada relacionada con Tarjeteamos que seguro que os gustará... ¡Hasta entonces!
Do you want to check it out? Tomorrow I'll be back with an entry concerning Tarjeteamos that I'm sure you'll love... Until then!

lunes, 6 de noviembre de 2017

¿Tarjeteamos?

¡Por fin llegó el día! Hoy ve la luz un proyecto muy especial, tanto para mis compañeras Isabel Rivera y Susana Artacho, como para mí. 

Hace tres años, cuando abrí mi blog y empecé a participar en retos scraperos, nunca me imaginé que acabaría embarcándome en una aventura como esta, con personas tan creativas y especiales como Isa y Susana.


Con una mezcla de ilusión y nervios os invito a visitar www.tarjeteamos.es y a descubrir todo sobre este proyecto creativo, en el que llevamos trabajando ya varios meses... ¡Hasta pronto!   


jueves, 2 de noviembre de 2017

Una tarjeta colorida para el reto de noviembre de La Pareja Creativa - A colorful card for the November challenge at LPC

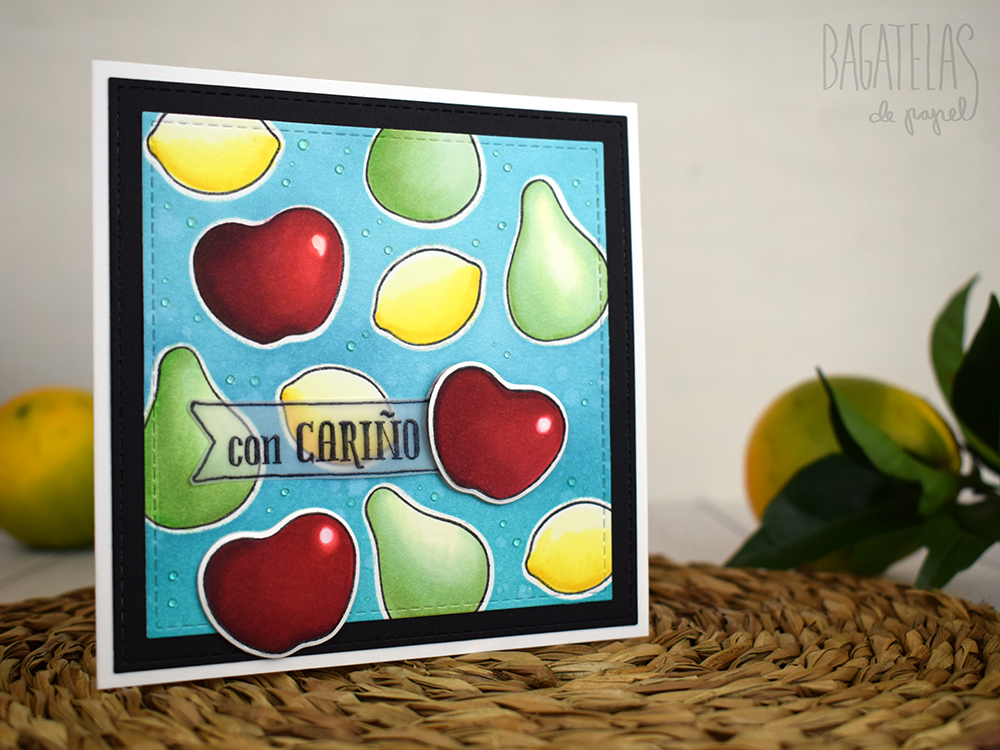
¡Hola! Octubre ha pasado volando y ya toca nuevo reto en La Pareja Creativa. Este mes, se trata de colorear algún elemento de nuestro proyecto... ya sea con acuarelas, tintas Distress, lapices de colores o rotuladores de alcohol.
Hi there! October has just flown by and it's time for our monthly challenge at La Pareja Creativa. This month we're asked to color some of the elements of our projects, either with watercolors, Distress inks, color pencils or alcohol markers.


Yo coloreé los sellos Frutas Deliciosas con mis rotuladores Copic. También usé los troqueles a juego para enmascarar mi panel y entintarlo con tres tonos de tintas Distress.
I colored the stamps from the set Frutas Deliciosas with my Copic Markers. I also used the matching dies to mask my panel and ink it with three tones of Distress Inks.

A continuación fotos de los pasos que seguí...
Here's a step by step in pictures...


Decidí estampar, colorear y troquelar de nuevo las tres manzanas para adherirlas con volumen... saliendo aún más del papel.
I decided to stamp, color and die cut the apples a second time to adhere them with some volume and make them really stand out...


El último toque fueron un banderín de vellum con el sentimiento del set Para Ti y unas gotitas de Glossy Accents.
The last touch was a vellum banner with the sentiment "Con cariño" (With love) from the Para Ti stamp set and some clear Glossy Accents drops.


Espero que os guste el reto de este mes tanto como a mí. Me voy corriendo al blog de La Pareja Creativa para ver los proyectos de mis compis y os invito a acompañarme... ¡Hasta pronto!
I hope you like this challenge as much as I do. I'm off to visit La Pareja Creativa's blog to check out the projects of the rest of the DT and I invite you to do the same... Until next time! 


miércoles, 25 de octubre de 2017

Dos tarjetas terroríficas para La Pareja Creativa - Two scary cards for LPC

¡Hola! Hoy me toca inspiraros en el blog de La Pareja Creativa y como sólo falta una semana para Halloween (en Galicia, Samaín), he preparado dos tarjetas con esta temática. Esta es la primera y la segunda la podéis ver, haciendo clic en la foto. ¡Hasta pronto!
Hi there! Today it's my turn to inspire you at La Pareja Creativa. Halloween is just around the corner, so I've prepared two scary cards (using no specific Halloween products). Here's the first one and you can check out the second one, by clicking on the picture. See you soon!


viernes, 20 de octubre de 2017

Amigo Invisible Creativo 2017 - Creative Secret Santa 2017

Por cuarto año consecutivo, Gemma del blog Guardiana de Momentos, ha vuelto a organizar el  divertido evento tarjetero Amigo Invisible Creativo, en el que cada participante preparaba dos lotes de material, uno para enviar a su amigo invisible y el otro para hacer una tarjeta. También recibía un lote de otro amigo invisible, con el que creaba una segunda tarjeta. ¡Dos lotes idénticos suelen resultar en dos tarjetas totalmente diferentes!
For the fourth consecutive year, Gemma from the Blog Guardiana de Momentos, has organized a fun cardmaking event called Creative Secret Santa, in which each participant had to prepare two cardmaking kits, one for herself (all girls this year) and one for her Secret Santa friend. She would also receive another kit in order to make a second card. ¡Two identical kits usually result in two totally different cards!

Este año me tocó mandarle un lote a Nerea Marsanz, una talentosa tarjetera a la que sigo en las redes y una de las organizadoras del evento tarjetero Cardmaking Madrid, al que asistiré en noviembre.
This year I had to send a kit to Nerea Marsanz, a talented cardmaker who I follow on social media. She is also one of the organizers of the Cardmaking Madrid event, which I will attend in November.

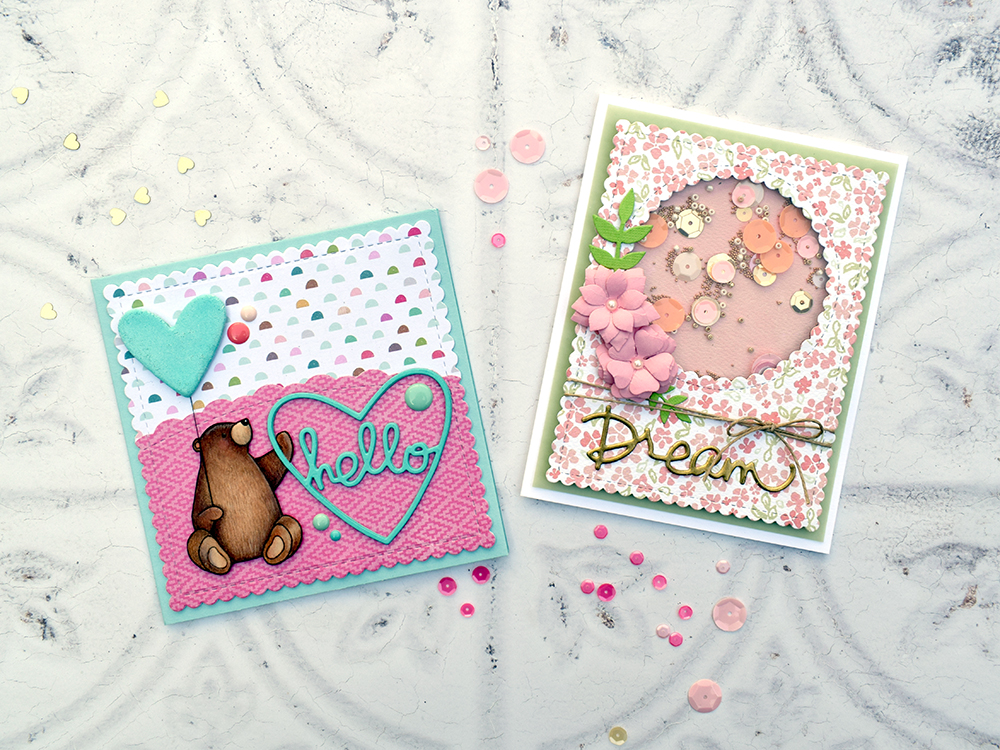
Esta es la tarjeta que creé con mi lote de materiales, que veréis enseguida:
Here's the card that I made with my kit, which you can find below):

Creo que a Nerea le gustó el lote, todo menos el corazón de madera XL de Lawn Fawn. A mí también me costó incluirlo, pero finalmente lo cubrí con varias capas de embossing y lo convertí en globo...
I think Nerea liked her kit, everything except the large wooden heart by Lawn Fawn. I had a hard time including it as well, but ended up covering it with multiple layers of embossing powder and turning it into a balloon...


El lote consistía en unos papeles estampados de la preciosa colección "Cute Girl" de Crate Paper, un trozo de cartulina de alto gramaje de Simon Says Stamp, cuatro corazones troquelados con adhesivo Stick-it por detrás (cuentan como un sólo elemento, je je je), cinco enamel dots en colores a juego, el mencionado corazón de madera y ese sello de osito de la marca My Favorite Things.
The kit included a couple of patterned papers from Crate Paper's lovely "Cute Girl" collection, a piece of aqua-colored heavyweight cardstock, four die-cut hearts with double sided adhesive on the back, five matching enamel dots, the before-mentioned wooden heart and a bear stamp by My Favorite Things.


Yo superpuse los cuatro corazones, cortados con un troquel de Paper Smooches y coloqué al oso, que coloreé con rotuladores Copic, sujetándolo.
I layered the four hearts, cut with a Paper Smooches die and attached it to the bear's paw.

Vamos con la segunda parte del amigo invisible creativo... Recibí un lote precioso con muchísimas cosas de Teresa Gimenez (@teresalerosa en IG) a la que no conocía anteriormente.
Now on to the second part of the Secret Santa... I received a beautiful kit filled with stuff from Teresa Gimenez (@teresalerosa on IG), a complete stranger to me. 


Se curró el packaging en plan flipbook y no me pudo gustar más... eso sí, siguiendo las instrucciones de Gemma, para la tarjeta sólo elegí los cinco elementos de la última foto. ¡Teresa usó todos! Me muero de ganas de ver su tarjeta. Aquí está la mía, una romántica tarjeta shaker:
She turned her kit into a flipbook which I loved! However, following Gemma's instructions, I only chose five elements for my card. Teresa used them all and I can't wait to see her card! Here's mine, a romantic shaker card:


Ji ji ji, no es muy de mi estilo con tanta flor, pero me gusta. Usé un troquel de Mama Elephant para cortar el papel floreado y añadí más lentejuelas y esas hojas verdes, cortadas con un troquel de Die-namics.
It's not 100% me with so many flowers, but I like it. I used a die by Mama Elephant to cut the flowery paper and added more sequins and those green leaves, cut with a Die-namics die.


Añadí una capa de embossing dorado a la palabra "Dream", ya que el fucsia resaltaba demasiado para mi gusto... Esas flores, creadas por Teresa son preciosas, ¿verdad?
I also added a layer of gold embossing to the word "Dream" since I didn't like it in fuchsia... Those paper flowers, made by Teresa, are beautiful, aren't they?


Me apetecía que las dos tarjetas tuvieran algo en común y por eso usé troqueles de borde festoneado en ambas.
I wanted my cards to have something in common, so I used dies with a scalloped edge for both of them.

Gracias Gemma, por montar de nuevo este tinglado tan divertido. Me voy corriendo a tu blog y después a visitar a los demás blogs participantes... ¡Un abrazo grande a Nerea y a Teresa!
Thanks Gemma, for organizing this fun event one more. I'm off to your blog, and then to visit the blogs of the rest of the participants. A big hug to my secret friends, Nerea and Teresa!


lunes, 16 de octubre de 2017

Mini álbum masculino retro para Up & Scrap - A masculine retro mini album for Up & Scrap

¡Hola! Hoy, en el blog de Up & Scrap, comparto un mini álbum muy retro que le hice a mi hermano por su 40 cumpleaños, usando la preciosa colección de papeles "Dapper" de Authentique. Espero que me acompañéis a echarle un vistazo.
Hi there! Today at Up & Scrap, I'm sharing a retro mini album that I made for my brother for his 40th Birthday. I used a wonderful collection called "Dapper" by Authentique. I hope you'll check it out!


A Lucas le encantó... espero que a vosotros también ;) 
Lucas loved his album... I hope that you do too. 


miércoles, 11 de octubre de 2017

Tarjeta slider magnética para La Pareja Creativa - A magnetic slider card for LPC

¡Buenos días! Hoy me toca inspiraros por el blog de La Pareja Creativa y lo hago con mucho gusto. He estado jugando con imanes para crear una tarjeta slider bastante original... ¿Os acercáis a verla?  ^_^
Hi there! Today it's my turn to inspire you at La Pareja Creativa's blog and I do so with pleasure. I've been playing around with magnets to create a unique slider card... Do you want to check it out?


¡Hasta la próxima!
I'll be back soon!

lunes, 2 de octubre de 2017

Una dulce tarjeta slider para La Pareja Creativa - A sweet slider card for LPC

¡Hola! Empiezo el mes de octubre con mucha energía y una tarjeta para el reto mensual de La Pareja Creativa. Esta vez Tina nos pide que creemos un proyecto interactivo y yo hice esta dulce tarjeta slider para felicitar a una amiga scrapera por su cumple...
Hi there! I'm starting October with lots of energy and a card for the monthly challenge at La Pareja Creativa. This time Tina asks us to make an interactive project, so I made this sweet slider card for a crafty friend's Birthday...


Tenía muchas ganas de estrenar algunos de los nuevos productos de La Pareja Creativa, como esos ositos tan adorables del set de sellos Osos Amigos. Quise retarme a crear una escena nocturna, así que los coloree en tonos oscuros, para acompañar al cielo estrellado del set de troqueles Noche Estrellada.
I was dying to try LPC's new products, like the adorable bears from the set Friendly Bears. I wanted to create a night time scene, so I colored them in dark tones that also suited the starry sky, cut with the Starry Night dies.


Como podéis ver en el gif animado, las estrellas se iluminan al tirar de la solapa... Usé este mismo efecto (lo llamo "Chibitronics lowcost", ji ji ji) para encender las luces de las casas en ESTA tarjeta navideña, que os mostré en el blog de La Pareja Creativa el año pasado.
As you can see from the animated gif, the stars light up, when you pull the tag... I used this same effect (I call it "Lowcost Chibitronics" ha ha ha) to turn on the house lights in THIS Christmas card that I showed you on LPC's blog last year.


El efecto se consigue con una simple tira de cartulina amarilla, adherida al panel slider. Una de las flechas del nuevo set de troqueles Flechas, me vino fenomenal para la solapita que cree con el troquel más pequeño del set Círculos Cosidos.
The effect is achieved with a simple strip of yellow cardstock glued to the slider panel. One of the arrows from the new die set Arrows, was perfect for the tag that I created with the smallest die from the set Stitched Circles.


Para el sentimiento usé el nuevo troquel Felicidades 2, ¡que me encanta! Por último añadí un par de flores troqueladas con el set Flores Navideñas (unos troqueles muy versátiles) en el mismo tono que la bufanda de uno de los ositos.
My sentiment was cut with the new die Felicidades 2, which I love! As a last detail, I added a couple of flowers cut with the set Christmas Flowers (a very versatile set of dies) in the same color as the bear's scarf.

Podéis ver un paso a paso de esta tarjeta en el siguiente vídeo:
Here's a step by step video tutorial of the card:


No os olvidéis de pasaros por el blog de La Pareja Creativa para ver los proyectos de mis talentosas compañeras y si venís de allí, ¡muchas gracias por la visita! ¡Hasta la próxima! ^_^
Don't forget to visit La Pareja Creativa's blog to check out the projects of my talented Design Team colleagues. Thanks for your visit! I'll be back soon... ^_^

viernes, 22 de septiembre de 2017

Una tarjeta sencilla para MFT - A Clean and Simple card for My Favorite Things

Hoy os muestro una tarjeta CAS con sorpresa para el reto 2017 Card Design Superstar: Clean and Simple Genius. Mi espacio blanco en este caso es negro y mi tarjeta no lleva ni adornos ni muchos elementos...
Today I'm showing you a CAS card with a surprise feature that I made for the 2017 Card Design Superstar: Clean and Simple Genius. My white space in this case is black and my card has no embellishments and very few elements...


Estaréis pensando: "ni siquiera lleva un mensaje". Pero cuando tiramos de la luna...
You're probably thinking: "it doesn't even have a sentiment". But if you pull at the moon...


...aparece el mensaje "eres mi sol" y la noche se convierte en amanecer! Se trata de una tarjeta slider especial, ya que todo el panel se desliza.
...the sentiment "You're the sunshine in my life" appears and the night turns into dawn! It's a special slider card since the whole panel slides.


He usado el troquel Die-namics NY Skyline en dos alturas para crear la silueta de esta mítica ciudad. Para que pareciesen edificios diferentes, recorté algunas repisas y chimeneas, sobre todo modifiqué al Empire State Building... 
I used the Die-namics NY Skyline in two rows to create the silhouette of this great city. In order to make them look like different buildings, I  cut a few towers and ledges off. I especially modified the Empire State Building.


Entinté el borde de las siluetas y la luna, del set de troqueles Die-namics LJD Spooky Sweets, con tinta plateada. El sentimiento, del set de sellos Soak up the Fun está embossado en plata sobre ese cielo entintado con tintas Distress en papel de acuarela.
I inked the edges of the skylines and the moon, from the set Die-namics LJD Spooky Sweets, with silver ink. I also embossed the sentiment from the stamp set Soak up the Fun in silver on the waterpaper panel, that I had previously inked with Distress inks.

Os voy a revelar el truco del mecanismo, sin entrar en muchos detalles: 
Here' a brief look at the mechanism:


Corté un panel rectangular 1,2cm más corto que la base de mi tarjeta y usé uno de los banners del set de troqueles Die-namics Blueprints 28 para cortar dos ranuras paralelas en el mismo. 
I cut a rectangular panel, half an inch shorter than my cardbase and used one of the banners from the Die-namics Blueprints 28 to cut two parallel grooves in it.


También troquelé dos rectángulos cosidos con el troquel Die-namics Essential Cover-Up Vertical y adherí dos trozos de palito de helado en uno de ellos. ¡Encajaban perfectamente en las ranuras del anterior panel! 
I also cut two rectangles with the Die-namics Essential Cover-Up Vertical die and adhered two pieces of popsicle sticks to one of them. They fit perfectly in the grooves of the previous panel!


Hice el siguiente sandwich de abajo a arriba: base de tarjeta + rectángulo cosido con los palitos + panel con las ranuras (adherido a la base de la tarjeta con almohadillas) + 2º rectángulo cosido + panel de acuarela.
I stacked the elements in the following manner: card base + rectangle with the popsicle sticks + panel with the grooves (glued to the cardbase with foam adhesive) + second rectangle + watercolor panel.

Adherí el skyline directamente a la base de la tarjeta con almohadillas adhesivas en el extremo inferior para que no interfiriese con el mecanismo y listo.
I put a strip of foam adhesive on the lower end of the cardbase and attached the skyline to it, so that it wouldn't interfere with the mecanism and voilá.


Os dejo con un pequeño gif del movimiento y un ¡hasta la próxima!
Here's a gif of my card so that you can see it in action... Until next time!


martes, 19 de septiembre de 2017

A triple interactive Birthday card for the My Favorite Things "Card Design Superstar Challenge"

Nota para mis seguidoras de habla española: Volveré muy pronto con otra versión del vídeo y de la entrada, para que no os perdáis ningún paso. ^_^

Hi there, I'm a big fan of My Favorite Things products, but their annual Card Design Superstar Challenge always catches me off guard... not this year! I've made a triple interactive card for the Innovation Master category. I hope you like it!


I made the card for my nephew and godson Nico, using mainly the Die-namics Castle set and the BB Magical Dragons stamp set, but also many unexpected MFT products which you can see in my video tutorial (there's also a list at the end of this post):


I had to edit the video quite a lot so that it wouldn't be super long... if you feel like making the card and are uncertain about any of the steps, feel free to comment. I'll be glad to help!


For example, I forgot to mention that the sliding panel of the second mechanism (that makes the Dino open its mouth) is attached to the base with the same brad that goes through the first band-aid shape in the right column...  


The first mechanism, is a rotating disk that allows three different fairy tale characters to look out through the window... 


My favorite mechanism is the second one... when you pull the tab, a message (from the retired "Super Boy" stamp set) is revealed and the T-rex opens its mouth! It ate the present and the dragon looks so confused, lol!


Here's the card with the third interactive element, a hidden sliding tower, in full view. As I said in the video, my nephew Nico loves cows, so I had to add one to his Birthday card. The stamp, from the BB Whole Herd set, is also easy to color on gray cardstock... 


I paper pieced the balloons -which I stamped on thin red, blue and yellow cardstock and shaded with Copic markers- to the cow stamp. 


I hope you liked my triple interactive card... it's not quick to make but I bet any kid or MFT fan would love to receive one... ^_^


Here's a list of all the My Favorite Things products that I used. I'll be back very soon with another card!