Mostrando entradas con la etiqueta slider card. Mostrar todas las entradas

jueves, 22 de septiembre de 2016

Mi tarjeta para el: / My card for the: Card Design Super Star Contest 2016

¡Hola! A pesar de que no dispongo de mucho tiempo para el scrap estos días, no podía dejar pasar la oportunidad de participar en el You Could be a Card Design Super Star Contest 2016 de My Favorite Things. Faltando seis horas para acabar el reto, hay ya 526 participaciones... ¡qué locura! Os muestro mi humilde tarjeta slider CAS para el concurso. A ver qué os parece:
Hi there! Even though I've been too busy to scrap these days, I couldn't pass up the opportunity to participate in MFT's You Could be a Card Design Super Star Contest 2016. There are six hours left and a staggering 526 participations so far... It's nuts! Here's my humble CAS slider card. I hope you like it:


Ya sé que os estáis diciendo... "¿pero, esto qué es? No se entiende nada." No se trata de un jeroglífico ni nada por el estilo, sino que el mensaje está oculto a simple viste y aparece al tirar de la solapita...
I know what you're thinking... "What in the world is this? I can't understand anything". Nope it's not a hieroglyph or anything like that. The message/sentiment is actually hidden in plain site and appears when the tab is pulled...

Lo podéis ver mejor en este GIF animado:
In this animated GIF you can see what I'm talking about:


El año pasado, hice una tarjeta parecida para mi amiga scrapera Sonia y resultó igual de divertido y casi igual de complicado crear ésta...
Last year I made a similar card for my scrappy friend Sonia and it was just as much fun and almost as difficult as it was to make this one...


Enseguida os mostraré cómo la he hecho, pero primero quiero hablaros de los productos de My Favorite Things que he usado. Los papeles tan cuquis son de los packs de 6x6 pulgadas; Lucky Prints y Dots and Stripes Sorbet.
I'll show you a quick step by step in a moment, byt first I want to talk about the My Favorite Things products that I used. The sweet papers are from the Lucky Prints and Dots and Stripes Sorbet 6x6 packs.


El set de troqueles Die-namics LLD Emmit Alphabet es mi abecedario favorito y lo uso un montón. El troquel de falso cosido, el corazón y la estrella son del set Die-namics Blueprints 15, la nube del set Die-namics In the Clouds y la flecha y los mini corazones son del set Die-namics Blueprints 28.
The Die-namics LLD Emmit Alphabet die set is one of my all time favorites and I use it a lot. The faux stich rectangle, the heart and the star are from the Die-namics Blueprints 15 set, the cloud is from the Die-namics In the Clouds set and the arrow and mini hearts are from the Die-namics Blueprints 28 set.

Vamos a ver rápidamente cómo la hice:
Let's have a quick look at the making of:


Descubrí que resulta muchísimo más fácil crear este tipo de tarjetas si se adhieren temporalmente los troqueles a una hoja de papel cuadriculado con cinta de doble cara. Para que la cartulina que troquelaremos no se adhiera al pegamento expuesto, conviene espolvorear el conjunto con polvos de talco. Como se repetían algunas letras, tuve que troquelar el panel en dos pasadas. Adherí un trozo de papel adhesivo de doble cara Stick-it al mismo, antes de troquelarlo, para que resultase más fácil de adherir al acetato.
I discovered that it's a lot easier to create these types of cards if you temporaly adhere the dies to a sheet of graph paper with double sided tape. So that the cardstock won't stick to the exposed tape, it's best to brush some baby powder on top of it. As some of the letters were used twice, I had to die cut the panel in two passes. I adhered a piece of Stick-it double sided adhesive to the cardstock before doing that, so that it would be easier to adhere it to the sheet of acetate.


Calculé la altura en la que tenían que estar las tiras de papel estampado y las adherí a la hoja slider. Pegué el panel de letras al acetato y construí el canal slider con varias capas de tiras de cartulina. Podría haber usado foam adhesivo, pero así quedaba más limpito.
I calculated where I needed to place my strips of patterned paper and adhered them to the slider panel. I peeled of the release paper and glued the panel with the die cut letters to the acetate. I also made a channel for the slider with layered strips of cardstock. Another, easier option would have been to use foam adhesive, but this was a neater solution.

Cree un tope para el panel slider con dos tiras de plástico celofán (ver las últimas dos fotos del collage) y adherí el panel a una base de tarjeta.
So that the panel could slide only to where I wanted it to, I adhered two strips of celophane on the back of it (take a look at the last two pictures of the collage) and glued the complete panel to a card base.


Espero que os haya gustado y que os deis un paseo por el blog de My Favorite Things, para ver las maravillas que se disputan los diez vales de 250 dolares, que hay en juego. ¡Hasta pronto, sois geniales! ;)
I hope that you liked my card and that you'll visit the My Favorite Things blog to have a look at the incredible cards that are competing for the ten 250USD vouchers. See you soon... you are great! ;)

miércoles, 4 de marzo de 2015

Otra tarjeta negra con mucho colorido - Another black card with a lot of color

Hace unos días combiné el reto de 3flowers, en el que había que usar solo cartulina blanca y negra, polvos de embossing y tintas para realizar una tarjeta colorida y el de La pareja creativa en el que nos pedían que hiciéramos un papel (fondo) decorativo con la ayuda de sellos o plantillas. El resultado fue una tarjeta negra con un fondo de embossing en colores vibrantes.
A few days ago I combined the challenges of 3flowers, in which we could only use white and black cardstock, embossing powders and ink to make a colorful card and La pareja creativa who asked us to make our own background paper using stamps or stencils. The result was a black card with a colorful embossed background.

Esta es la segunda tarjeta que surgió de esa sesión creativa...
Here is the second card that resulted from that creative session...
Una tarjeta "slider" (deslizante) muy colorida con un mensaje "secreto".
A very colorful slider card with a "secret" message.

Añadí los tres enamel dots (me los pedía la tarjeta) para poder participar en el reto de House of cards de este mes. No os lo perdáis...tenéis hasta el 2/4 para participar. Además, a través de una serie de entradas en su blog, nos van a enseñar a hacerlas en casa y darnos un montón de inspiración.
I added the three enamel dots (the card really needed them) in order to be able to participate in the March challenge of the House of Cards. Don't miss out... you have until April 2 to link up. They will also be showing us how to make them ourselves and give us a lot of inspiration through a series of blog posts.


A continuación os dejo un tutorial paso a paso por si os apetece recrear la tarjeta... A lo mejor hay formas mejores de hacer algo así, pero en lugar de buscar en internet, lo descubrí por mi misma... y funciona!
Below you can see the full step by step tutorial in case you want to reproduce this card yourselves... There are probably better ways of making something like this, but instead of searching online, I figured it out on my own... and it works!


1. Aplicar los polvos anti-estáticos por toda la superficie a embosar. Así los polvos de embossing no se pegan a las huellas dactilares o a cualquier suciedad del papel.
1. Apply the anti-static powder on the surface that you're going to emboss. That way the embossing powder won't stick to finger prints or any possible dirt on your paper.

2. Sujetar la plantilla (la mía se llama "Petit pois" de Kesi'art) con washi tape, cinta de carrocero o similar pero aseguraros de que no pegue demasiado para no dañar el papel. Aplicar tinta de embossing generosamente encima de la plantilla con toques ligeros.
2. Attach the stencil (mine is called "Petit pois" and it's by Kesi'art) with washi, painter's tape or similar, but make sure that it's not too sticky so that you don't tear your paper. Apply a generous amount of embossing ink on the stencil by lightly pressing down.

3. Retirar la plantilla con cuidado y cortar un trozo de una pajita en ángulo para poder espolvorear pequeñas cantidades de polvo de embossing por zonas. Limpiarla bien antes de cambiar de color o cortar un trozo para cada color de polvo. Podéis ver un vídeo de Jennifer Mcguire del proceso AQUÍ.
3. Carefully remove the stencil and cut a piece of a straw in an angle so that you can apply small amounts of embossing powder in the chosen areas. Clean the straw well before swithing to another color or cut a piece of straw for each color. You can see Jennifer Mcguire's great video of the process HERE.

4. y 5. Espolvorear en franjas (o creando un efecto arcoiris, de dos tonos, un degradado... las posibilidades son infinitas) 
4. and 5. Sprinkle the powder in stripes (or creating a rainbow effect, using only two tones, creating an "ombre" effect... the possibilities are endless)

6. Inclinar el papel y dejar que los polvos se caigan (sin mezclarse mucho) en otra superficie entintada. Yo hice tres tarjetas y estos sentimientos con los mismos polvos antes de verterlos en un pequeño frasco para hacer proyectos de embossing con mis hijos: 
6. Carefully tilt the paper on to another inked surface to take advantage of the excess embossing powder. I made three cards and all these sentiments with the same powder before pouring the mix into a small jar for embossing projects with the kids:


Golpear suavemente el papel con los dedos para deshacerse del exceso de polvos y derretirlos con la pistola de calor.
Flick the paper gently with your fingers to get rid of any excess powder and melt it with a heat gun.

Una vez embosado el fondo de lunares , recortarlo a 9,0cm de ancho por 17,5cm de largo y preparar el mecanismo slider de la siguiente manera: recortar una cartulina negra de alto gramaje a un tamaño de 18,5cm de ancho por 22,5cm de largo. Con una plegadora (o una regla y un "hueso plegador" o una aguja de punta romba) hacer dos pliegues por el lado largo, uno a 2,5cm del borde y otro a 12,5cm del borde.
Once the dotted background has been embossed, cut it down to 3.5" wide x 6.9" long and prepare the slider mechanism in the following manner: cut a piece of black heavy weight cardstock to 7.3" x 8.9". Use a scoreboard (or a bonefolder and a ruler) to score twice on the long side , first at 1" from the border and then at 4.9". 


Sujetar el troquel de círculos (el mio es de Die-namics y mide 7,8cm de diámetro, pero también valdría cualquier otra forma mientras no sea demasiado grande) a la parte exterior de la tarjeta con cinta washi para que la apertura quede a 1,5cm del borde lateral y centrado por arriba y por abajo (más o menos a 1cm del borde). Tenéis que plegar el papel para que pueda pasar por la Big shot:
Fasten the circle die (mine is from Die-namics and has a diametre of 3.1", but any shape would do if it isn't too large) to the outside panel of the card with washi tape so that the opening is placed at 0.6" from the edge and centered (about 0.4" from the upper and lower edges). You have to fold the paper in order to make it fit through the Big shot: 


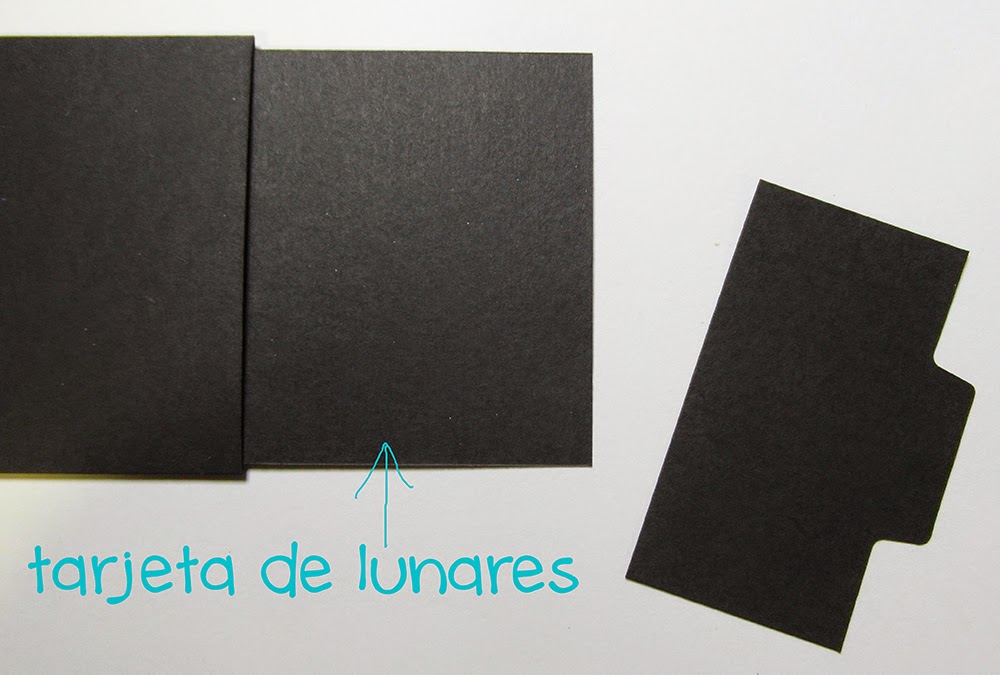
El siguiente paso es ponerle un tirador al panel de lunares. Yo usé el troquel "File tabs" de Sizzix, pero cualquier forma puede valer, incluso un círculo... Exageré un poco el ancho del tirador pero quería asegurarme de que no se rompiera al tirar por el ;)
The next step is to make a pull tab for the dotted panel. I used the Sizzix die "File tabs", but any shape will do, including a circle. I exaggerated the width of the tab a bit, but I wanted to make sure that it wouldn't come off easily when pulled;)


A continuación coger una tira de celofán/plástico fino (de cualquier envoltorio) de unos 9cm de largo y pegarlo al panel de lunares por detrás con cinta de doble cara:
Now take a piece of cellophane/thin plastic (from any packaging) about 3.5" long and glue it to the backside of the dotted panel with double-sided tape:


No es necesario medir el plástico, simplemente poner otra tira de cinta de doble cara en el lado derecho de la parte exterior de la tarjeta y presionar el celofán contra el pegamento a la altura correcta. Cuando tiramos por el tirador el plástico se tensa y actúa de tope... Cortar el exceso de plástico que sobrepasa de la tarjeta.
There is no need to measure the cellophane, just put a strip of double-sided tape to the right side of the exterior of the card and press the plastic against it at the right place. When you pull the tab, the plastic is tensed and acts as a stop... Cut the excess.


Antes de pegar las solapas, cerrar la tarjeta con los dedos y comprobar si funciona el mecanismo... (aquí ya le había pegado un marco circular de cartulina blanca a la apertura): 
Before gluing the flaps, close the card with your fingers and check if the slider mechanism works... (here I had already glued a white cardstock frame to the opening):


Ahora viene la parte más divertida... crear el mensaje para la parte oculta y decorar la tarjeta por fuera. Yo usé un sello de una rana que coloree con tinta de pigmento Colorbox y una capa de Wink of Stella transparente, un sello de Sizzix que pone "Friend", un troquel de bocadillo (no me acuerdo de qué marca es) y el texto "hello", un troquel de Lawn Fawn...
Now comes the best part... creating a message for the hidden part and decorating the exterior of the card. I used a frog stamp which I colored with ColorBox pigment ink and a layer of clear Wink of Stella, a Sizzix stamp with the word "Friend", a speech bubble die (I don't remeber the brand) and the word "hello", a die by Lawn Fawn...


Aquí tenéis la primera versión que hice en español, pero que me quedó un pelín pequeña. Tuve que usar un troquel de círculo más pequeño y aún así, casi no queda espacio alrededor de la apertura)
Here's the first version that I made in Spanish, but it turned out a bit too small. I had to use a smaller circle die and even so, there is almost no room around the opening.


Os vuelvo a enseñar la tarjeta acabada... un estilo de los años sesenta, tipo Op art que me encanta! 
Here's another look at the finished card... a sixties Op art style which I love!


Espero que os hayan quedado claros los pasos... Esta tarjeta es más fácil de hacer de lo que parece y os animo a probar! Si tenéis cualquier duda, la ponéis en los comentarios y os contestaré enseguida... Hasta la próxima!
I hope you have understood all the steps... This card is easier to make than it seems and I encourage you to try it! If you have any doubts, just post a comment and I'll answer you asap... Until the next time!