Mostrando entradas con la etiqueta CAS. Mostrar todas las entradas

viernes, 1 de septiembre de 2017

Reto de septiembre en La Pareja Creativa

Cuatro días más tarde de lo prometido, retomo el blog con un proyecto de inspiración para el reto de septiembre de La Pareja Creativa. Yo he creado esta tarjeta:


Es una interpretación literal de este divertido sketch que nos propone Tina:


No hay nada mejor para activar la creatividad después de un parón scrapero, que seguir un sketch o hacer un scraplift...


Yo usé troqueles del set Rectángulos Cosidos A6 para cortar tiras de cartulina en los colores del arco iris usando la técnica del troquelado parcial. Las pegué con foam adhesivo a diferentes alturas para darle más interés al conjunto.


Embossé el sentimiento del set de troqueles Feliz Cumpleaños con polvos de embossing clear y añadí una tira de cartulina blanca con ese pequeño "feliz" del set de sellos Monstruitos, para completar el mensaje. El toque final fueron tres enamels en los colores de las cartulinas y listo.


Espero que os acerquéis al blog de La Pareja Creativa para ver si ganasteis el reto del mes pasado y para ver los proyectos del resto del DT, que seguro que son preciosos. ¡Buen fin de semana y hasta pronto!

lunes, 3 de julio de 2017

Una tarjeta CAS para el reto de julio de La Pareja Creativa - A Clean and Simple card for LPC's July challenge

El mes de junio ha pasado volando y ya toca nuevo reto mensual en el blog de La Pareja Creativa... Esta vez os pedimos un proyecto "clean and simple". ¿Qué es el CAS? Pues un estilo limpio, con mucho espacio vacío y pocos adornos. Como esta tarjeta que le he hecho a mi maridito por nuestro 13º aniversario, ¡que es hoy!: 
The month of June just flew by and it's time for a new challenge at La Pareja Creativa. This time we ask for a clean and simple project. For those of you who don't understand the meaning of CAS, it's a clean style with a lot of empty space and very few embellishments. Like this card that I made for my hubby for our thirteenth Wedding Anniversary, which happens to be today!


Usé los troqueles "Feliz" del set Feliz Navidad Banderín y "aniversario" del set Ocasiones Felices para troquelar el mensaje en papel de acuarela de alto gramaje. 
I used dies from this and this set to die cut the sentiment out of heavy-weight water color paper.


Para el efecto de falso embossing troquelé los Corazones de Acuarela del mismo papel y los adherí a la tira con la palabra aniversario.
To create the faux embossing, I die cut several hearts from this set out of the same paper and adhered them to the strip with the word "anniversary".


Podría haber añadido algún enamel o gotitas de Glossy Accents en la zona azul, pero me gustaba la tarjeta así de sencilla... Voy a echar un vistazo a los proyectos de mis compis y os invito a seguirme, haciendo clic AQUÍ. Feliz lunes! 
I could have added a few enamel drops or some Glossy Accents droplets and still keep the card CAS, but I decided to go with a less-is-more approach. I'm going to check out the projects of my DT colleagues and invite you to do the same by clicking HERE. Have a great Monday! 

miércoles, 10 de mayo de 2017

Elegante tarjeta de bebé para La Pareja Creativa - An elegant baby card for LPC

¡Hola! Me paso por aquí rapidito para dejaros el enlace al blog de La Pareja Creativa donde hoy comparto una sencilla y elegante tarjeta de bebé. Haciendo clic sobre la imagen podréis ir a verla con todo detalle... ¡Hasta pronto!
Hi there! I'm just stopping by today to share the link to the simple and elegant baby card that I made for LPC. Click on the image to check it out... Have a great day!


miércoles, 1 de marzo de 2017

Tarjeta geométrica para el reto de marzo de La Pareja Creativa

¡Hola! Aquí en Galicia estamos teniendo un carnaval pasado por agua, como es habitual... Menos mal que hoy empieza el mes de la primavera y poco a poco se irán calentando los días. Un nuevo mes significa un nuevo reto en La Pareja Creativa y esta vez se trata de crear algo inspirado en la geometría...


Yo he hecho esta sencilla tarjeta con los triangulitos que sobran al troquelar el corazón más grande del set Corazones Brillantes. Para no complicarme la vida, he adherido trozos de pegatina Stick-it de doble cara, detrás de las cartulinas, antes de troquelarlas. De esta manera puedo jugar con la colocación (incluso equivocarme) y conseguir un resultado limpio.


También he usado Stick-it para troquelar ese Feliz Cumpleaños tan bonito... Decidí no añadir ningún adorno... los triangulos dorados ya visten bastante esta tarjeta "clean and simple".


Espero que os animéis a participar y a ver los proyectos de mis compis en el blog de La Pareja Creativa. Hoy se estrena "la chica nueva" (después de un año, ya no soy yo, ji ji ji), la talentosa y majísima Carolina del blog Lebílulas de Colores.

Aprovecho también para felicitar a mi querida sobrina que hoy cumple 14 añitos. Grattis kära Sandra!

viernes, 17 de febrero de 2017

Tarjeta sencilla para una amiga scrapera - A CAS card for a crafty friend

¡Uf, no me puedo creer que lleve desde el día uno sin publicar! Cada vez tengo más alumnos de inglés y menos tiempo para scrapear... menos mal que puedo aprovechar para hacer algún que otro proyecto scrapero con ellos, para matar el gusanillo, ji ji ji. 
I can't believe that I haven't posted anything since February 2! Since I started teaching English to kids, I've had less time to craft... Luckily I get to make some fun scrapbook projects with them, lol.

También estuve pachucha dos findes seguidos, pero por fin vuelvo a la carga con esta tarjeta que hice por el cumple de Sonia del blog WashiScrap Adicta...
I was also sick for two weekends in a row, but now I'm finally back to show you this Birthday card that I made for my crafty friend Sonia... 


...creada a partir del sketch 450 de Sketch Saturday:


Desde que mi amiga Noe, del blog El scrap de Cris y Noe empezó su andadura en el DT de este blog, le he prometido que me presentaría en uno de sus retos y por fin lo logro! ^_^
Ever since my friend Noe, from the blog El scrap de Cris y Noe, joined their DT, I've been wanting to participate in one of their challenges, and now I finally am! ^_^ 


La tarjeta es casi clean and simple, porque tiene muy pocos elementos. Corté el panel asimétrico con un troquel de Die-namics y el sello del osito es de My Favorite Things. El gesto del personaje, me permitió meterle una guitarra en las patas, ja ja ja. Se trata de un sello de Docrafts, que tuve que embossar en blanco sobre cartulina negra, para que destacara bien.
The card is almost clean and simple because it has such few elements. I cut the assymetrical panel with a Die-namics die. The cute bear is from a stamp set by My Favorite Things and the guitar, that I inserted in its paws, is from DoCrafts. Doesn't it look perfect there? I had to emboss it in white on some black cardstock in order to make it stand out.


El troquel de bocadillo también es de Die-namics. Me hubiese encantado estampar un "Happy Birthday to youuuu..." para que el sentimiento pareciese cantado, pero no pudo ser. Cuatro enamels y una tira de washitape de partitura completan la tarjeta.
The speech bubble die is also by Die-namics. I would have loved to stamp a "Happy Birthday to youuuu..." sentiment, in order to make it look like the bear is singing it, but it was impossible. Four enamel dots and a strip of washitape with notes, complete the card.


En mi próxima entrada os mostraré el flipbook que acompañaba la tarjeta, porque no soy muy amiga de las entradas interminables... ¡Un besote muy grande (sobre todo a mi querida Sonia) y hasta pronto!  
In my next entry, I'll show you the flipbook that accompanied the card, because I don't like to write very long blog entries... A big hug to my friend Sonia! Thanks for your visit!

jueves, 22 de septiembre de 2016

Mi tarjeta para el: / My card for the: Card Design Super Star Contest 2016

¡Hola! A pesar de que no dispongo de mucho tiempo para el scrap estos días, no podía dejar pasar la oportunidad de participar en el You Could be a Card Design Super Star Contest 2016 de My Favorite Things. Faltando seis horas para acabar el reto, hay ya 526 participaciones... ¡qué locura! Os muestro mi humilde tarjeta slider CAS para el concurso. A ver qué os parece:
Hi there! Even though I've been too busy to scrap these days, I couldn't pass up the opportunity to participate in MFT's You Could be a Card Design Super Star Contest 2016. There are six hours left and a staggering 526 participations so far... It's nuts! Here's my humble CAS slider card. I hope you like it:


Ya sé que os estáis diciendo... "¿pero, esto qué es? No se entiende nada." No se trata de un jeroglífico ni nada por el estilo, sino que el mensaje está oculto a simple viste y aparece al tirar de la solapita...
I know what you're thinking... "What in the world is this? I can't understand anything". Nope it's not a hieroglyph or anything like that. The message/sentiment is actually hidden in plain site and appears when the tab is pulled...

Lo podéis ver mejor en este GIF animado:
In this animated GIF you can see what I'm talking about:


El año pasado, hice una tarjeta parecida para mi amiga scrapera Sonia y resultó igual de divertido y casi igual de complicado crear ésta...
Last year I made a similar card for my scrappy friend Sonia and it was just as much fun and almost as difficult as it was to make this one...


Enseguida os mostraré cómo la he hecho, pero primero quiero hablaros de los productos de My Favorite Things que he usado. Los papeles tan cuquis son de los packs de 6x6 pulgadas; Lucky Prints y Dots and Stripes Sorbet.
I'll show you a quick step by step in a moment, byt first I want to talk about the My Favorite Things products that I used. The sweet papers are from the Lucky Prints and Dots and Stripes Sorbet 6x6 packs.


El set de troqueles Die-namics LLD Emmit Alphabet es mi abecedario favorito y lo uso un montón. El troquel de falso cosido, el corazón y la estrella son del set Die-namics Blueprints 15, la nube del set Die-namics In the Clouds y la flecha y los mini corazones son del set Die-namics Blueprints 28.
The Die-namics LLD Emmit Alphabet die set is one of my all time favorites and I use it a lot. The faux stich rectangle, the heart and the star are from the Die-namics Blueprints 15 set, the cloud is from the Die-namics In the Clouds set and the arrow and mini hearts are from the Die-namics Blueprints 28 set.

Vamos a ver rápidamente cómo la hice:
Let's have a quick look at the making of:


Descubrí que resulta muchísimo más fácil crear este tipo de tarjetas si se adhieren temporalmente los troqueles a una hoja de papel cuadriculado con cinta de doble cara. Para que la cartulina que troquelaremos no se adhiera al pegamento expuesto, conviene espolvorear el conjunto con polvos de talco. Como se repetían algunas letras, tuve que troquelar el panel en dos pasadas. Adherí un trozo de papel adhesivo de doble cara Stick-it al mismo, antes de troquelarlo, para que resultase más fácil de adherir al acetato.
I discovered that it's a lot easier to create these types of cards if you temporaly adhere the dies to a sheet of graph paper with double sided tape. So that the cardstock won't stick to the exposed tape, it's best to brush some baby powder on top of it. As some of the letters were used twice, I had to die cut the panel in two passes. I adhered a piece of Stick-it double sided adhesive to the cardstock before doing that, so that it would be easier to adhere it to the sheet of acetate.


Calculé la altura en la que tenían que estar las tiras de papel estampado y las adherí a la hoja slider. Pegué el panel de letras al acetato y construí el canal slider con varias capas de tiras de cartulina. Podría haber usado foam adhesivo, pero así quedaba más limpito.
I calculated where I needed to place my strips of patterned paper and adhered them to the slider panel. I peeled of the release paper and glued the panel with the die cut letters to the acetate. I also made a channel for the slider with layered strips of cardstock. Another, easier option would have been to use foam adhesive, but this was a neater solution.

Cree un tope para el panel slider con dos tiras de plástico celofán (ver las últimas dos fotos del collage) y adherí el panel a una base de tarjeta.
So that the panel could slide only to where I wanted it to, I adhered two strips of celophane on the back of it (take a look at the last two pictures of the collage) and glued the complete panel to a card base.


Espero que os haya gustado y que os deis un paseo por el blog de My Favorite Things, para ver las maravillas que se disputan los diez vales de 250 dolares, que hay en juego. ¡Hasta pronto, sois geniales! ;)
I hope that you liked my card and that you'll visit the My Favorite Things blog to have a look at the incredible cards that are competing for the ten 250USD vouchers. See you soon... you are great! ;)

miércoles, 6 de julio de 2016

Reto CASometry última fase - Last stage of Umichka's CASometry challenge

Todo lo bueno se acaba y hoy toca mostraros mi quinta y última tarjeta CAS para el divertido y difícil reto CASometry 2 - Make Five de Anna Kossakovskaya usando el mismo set de sellos. Aquí está:
All good things must come to an end and today it's time to show you my fifth and last card for Anna Kossakovskaya's fun and difficult challenge CASometry 2 - Make Five, using the same stamp set. Here it is: 


Esta vez se trataba de hacer una versión de una de las tarjetas de este tablón de Pinterest con los favoritos de Anna. Me he inspirado en esta delicada y preciosa tarjeta de Ashwini Rao:
This time the additional task was to CASE one of the cards from this Pinterest board with Anna's favorites. I was inspired by this pretty and delicate card by Ashwini Rao.


Ashwini ha estampado los sellos con una tinta de color kraft y ha coloreado la escena con tintas Distress. El resultado es perfectamente imperfecto y precioso. Me he retado a mi misma a intentar hacer algo así... a dejar que el color fluya casi libremente...
Ashwini stamped her cute animals with kraft ink and colored everything with Distress inks. The result is perfectly imperfect and so pretty. I challenged myself to make something like this... to let the color flow almost freely...


Estampé los sellos del set "Somebunny" de My Favorite Things con tinta Memento Luxe "Toffee Crunch" y coloree la escena con tintas Distress y mucha agua. Espero que Ashwini me de un aprobado ^_^
I created the scene using stamps from the set "Somebunny" by My Favorite Things and Memento Luxe "Toffee Crunch" ink and colored it with Distress inks and plenty of water. I hope Ashwini approves ^_^

Aquí tenéis mis cinco tarjetas todas juntas:
Here are my five cards all together:

Tarjeta 1 - Card 1

Tarjeta 2 - Card 2

Tarjeta 3 - Card 3

Tarjeta 4 - Card 4

Tarjeta 5 - Card 5
Las cinco son muy diferentes y les tengo el mismo cariño, por lo que me cuesta elegir una favorita, pero me encantaría saber cuál es la que más os gusta a vosotras... Mil gracias a Anna por este divertido juego y un saludo especial a Ashwini.
They are all very different and I'm attached to all five, but I would love to know which one is your favorite. A million thanks (Спасибо) to Anna for this fun game and a special greeting to Ashwini.

Mañana volveré con un tutorial muy veraniego... ¡hasta entonces!
Tomorrow I'll be back with a summer-themed tutorial... until then!


domingo, 12 de junio de 2016

Mi cuarta tarjeta para CASometry - My fourth card for CASometry

No suelo publicar los domingos, pero tenía muchas ganas de compartir mi cuarta tarjeta para el CASometry Challenge 2 con vosotr@s, así que aquí estoy...
I usually don't publish any posts on Sundays, but I really felt like sharing my fourth card for the CASometry Challenge 2 with you, so here I am...


Esta vez he situado a mis protagonistas, del set "Somebunny" de MFT Stamps, en un coche zanahoria. Aunque estos animalitos tan adorables no tienen unos rostros muy expresivos, ¡parece que se lo están pasando pipa!
This time I've put my main characters, from the "Somebunny" set by MFT Stamps, in a carrot car. Although these cute animals don't have very expressive faces, they look like they're having a blast!

Ja ja ja, con la excepción del pobre pollito que se está agarrando a la bufanda como puede... 
Ha ha ha, except the poor chick, who is holding on to the scarf for dear life...

La idea para el coche nació al darme cuenta de que las orejas de los conejos se inclinaban hacia un lado... Pensé que sería divertido situarlos en un vehículo en movimiento y buscando sellos digitales, encontré ESTE de Craftin Desert Divas...
I got the idea for the car when I observed that the bunny ears were slightly bent... I thought it would be fun to put them in a moving vehicle and in my search for digital stamps, I found THIS one from Craftin Desert Divas...


...que fue la inspiración para mi deportivo más "realista", con su carrocería metálica, puerta y tubo de escape:
...which inspired me to make a slightly more "realistic" car with a metallic body, a door and an exhaust pipe.


Por si os habéis perdido alguna de mis tarjetas para este reto, aquí las tenéis todas juntas:
In case you missed any of my earlier cards for the challenge, here they are all together:


También podéis visitar el tablero de Pinterest del reto para ver las tarjetas destacadas... ¡hay auténticas maravillas de muchos diferentes estilos!
You can also visit the CASometry 2 Pinterest board to see the favorites... There are some really great cards in many different styles. 

El reto de Anna Kossakovskaya está llegando a su fin, pero creo que continuaré con su idea de crear al menos cinco tarjetas con cada uno de mis sets de sellos. Me parece una manera ideal de aprovechar los materiales y de dar rienda suelta a nuestra creatividad.
Anna Kossakovskaya's challenge is coming to an end, but I think I will continue applying her idea of making at least five cards with each of my stamp sets. I think it's a perfect way of making the most of our materials and of unleashing our creativity.


Estoy deseando descubrir el "secreto especial" de la etapa final del reto... seguro que a Anna se le ha ocurrido algo genial. ¡Hasta mañana! 
I'm really looking forward to the final special secret stage... I'm sure Anna has something great in store for us. See you tomorrow!

viernes, 20 de mayo de 2016

Mi segunda tarjeta para el reto de Umichka - My second card for Umichka's challenge

Hoy os muestro mi segunda tarjeta para el divertido reto de Anna Kossakovskaya, "CASometry Challenge - Make Five" en el que hay que usar un set de sellos principal para crear cinco tarjetas CAS (clean and simple = limpia y sencilla). En ESTA entrada podéis ver mi anterior tarjeta y saber un poco más sobre el reto...
Today I'm showing you my second card for Anna Kossakovskaya's "CASometry Challenge - Make Five", in which we have to use one main stamp set to make five CAS cards. In THIS entry you can see my previous card and find out more about the challenge...


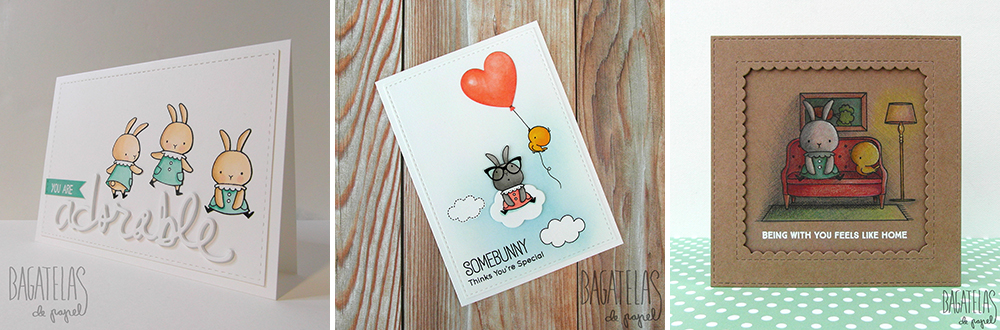
He creado esta divertida y sencilla escena con sellos de sel set "Somebunny" de MFT Stamps, aunque las gafas son de un set de Hero Arts llamado "Hipster animals" y el globo cortado con un troquel de Lawn Fawn.
I created this fun and simple scene with stamps from the set "Somebunny" by MFT Stamps, although the glasses are from a set by Hero Arts called "Hipster animals" and the balloon was cut with a Lawn Fawn die.


Estampé y enmascaré las nubes y el pollito para entintar el panel de fondo muy suavemente con tinta Distress "Tumbled glass". Después estampé el sentimiento.. prefiero no dejarlo para el final por si meto la pata y tengo que volver a empezar.
I stamped and masked the clouds and chick so that I could softly ink the back ground with "Tumbled glass" Distress ink. Then I stamped the sentiment... I prefer to do it sooner than later, just in case I don't get it right and have to redo the whole thing.


Coloree el globo con rotuladores Copic usando tres diferentes tonos (E02, YR02 y R22) para intentar darle algo de volumen.
I coloured the balloon with Copic markers using three different tones (E02, YR02 and R22) to give it some volume.

Para conseguir que la cara del conejo tuviera un poco más de expresividad, seguí los siguientes pasos:
To give the bunnie's face a bit more expression, I followed these steps (I hope you get the picture without a translation of each step):


1. El sello original estampado es así.
2. Entinté todo menos los rasgos de la cara y lo estampé en cartulina Neenah Smooth.
3. Comprobé si podía usar el sello para estampar los rasgos de la cara de manera desfasada.
4. Entinté los ojos y la nariz del sello con un rotulador Memento.
5. Estampé el sello de forma desfasada.
6. Quedó bastante bien, pero le faltaba algo...
7. Dibujé una boca con el rotulador de antes. 


Después coloree la imagen y estampé las gafas con tinta Archival negra y polvos de embossing transparente, para darle un poco de relieve y brillo a las mismas. Aunque no fui capaz de captarlo en las fotos, las lentes llevan una capa de Glossy Accents.
Then I coloured the image and stamped the glasses with Black Archival Ink and clear embossing powder to give them some shine and volume. I wasn't able to capture the layer of Glossy Accents of the lenses on a photograph.


El año que viene le voy a sugerir una nueva modalidad del reto a Anna; usar un mismo sello en las cinco tarjetas ;) De momento he usado el de la conejita sentada para las dos primeras... a ver qué pasa con la tercera... Mañana estaré de vuelta con otra tarjeta... ¡hasta entonces!
Next year I will suggest a new version of this challenge to Anna; using one stamp for the five different cards ;) I've used the sitting bunny for the first two... let's see what happens with the third one. Tomorrow I'll be back with another card... see you then!

viernes, 13 de mayo de 2016

Tarjeta CAS para un reto especial - A CAS card for a special challenge

Una de las tarjeteras internacionales a las que más admiro es Anna Kossakovskaya del blog Umichka. Sus tarjetas son espectaculares... dulces, divertidas, a veces interactivas, y llenas de animalitos.
One of my favourite international card makers is Anna Kossakovskaya from the blog Umichka. Her cards are spectacular... sweet, fun, sometimes interactive, and full of critters.

Cuando propuso su reto CASometry Challenge 2, sabía que tenía que participar sí o sí. Esta es la tarjeta que he hecho... ahora os cuento de qué va el reto.
When she launched her CASometry Challenge 2, I knew that I had to participate. This is my card... in a moment I'll tell you more about the challenge.


Tenemos que usar un mismo set de sellos para crear cinco tarjetas "clean and simple", un estilo en el que Anna se mueve como pez en el agua. A mí también me gusta, pero nunca había usado animalitos para mis tarjetas CAS... supongo que podría haber elegido un set de sellos de flores, ja ja ja.
We have to use only one set of stamps to create five "clean and simple" cards, a style that Anna is very comfortable with. I also like it, but I had never used critters for my CAS cards before... I suppose I could have chosen a set with flowers instead, ha ha ha.

Podemos usar otros sellos y troqueles, pero los protagonistas de las tarjetas tienen que proceder de un mismo set. Yo he elegido el set "Somebunny" de MFT Stamps, una de mis marcas favoritas, porque me parece que da mucho de sí.
We can use other stamps and dies, but the main accent of the card has to come from the same set. I chose the stamp set "Somebunny" by Mft Stamps, one of my favourite brands, because I think it can go a long way.


Como podéis ver no es un reto precisamente fácil, pero por eso resulta tan divertido... se trata de exprimir los sellos al máximo. Espero que no os canséis de estos conejos, que estrené creando ESTA tarjeta diorama. Tenemos dos semanas para entregar cada tarjeta. El plazo de la primera acaba mañana. 
As you can see, it is not an easy challenge, but that's what makes it so much fun... we have to make the most of our stamps. I hope that you don't get tired of these bunnies, that I used for the first time for THIS diorama card. We have two weeks to complete and link each card. The deadline for the first one ends tomorrow.


Volviendo a mi tarjeta, para el sentimiento usé un troquel de Kesi'art y un sello de Mama Elephant que estampé parcialmente sobre un pequeño banderín, coloreado con uno de los rotuladores que usé para el vestido.
Back to my card... for the sentiment, I used a die by Kesi'art and a partially stamped stamp by Mama Elephant, which I white embossed on a small banner, coloured with one of the markers that I used for the dresses. 


Estampé estos tres sellos con tinta Memento "Tuxedo Black", los coloree con rotuladores Copic y los recorté con las tijeras. Cree esta divertida secuencia de la conejita dando sus primeros pasos... a mí me parece adorable ;) e ideal para regalar tanto a una amiga como a unos recién estrenados padres.
I stamped these three stamps with "Tuxedo Black" Memento ink, coloured them with Copic markers and fussy cut them. I created this fun little scene of the little bunny taking her first steps... I think it's adorable, making it an ideal card both for a friend as for a couple of brand new parents.

Dentro de una hora estaré de vuelta con otra entrada... ¡hasta entonces!
In an hour I'll be back with another entry... see you then!


martes, 1 de marzo de 2016

Reto de marzo en Locas por el Scrap - March challenge at LPES

Qué rápido ha pasado febrero, ¿verdad? Este mes en Locas por el Scrap os pedimos que hagáis un proyecto usando acuarelas. Yo he hecho esta tarjeta CAS (limpia y sencilla) para mi sobrina Sandra que cumple 13 añitos hoy:
Wow, February has gone by really fast, hasn't it? This month at Locas por el Scrap, we're asking you to make a project using watercolour. I made a CAS (clean and simple) card for my niece Sandra, who turns thirteen today:


Usé seis tonos de tintas Distress (Spun sugar, Worn lipstick, Squeezed lemonade, Mustard seed, Dried marigold y Abandoned coral), papel de acuarela y la técnica del "ink smooshing" para crear un fondo de acuarela. Después usé un troquel (creo que es de Memory box) para cortar el corazón de corazones. Una vez adheridos, con trocitos de cinta acolchada, apliqué Wink of Stella transparente sobre los corazones.
I used six tones of Distress ink (Spun sugar, Worn lipstick, Squeezed lemonade, Mustard seed, Dried marigold and Abandoned coral), watercolour paper and the "ink smooshing" technique to create a watercolour background. Then I used a die (I think its by Memory box) to cut the heart of hearts. Once I adhered them to the card panel with tiny pieces of foam tape, I applied some clear Wink of Stella on the hearts.


Embosé el sentimiento, de un set de sellos de Simon Says Stamp, en oro sobre un trozo de papel vegetal y lo recorté y adherí con gotitas de pegamento Multi Medium Matte.
I gold embossed the sentiment, from a Simon Says Stamp set, on a piece of vellum, fussy cut it and adhered it with Multi Medium Matte.


Por último, adorné la tarjeta con unas pocas lentejuelas y ya está... Pinchad AQUÍ para no perderos los proyectos de mis compañeras y todos los detalles del reto. ¡Hasta muy pronto!
Lastly, I embellished the card with some sequins and that's it... Click HERE to see the projects of the rest of the DT and read all about the challenge (in Spanish). See you very soon!

Grattis, kära Sandra!