Mostrando entradas con la etiqueta MFT august guest designer. Mostrar todas las entradas

miércoles, 31 de agosto de 2016

Mi tercera entrada para My Favorite Things - My third entry for My Favorite Things

Agosto llega a su fin... un mes lleno de nervios y satisfacciones, ya que he tenido la oportunidad de crear tarjetas para una de mis marcas favoritas. Muchísimas gracias por vuestro apoyo y comentarios, queridas lectoras y compañeras. 
August is reaching its end... a month filled with strong emotions for me since I´ve had the opportunity to create cards for one of my favorite brands. Thank you so much for your support and comments, dear readers. 

Pero antes de despedirme de My Favorite Things, os muestro aquí una de mis dos últimas tarjetas, elaborada con productos de la colección de agosto, con más detalle.
But before saying goodbye to My Favorite Things, I´ll show you one of the last two cards that I made using products from the August collection, in detail.

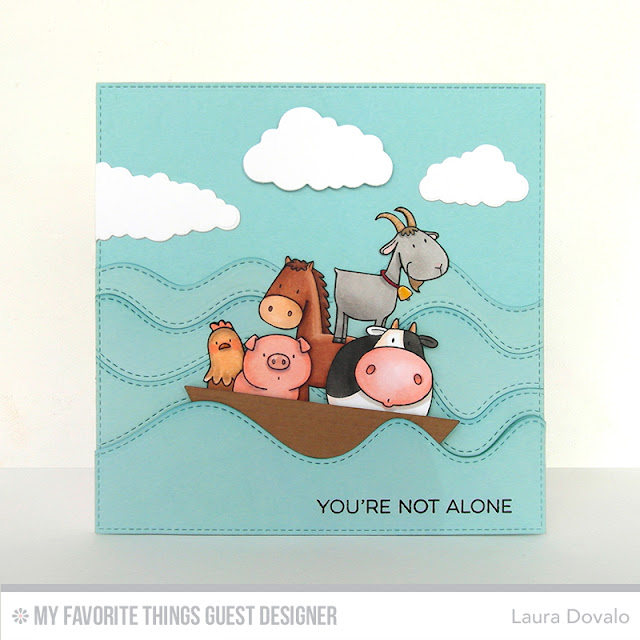
Mi primera tarjeta de hoy es una divertida versión del arca de Noé, que cree con los sellos del set The Whole Herd, del año pasado. Jajaja, la mayoría de los animales no parecen estar muy a gusto en ese barquito...
My first card for today is a fun version of Noah´s ark that I made with stamps from last years The Whole Herd set. Ha ha ha... only the goat seems to be enjoying himself!

Será porque el mar, cortado con el nuevo set Die-namics Stiched Whimsical Waves, está bastante bravo? Para esta tarjeta entinté ligeramente los bordes de las olas con tinta Distress Broken China.
Maybe it´s because the sea, die cut using the Die-namics Stiched Whimsical Waves die set, is quite rough. For this card, I lightly inked the edges of the waves with Broken China Distress ink.
En esta foto se aprecia mejor la textura del barquito, que troquelé parcialmente con uno de los troqueles del set Die-namics Sailboat, para ensancharlo un pelín. También se puede ver que apliqué Glossy Accents en la nariz del cerdo, en el pico de la gallina y en la campana de la cabra.
In this picture you can see the nice texture of the boat that I widened by partially die cutting one of the dies from the set Die-namics Sailboat. You can also see the touches of Glossy Accents that I added to the pig's snout, the chicken's beak and the goat's bell.


Os invito a visitar el blog de My Favorite Things para ver mi última tarjeta de hoy y para contaros algo que me hace mucha ilusión. 
I now invite you to visit the My Favorite Things blog to see my last card for today and to share some news that I'm thrilled about.

Si venís de allí, muchísimas gracias por acercaros. Mañana estaré de vuelta con mi tarjeta para el reto de septiembre de La Pareja Creativa.
If you came from there, thank you so much for your visit! I'll be back tomorrow to show you my card for the September challenge at La Pareja Creativa

jueves, 25 de agosto de 2016

Tutorial estampación parcial - Partial stamping tutorial

Hoy vuelvo con otro tutorial, esta vez para mostraros cómo he conseguido que esta adorable pareja se tome de la mano, para crear la tarjeta de boda, que se publicó ayer en el blog de My Favorite Things.
Today I'm back with another tutorial, this time it's to show you how I got this adorable couple to hold hands in able to make the Wedding card that was published yesterday on MFT's blog.


Vamos a ver los sellos originales y después os explicaré el paso a paso de la estampación parcial que he hecho. Resulta mucho más fácil si tenemos la MISTI o si usamos una caja de DVD como posicionador de sellos.
Let's have a look at the original stamps and then I'll explain the partial stamping technique that I used, step by step. It's a lot easier if we use a MISTI or a clear DVD case to do our stamping.


Como podéis observar sus brazos están bastante pegados al cuerpo, pero vamos a aprovechar esa pequeña separación para girarlos un pelín... 
As you can see, their arms are hanging quite near their bodies, but we'll take advantage of that small separation to rotate them a bit...


Dibujamos suavemente una línea recta sobre el papel y colocamos el sello de la chica boca abajo. Marcamos la altura del hombro en el papel. Giramos el sello sobre un eje invisible, respetando la altura del hombro y entintamos solo el brazo que estará a la derecha.
Draw a straight pencil line on the paper and place the stamp of the girl on it. Make a mark at the height of the shoulder. Now rotate the stamp counterclockwise, respecting the previously drawn mark and ink only the arm that will be stamped on the right side.


Estampamos el brazo sobre el papel y volvemos a colocar el sello en su posición inicial. Tapamos el brazo del sello que acabamos de estampar con un trozo de Post-it...
Stamp the arm and place the stamp in its initial position. Cover the arm of the stamp with a piece of Post-it...


...y entintamos todo el sello. Retiramos el trozo de Post-it y estampamos. La chica está casi lista.
...and ink the rest of the stamp. Remove the piece of Post-it and stamp. The girl is almost done.


Creamos una máscara de Post-it o papel de enmascarar y cubrimos la mano y parte del brazo de la chica. Colocamos al sello de Frankenstein sobre el papel, inclinado de tal manera que su mano y la de su novia coincidan... Entintamos parcialmente y estampamos solo el brazo. Giramos el sello y entintamos todo menos el brazo de nuestro personaje. Estampamos...
Make a mask for the hand and lower arm out of Post-it or masking paper and adhere it in its place. Put the Frankenstein stamp on the paper and rotate it so that his and her hands coincide... Partially ink and stamp his arm. Place the stamp in its initial position and ink everything but the arm. Stamp...


...y ya están los dos listos. Retiramos la máscara y coloreamos los personajes a nuestro gusto. 
...and they're both ready. Remove the mask from her arm and color the characters.


Yo añadí un sencillo velo dibujado y cristalitos tanto en el pelo de ella como en la pajarita de él. Un toque de Glossy Accents en los labios, un par de lentejuelas a juego y listo.
I added a simple veil and rhinestones, both to her hair as to his bat bow tie. A drop of Glossy Accents to her lips, a couple of matching sequins and that's it.


Espero que os hayáis divertido... ¡hasta la próxima!
Hope you had fun! See you next time!

miércoles, 24 de agosto de 2016

Mi segunda entrada para My Favorite Things - My second blog entry for My Favorite Things

¡Buenos días! Hoy vuelvo al blog de My Favorite Things para mostraros más tarjetas que he hecho con sus nuevos productos. Esta vez la cosa va de Halloween y aunque sé que aquí en España no se celebra mucho, espero que podáis usar alguna de mis ideas para otro tipo de proyectos.
Good morning! Today I'm back at My Favorite Thing's blog to show you a couple of Halloween cards that I made with their brand new products. 

Me han dado luz verde para compartir un tutorial de mi segunda tarjeta en mi blog personal así que vamos allá...
I've gotten premission to share a tutorial of my second card here on my personal blog, so let's get to it.

A primera vista no tiene mucha gracia la tarjeta, verdad? Hasta resulta un poco deprimente, pero si empujamos la solapita de la izquierda hacia arriba...
At first glance the card is quite depressing, isn't it? But if you push the tab upwards...


...aparece un divertido personaje desde detrás del árbol. Sí, ya sé que ese pobre árbol no lo ocultaría, pero no olvidéis que el Conde Dracula puede convertirse en murciélago a su antojo, je je je.
...a fun character pops up from behind the tree. Yes, I know that such a skinny tree couldn't hide him, but remember that Count Dracula has the ability to turn himself into a bat, ha ha ha.
El mecanismo que he usado es realmente sencillo. Un disco de acetato y un brad o encuadernador. Vamos a verlo con más detalle, aunque primero os daré las medidas de la tarjeta, por si os apetece recrearla:

Base de tarjeta: 13,6cm x 27,2cm
Panel de tarjeta: 13,6cm x 13,6 cm
Diámetro del disco de acetato: 11,5cm

The mechanism that I used is really simple. An acetate disc and a brad. Let's begin by giving you the measures of the elements in case you want to make it yourself:

Card base: 5 3/8" x 10 11/16"
Card panel: 5 3/8" x 5 3/8"
Acetate disc diametre: 4 1/2"


Empecé por estampar el árbol del set Spooky Sweets y los murciélagos del set Frightful Friends en un trozo de cartulina azul, que corté con el rectángulo cosido del set Die-namics Blueprints 15. También corté la colina de cartulina verde con el mismo troquel y la curva con uno de los troqueles del set Bordes decorativos de La Pareja Creativa. Corté la cartulina azul con unas tijeras siguiendo la silueta del árbol y adherí las piezas con pegamento líquido.
I started by stamping the tree from the Spooky Sweets set and bats from the Frightful friends set on a piece of blue cardstock that I die cut using the stiched rectangle die from the Die-namics Blueprints 15 set. I also cut the hill out of green cardstock, using the same die, as well as a curved stiched border die. Before attaching these two pieces together with liquid glue, I used a pair of scissors to cut the blue cardstock to the right of the tree, following its silhouette.


Este es el mecanismo básico de la tarjeta. No quise usar un disco más grande de lo estrictamente necesario y como el personaje solo se deslizaría unos centímetros, no importa que el encuadernador (brad) no esté insertado en el centro.
Here's the basic mechanism of the card. I didnt want to use a larger disc than needed and since the character was only going to move a little bit, it doesn't matter that the brad is not inserted in the middle of it.


Después de colorear al Conde Dracula con rotuladores Copic y recortarlo, lo convertí en pegatina y lo adherí en su sitio con adhesivo Xyron. Recorté una tira del disco con unas tijeras para que no sobresaliese de la tarjeta.
After coloring Count Dracula with Copic markers and fussy cutting him, I turned him into a sticker using Xyron adhesive and glued him in place. I cut a strip of the acetate disc so that it wouldn't show on the front of the card.


Adherí una tira al disco de acetato y coloqué unos cuadraditos de foam adhesivos para que hicieran de topes. También coloqué foam en todas las zonas libres, para no interferir con el mecanismo.
I attached a strip of paper to the acetate disc and some adhesive foam squares in places that wouldn't interfere with the mechanism.


Después de asegurarme de que todo estaba funcionando correctamente, adherí el panel a la base de la tarjeta y añadí las tres lápidas estampadas con el set de sellos Grave Situation y troqueladas con los troqueles a juego. Como no me gustaban mucho los bordes en blanco para esta tarjeta, recorté la parte del cuervo y coloree el resto con un rotulador verde.
After making sure that everything was working correctly, I attached the panel to the cardbase and added the three headstones, stamped with the Grave Situation stamp set and die cut with the matching dies. Since I didn't like the look of white borders for this card, I just colored them with a matching marker and fussy cut the part with the crow.


Eso es todo por hoy, pero mañana volveré para contaros cómo manipulé los sellos de Frankenstein y su novia para crear ESTA divertida tarjeta de boda.
That's all for today, but tomorrow I'll be back to show you how I manipulated the stamps featuring Frankenstein and his bride, to make THIS fun Wedding card. 

jueves, 4 de agosto de 2016

¡Diseñadora invitada en My Favorite Things! - Guest designer at My Favorite Things!

¡Hola, hoy no puedo estar más emocionada! Una de mis marcas favoritas, My Favorite Things, me ha invitado a jugar con su nueva colección de agosto... ¡un montón de sets de sellos y troqueles chulísimos! Para mi primera entrada, he preparado tres tarjetas con un divertido y versátil set de sellos llamado "BB Magical Dragons".
Hi there! I couldn't be more excited! One of my favorite brands, My Favorite Things, has invited me to play with their new August release... a whole bunch of awesome stamps and dies! For my first entry, I've made three cards with a fun and versatile stamp set called "BB Magical Dragons". 

Ésta es la primera, pero si quieres ver las otras dos y saber más detalles sobre las tres, haz clic en el logo y visita el blog de My Favorite Things:
This is the first one, but if you want to see the other two, and find out more details about all three of them, please click on the logo and head on over to the My Favorite Things blog:


¡Hasta pronto!
See you soon!