Mostrando entradas con la etiqueta Kimidori. Mostrar todas las entradas

lunes, 31 de agosto de 2015

Layout veraniego - A summer-time layout

Una rapídisima entrada para mostraros un layout que hice para participar en el reto de agosto de Kimidori: "¡Al agua patos!". Como todavía no he impreso fotos de este verano y tenía pendiente scrapear unas de nuestra boda y luna de miel (en Xcaret, México), he tirado de archivo...
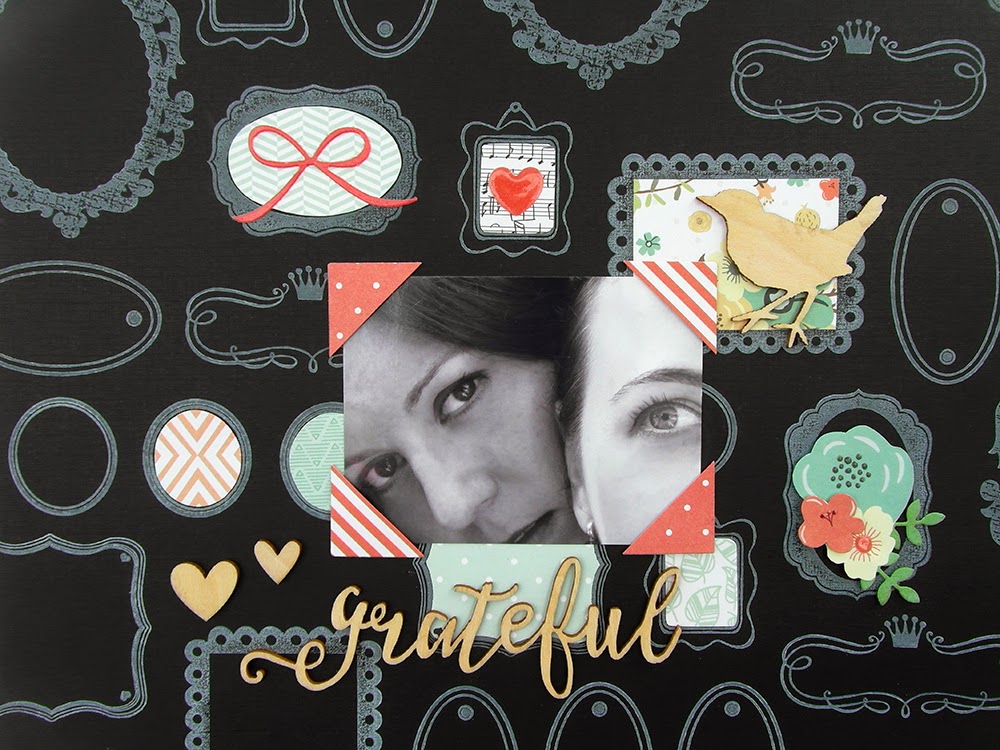
A very quick blog entry to show you a layout that I made to participate in the August challenge at Kimidori: "Jump right in!". Since I haven't yet printed the pictures of this ongoing summer and I still haven't started scrapbooking the ones from our wedding and honeymoon (in Xcaret, Mexico) I picked a couple of the latter...


Había que hacer un proyecto relacionado con el agua y como el turquesa es uno de mis colores favoritos, creé un fondo con tintas Distress (Tumbled glass, Broken china y Peacock feathers) y un toque de Perfect pearls, para darle un poco de brillo, usando la técnica de "Ink smooshing".
The challenge was water-themed and since turquoise is one of my favourite colours, I created a background with Distress inks (Tumbled glass, Broken china and Peacock feathers) and a touch of Perfect pearls, for some shine, using the "Ink smooshing" technique.


Utilicé un par de maderitas, stickers y formas troqueladas para adornar este layout bastante sencillito...
I used a couple of wood veneers, stickers and die-cuts to embellish this quite simple layout...


El adorno principal del layout, es esta etiqueta que fue creada con troqueles y sellos de La Pareja Creativa. En mi línea de exprimir al máximo los troqueles, usé el troquel de hilo del "Set de costura" para cortar las ondas. En ESTA entrada os muestro otras maneras de aprovecharlos.
The main embellishment of the LO is this tag, that was made using dies and stamps by La Pareja Creativa. In order to make the most of  my dies, as I usually do, I used the thread die from the Sewing kit to cut the waves. In THIS entry, I show you other ways to take advantage of your dies.


Me apetecía usar unas "thickers" para el título, pero como no tenía unas adecuadas, pegué tres capas superpuestas de papel de acuarela y las corté con el troquel Bigz XL "Wordplay" diseñado por Tim Holtz para Sizzix. Me encanta el resultado... las letras tienen mucho volumen sin ser demasiado llamativas.
I felt like using thickers for the title, but since I didn't have any, I glued three layers of watercolour paper on top of each other and cut them with the Bigz XL die "Wordplay" designed by Tim Holtz for Sizzix. I love the result... the letters have a lot of volume without drawing too much attention.


Me despido con un último vistazo al layout... Hoy os vais a cansar de mí hoy porque tengo otra entrada programada para las once... ¡Hasta muy pronto!
Here's one more look at the whole layout... Today you will grow tired of me because I have another entry programmed for eleven o'clock... See you very soon!

sábado, 25 de julio de 2015

Móvil geométrico - Geometrical mobile

Hoy vengo a demostraros uno de los proyectos de papel más difíciles, delicados y bonitos que he creado en estos últimos cinco años... un móvil de formas geométricas.
Today I'm here to show you one of the most difficult, delicate and beautiful paper projects that I have created in these past five years... a mobile with geometrical shapes.


Troquelar, pegar y montar este móvil ha sido un trabajo de mucho precisión y estoy muy contenta con el resultado.
Die-cutting, adhering and assembling this mobile has been a high precision task and I'm very happy with the result.


Por su naturaleza delicada también ha sido un proyecto muy difícil de fotografiar. Las ráfagas de viento en mi huerta, no me han permitido fotografiarlo en el exterior y he hecho lo que he podido a la luz de la ventana...
Due to its delicate nature, it has also been a difficult project to photograph. The gusts of wind in my backyard forced me to take the pictures inside by the light of a window... I did my best. 


Por desgracia no se aprecia bien el movimiento constante de esta pieza y el brillo de los diamantes de cartulina dorada.
Unfortunately you can't appreciate the constant movement of this piece and the glow of the golden paper diamonds.


La idea para este proyecto es fruto de un recuerdo. En mi Finlandia natal, hace muchos años, mi madrina Elvi me enseño una técnica tradicional para crear móviles "Himmeli" (del sueco o alemán "himmel"=cielo). 
The idea for this project came from a memory. Many years ago, in my native Finland, my godmother Elvi showed me a traditional technique that is used to created the "Himmeli" mobiles (from the Swedish or German word "himmel"=heaven).


Estos móviles geométricos se fabricaban con paja y se colgaban en la casa o en el árbol de Navidad para que la cosecha del próximo año fuera abundante. Así, y según la tradición, mientras más grande y elaborado era el Himmeli, mayor sería la suerte los próximos 12 meses. 
These geometrical mobiles where made out of straw and were hung in the house or christmas tree so that next year's harvest would be bountiful. According to tradition, the bigger and more elaborated the Himmeli was, the better the luck for the next 12 months would be.

Cuando vi los retos de julio de Locas por el Scrap e In the Scrap para los que había que crear algo inspirado en las formas geométricas, me acordé de estos móviles y decidí hacer mi propia versión usando material de scrapbooking. Añadí unos toques dorados para poder participar también en el reto "Sueños dorados" de Kimidori.
When I saw the July challenges for Locas por el Scrap and In the Scrap, for which you had to draw inspiration from geometrical shapes, I remembered these mobiles and decided to create my own version using scrapbooking material. I added some gold to be able to participate in Kimidori's "Golden dreams" challenge as well.

Usé estos troqueles de My Minds Eye y Echo Park Paper...
I used these dies by My Minds Eye and Echo Park Paper...


...para cortar los diamantes de cartulina dorada y unas carpetas de cartulina kraft y blancas de alto gramaje entintadas con tintas de pigmento de Mama Elephant en los tonos: Apricot, Fresh mint y Bubblegum.
...to cut the diamonds out of gold cardstock and kraft and white heavy weight cardstock inked with Mama Elephant pigment inks in the following tones: Apricot, Fresh mint and Bubble gum.

Sobraron un montón de trocitos interesantes que seguramente aprovecharé para algo ^_^
Many small interesting pieces were left over which I will probably use for something ^_^


La estructura de la que cuelgan los diamantes fue creada con agujas de calcetar de acero de 1,5mm a las que le di forma con unos alicates de punta redonda: 
The structure from which the diamonds hang was made out of 1,5mm steel knitting needles that I shaped with round tip pliers:


Lo más difícil fue pegar las partes delanteras y posteriores de las formas de cartulina con un finísimo hilo transparente por el medio y atar estas tiras a la estructura manteniendo el equilibrio de la pieza...
The hardest part was to glue the front and back pieces of the shapes with a thin transparent string in between and to tie these strings to the structure while maintaining the balance of the piece...


Pero el resultado ha valido la pena y este móvil geométrico decorará nuestro hogar durante muchos años... ¡Hasta la próxima... buen fin de semana!
But the result is worth the trouble and I'm sure this geometrical mobile will decorate our home for many years... Have a good weekend... see you next time!

jueves, 30 de abril de 2015

Layout para el Día de la Madre - Mother's Day layout

El reto de abril de Kimidori se llama "Guarreo power" y consiste en crear un proyecto usando técnicas de mixed media. Os animaría a participar, pero el plazo de entrega se acaba dentro de una hora. De todos modos echad un vistazo a su blog porque las propuestas del DT son impresionantes, como siempre...
Kimidori's April Challenge is called "Power of messiness" and consists in using mixed media techniques to create a scrapbooking project. I would urge you to participate, but the link-up closes in an hour. Anyway, have a look at their blog because the layouts of the DT are impressive, as always...

Quise hacerle un regalo especial a mi madre para la festividad del domingo así que decidí hacerle un layout con mis papis como protagonistas... La divertida foto fue sacada por mi hermana Luisa el año pasado.
I wanted to make my mother a special gift for the upcoming festivity (Mother's Day on Sunday) and decided to make a layout with my parents as the main subject... The fun picture was taken by my sister Luisa last year.


Usé una plantilla de Heidi Swapp, tintas de pigmento Color Box, tintas Distress, tinta china  y pilot negro para crear un layout lleno de amor...
I used a Heidi Swapp stencil, Color Box pigment inks, Distress inks, Indian ink and a black pen to make a layout filled with love... 


Utilicé muy pocos adornos para darle protagonismo al fondo... unos enamel dots, unos banderines y corazones en papeles estampados, un brad con una taza de té, una maderita y pegatinas.
I used very few embellishments to give more importance to the background... a couple of enamel dots, some designer paper pennants and hearts, a brad with a tea cup, a wooden heart and stickers.


El momento de hacer las salpicaduras siempre da miedo, pero salieron bastante bien... usé un pincel mojado en tinta china negra que sacudí para conseguir los manchurrones grandes y golpee con la uña para las gotitas pequeñas.
I'm always a bit worried when it's time to make splatters, but they turned out quite nice... I used a paint brush dipped in Indian ink that I shook for the big stains and flicked with a finger for the tiny dots.


Espero que os guste, pero sobre todo espero que le guste a mamá Birgitta... tengo la suerte de que mis padres se han venido de vacaciones a Galicia así que el domingo lo veré :)
I hope you like it, but I especially hope mom Birgitta does... Luckily my parents are on vacation here in Galicia so I'll find out on Sunday :)


Por último os dejo unas fotitos del proceso ya que no me dio tiempo a preparar un tutorial:

Since I didn't have time to make a tutorial, here are a couple of pictures of the process:


domingo, 29 de marzo de 2015

Scraplift para Kimidori - A scraplift for Kimidori

Hoy se acaba el plazo para entregar el reto de marzo de Kimidori, un scraplift de uno de los proyectos de sus talentosas diseñadoras: Teresa Fulgado, Maribel Tirados, Sandra Casas, Jara Teba, Xénia, Shei o Nuria Prieto. Aquí tenéis los enlaces a sus blogs por si no las conocíais todavía...
Today is the last day to link up our submissions for Kimidori's March challenge, a scraplift of one of the projects of their talented designers: Teresa Fulgado, Maribel Tirados, Sandra Casas, Jara Teba, Xenia, Shei or Nuria Prieto. Here are the links to their blogs in case you want to get to know them...

Aunque Bárbara, la jefa de Kimidori (?) decía que "nos lo había puesto fácil" con este reto, tengo que admitir que nunca había hecho un scraplift y que tardé muchísimo en elegir el proyecto que quería "scrapliftear", pero al final me decidí por este precioso layout de Xénia publicado el 17 de febrero de 2015:
Even though Barbara, the boss (?) at Kimidori, said that it would be "an easy challenge", I have to admit that I have never scraplifted before and that it took me a long time to chose the project to scraplift, but I finally decided to go with this beautiful layout by Xenia, posted on February 17, 2015:

Podéis ver la entrada original AQUÍ.
Clic HERE to see the original entry.

Me llamó mucho la atención el chulísimo papel de fondo de la colección Bella Rouge de Pink Paislee y la manera en que Xénia fue capaz de integrar los marcos en su diseño... una tarea nada fácil.
The thing that caught my eye was the outstanding background paper from the collection "Bella Rouge" by Pink Paislee and the way in which Xenia was able to integrate the frames in her design... not an easy job.

Aquí tenéis mi layout en el que he tomado la idea de Xénia pero dándole mi toque personal:
Here's my layout for which I borrowed Xenia's idea but gave it my own twist:


A continuación una breve explicación del proceso...
Next a brief description of the process...

Como no tenía el papel de fondo, pero sí un montón de sellos de marcos (tuve que tunear y enmascarar alguno de ellos), me puse manos a la obra y los estampé con tinta de pigmento blanca (una de las mejores que hay) "Unicorn" de Hero Arts sobre una cartulina negra de 12"x12".
Since I didn't have the same patterned paper for the background, I decided to make my own, using my many frame stamps (I had to customize and mask some). I went ahead and stamped them on black 12"x12" cardstock using Hero Arts' Unicorn pigment ink (one of the best inks there is for this job).

Usé una gubia para eliminar las líneas horizontales de este sello.
I used a gouge to eliminate the horizontal lines of this stamp.

Estos son todos los sellos de marcos que tengo.
These are all the frame stamps that I have.


Tuve mucha suerte de no meter la pata con la estampación y el resultado fue bastante bueno...
I was very lucky to not mess up the stamping and the result was quite good...


A continuación elegí una foto bastante especial en la que salimos mi hermana Luisa (bueno, al menos su bonito ojo) y yo, papeles de la preciosa colección "Nine & Co." de Teresa Collins y algunas maderitas de la colección "I am" de Simple stories. 
Next I chose a quite special photograph of my sister Luisa (well at least of her beautiful eye) and me, papers from the wonderful collection "Nine & Co." by Teresa Collins and some wood embellishments from the "I am" collection by Simple stories


La palabra "grateful" me parece perfecta como título, porque estoy muy agradecida y feliz de tener la hermana más buena, creativa y maravillosa del mundo ^_^
The word "grateful" is perfect for the title since I am really grateful and happy to have the kindest, most creative and wonderful sister of the world ^_^

Corté todos los papelitos a mano con la técnica del "paper piecing" (estampando los sellos de los marcos sobre el papel para tener una referencia perfecta de lo que había que recortar) y los pegué sobre el papel de fondo.
I fussy cut all of the papers using the "paper piecing" technique (I stamped the frames on the patterned paper to have a perfect reference of what needed to be cut out) and glued them on the background paper.


Los adornos (las flores, el corazón y el lacito) fueron creados usando la misma colección de papeles, troqueles (de Sizzix  y de La pareja creativa) y Glossy accents.
The embellishments (the flowers, the heart and the little bow) were created using the same paper collection, dies (by Sizzix and La pareja creativa) and Glossy accents.


Me he divertido mucho haciendo este scraplift... espero que os haya gustado y sobre todo que le haya gustado a Xénia. Hasta la próxima!
I had a lot of fun making this scraplift... I hope you liked it and I especially hope that Xenia did. See you next time!


viernes, 20 de febrero de 2015

Layout carnavalesco - carnival-themed layout

Siempre he disfrutado mucho del carnaval aquí en Galicia y desde que nacieron mis hijos todavía más. En el 2013 cuando Iris tenía 5 años y Matías 2, descubrieron lo divertido que era disfrazarse juntos. La hermana mayor lo tenía claro: "Mamá, este año vamos de Doraemon y Novita". Me pareció un título perfecto para este colorido layout...

I've always enjoyed the carnival here in Galicia, but since my children were born it has been even more fun. In 2013 when Iris was 5 years old and Matias 2, they discovered how awesome it was to get dressed up together. Big sister had already made up her mind: "Mom, this year we are going as Doraemon and Novita". I thought it was the perfect title for this colorful layout...


En este layout he combinado las premisas de dos retos, el de Locas por el scrap que pedían un proyecto relacionado con el carnaval que tuviera costuras y lentejuelas y el de Kimidori cuya temática era el confetti.
In this layout I have combined two challenges. Locas por el scrap wanted us to make something carnival-themed with sequins and sewing and Kimidori was looking for a project with confetti.


Siento que las fotos no sean de mejor calidad, pero el tiempo no acompañaba y uno de mis focos se fundió... espero poder rehacerlas otro día :)

I'm sorry that the pictures aren't that great, but the weather was awful and one of my spot lights blew out... I hope I can retake them some other day :)

Os dejo con unos detalles de mi layout y un "hasta pronto". Ah, y si os preguntáis si los disfraces están hechos en casa, la respuesta es sí!
I'll leave you with some close-ups of my layout and a "see you soon". Oh, and in case you are wondering if the costumes are handmade, the answer is yes!


jueves, 29 de enero de 2015

Layout rosa "Mi primer diente" - Pink "My first tooth" layout

La idea era presentar este layout para el reto de Kimidori, una nueva tienda de material de scrapbooking muy chula, pero llegué tarde así que aprovecho para incluirlo en el reto "Anything goes" Wednesday Challenge del blog de Simon Says Stamp.
The idea was to submit this layout for the challenge on Kimidori's blog, a new cool scrapbooking store, but I was too late, so I included it in the Simon Says Stamp blog's "Anything goes" Wednesday Challenge in stead.


Me encanta este troquel de cuttlebug. Es muy versátil ya que te permite cortar y colorear los elementos a tu gusto. Para este LO corté el bebé de cartulina blanca y lo coloreé con Distress Ink Tattered rose (para la piel) y "Vintage Pink” efecto tiza de Prima (para el pijamita). 
I love this die by Cuttlebug. It's very versatile since it allows you to cut and color the elements exactly like you want them. For this LO I die cut the baby from white cardstock and colored it with Tattered Rose Distress ink (for the skin) and Prima's "Vintage Pink" chalk ink for the pajamas.

También le recorté la boca al bebé, dejando un pequeño diente que coloreé con bolígrafo de gel blanco. Pegué un trocito de papel negro detrás del hueco de la boca para hacer resaltar el diente.
I also cut the mouth of the baby leaving a tiny tooth that I colored with a white gel paint. On the back side of the baby's head I glued a small piece of black paper to make the tooth really stand out.

Por último recorté un pequeño cepillo de dientes de cartulina blanca que entinté con tinta pigmentada y embosé con polvos de embossing transparentes.
Lastly I cut a small toothbrush out of white cardstock, inked it with pigment ink and embossed it with clear embossing powder.


Como no tenía letras adecuadas, lijé unas rojas de la colección “Head over heels” de BoBunny, las entinté con tinta rosa y las cubrí con Glossy Accents.
Since I din't have any suitable letters, I sanded the red letters from BoBunny's "Head over Heels" collection, inked them with pink chalk ink and covered them with Glossy Accents.

No soy muy amiga del rosa, pero me gusta bastante el resultado... ¡Hasta la próxima!
I'm not really a fan of pink, but I really like the result... See you next time!