Mostrando entradas con la etiqueta dorado. Mostrar todas las entradas

lunes, 1 de mayo de 2017

Tarjeta de cumpleaños unisex - A unisex Birthday card

He aprovechado el puente de mayo para hacer algo de scrap y hoy os muestro una sencilla tarjeta cumpleañera, que he creado para el reto de abril de House of Cards, que se acaba dentro de unas horas...
I've been crafting quite a lot this Bank Holiday and today I want to show you a simple Birthday card that I made for the April challenge at House of Cards, that's just about to end.


La imagen del reto, que veréis a continuación, me pareció muy inspiradora, al igual que el tema de usar plumas. Por fin pude estrenar el set de sellos "Feather More" de Waffle Flower, que gané hace unos meses en uno de sus retos.
I found the challenge picture to be very inspiring with it's feather theme and beautiful color palette. It also gave me a chance to use Waffle Flower's "Feather More" stamp set that I won a couple of months ago (in one of their challenges), for the first time.

 
Estampé las plumas en tres tonos de tinta; "Toffee Crunch" Memento Luxe, "Teal zeal" Memento y "Knotted Wood" sobre cartulina azul clarita para crear mi fondo.
I used three different inks to create my stamped background: "Toffee Crunch" Memento Luxe, "Teal Zeal" Memento and "Knotted Wood" by Prima.


Añadí unos toques dorados con polvos de embossing de Imagination Crafts y usé los mismos polvos para añadir varias capas al sentimiento XL, troquelado con un troquel de Die-namics.
I also added some embossed touches with Imagination Crafts gold embossing powder, which I also used to cover the XL sentiment, cut with a Die-namics die.


Esto es todo por hoy... ¡Feliz uno de mayo y hasta muy pronto!
That's all for today... Have a great day! I'll be back really soon.

lunes, 3 de abril de 2017

Tarjeta primaveral para La Pareja Creativa - A springtime card for LPC

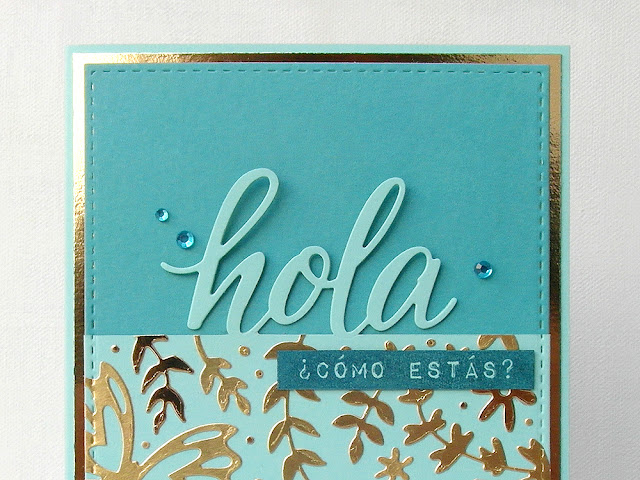
¡Buenos días! Empiezo la primera semana de abril con mucha energía y con un proyecto para el reto mensual de La Pareja Creativa. He combinado dos tonos de azul con dos diferentes dorados (mate y brillante) para crear esta elegante tarjeta primaveral...


... inspirada en la imagen del reto:


Me parece un conjunto de fotos muy bonito y para todos los gustos... esas flores, esos azules y dorados, las texturas naturales, la repetición... Se me ocurren un montón de proyectos y ¡me muero de ganas de ver los vuestros!, así que espero que os animéis a participar. 


Volviendo a mi tarjeta, para el panel principal usé uno de los Rectángulos Cosidos A6 y el troquel Hola 2, que troquelé parcialmente en cartulina de alto gramaje ("Mermaid" de Lawn Fawn). Usé la misma cartulina para la base de la tarjeta y un trozo de cartulina "Ombre Robin's Egg" de Bazzil para la tira superior del panel.


Decoré el panel con flores del set Decora con flores y mariposas del set Mariposas-troqueles en dos tonos de cartulina dorada. Para facilitar la tarea de adherirlas, usé laminas de papel adhesivo Stick-it por detrás. El sentimiento "cómo estás" es un sello del set "Label Love Spanish" de la marca Altenew. Como último detalle, unos brillantes para atraer la mirada hacia el sentimiento principal. 


Os dejo con una última imagen de mi tarjeta y os invito a ver los proyectos de mis geniales compañeras de La Pareja Creativa. ¡Hasta pronto!

jueves, 12 de enero de 2017

Una tarjeta ochentera para Seven Hills Crafts - An eighties card for Seven Hills Crafts

Los retos de scrapbooking siempre son una fuente de inspiración, y cuando incluyen un sketch con un buen diseño, nos facilitan mucho el trabajo. Para el reto de enero de Seven Hills Crafts, hice esta tarjeta...
Scrapbooking challenges are always a source of inspiration, more so when they include a well-designed sketch. I made this card for the January challenge at Seven Hills Crafts... 


...inspirada en el siguiente sketch:
...inspired by this sketch:

Combiné dos tonos de cartulina kraft con cartulina "Mermaid" de Lawn Fawn y cartulina entintada con tinta de pigmento "Apricot" de Mama Elephant. Para crear la franja del sketch, usé el troquel "Stepped Up Chevron" de Die-namics.
I combined two tones of kraft-coloured cardstock with Lawn Fawn's "Mermaid" cardstock and some cardstock inked with Mama Elephant's "Apricot" pigment ink. I used the "Stepped Up Chevron Die" from Die-namics for the horizontal strips.


Corté el círculo con uno de los troqueles del set "Flower Circles" de Waffle Flower y lo adherí con almohadillas adhesivas. Las hojas y flores embossadas en dorado sobre vellum son del precioso set de sellos "Wild & Free", también de Waffle Flower. La palabra "hello" es de la marca Simon Says Stamp.
I cut the pierced circle with one of the dies from the Waffle Flower's "Flower Circles" set and adhered it with foam squares. I embossed the flowers and leaves from the "Wild & Free" stamp set, also by Waffle Flower, in gold on some thick vellum. The die-cut sentiment "hello" is by Simon Says Stamp.


Me gusta mucho la combinación de colores, y la calidez y textura de la cartulina kraft de mi tarjeta, aunque a mi hermana le pareció muy ochentera (casi un insulto durante nuestra adolescencia)... hasta le puso el título "Dinastía", ja ja ja. ¿Estáis de acuerdo?
I love the colour combination and the warmth and texture of the kraft cardstock, that I used in this card, even though my sister thinks it's very "eighties" (almost an insult when we were growing up)... she even gave it the title; "Dynasty", ha ha ha. What do you think? 

lunes, 11 de abril de 2016

Tarjeta con vellum y dorado para el primer reto de tarjetas de Locas por el Scrap - A Card with gold and vellum for the first card challenge at LPES

¡Sopresa! El título ya lo dice todo, pero las locas más tarjeteras hemos pensado que estaría guay organizar un reto de tarjetas mensual, a ver qué tal funciona. La temática de este primer reto de tarjetas de Locas por el Scrap es: vellum + dorado. Aquí tenéis mi tarjeta:
Surprise! Even though the title says it all, the card makers at "Locas" have been thinking that it would be great to start a monthly card challenge, to see how it goes. The theme of this first card challenge at Locas por el Scrap is: vellum + gold. Here's my card:


He jugado un poco con las diferentes texturas y volúmenes para crear una tarjeta bastante tridimensional. He usado troqueles de La Pareja Creativa para cortar el marco circular (usando un papel de la colección "Wood" de MME) y el panel cuadrado con falso cosido.
I've played around with different textures and volumes to create a rather three dimensional card. I used dies from LPC to cut the circular frame (with a paper from MME's "Wood" collection) and square panel with faux stiching.


Camuflé la palabra "thanks", cortada con un troquel de Lawn Fawn, en este bonito papel de chevron de Craft Asylum, usando la técnica del incrustado, pero añadiendo un par de capas de cartulina, para que tuviera algo de volumen.
I camouflaged the sentiment, cut with a Lawn Fawn die, in this pretty chevron paper by Craft Asylum, using the inlay technique, but adding a couple of layers of cardstock to give it more volume.


Me encanta el troquel ("Adorable array") de Paper Smooches, que usé para cortar la delicada flor y hojas en cartulina dorada. Previamente adherí un trozo de hoja adhesiva de doble cara Stick-it a la cartulina, para poder pegar las formas troqueladas al vellum limpiamente.
I love the "Adorable array" die by Paper Smooches, that I used to die cut the delicate flower and leaves out of gold cardstock. Before that, I adhered a piece of Stick-it double-sided adhesive paper to the cardstock, so that I could cleanly attach the die cuts to the vellum.   

Pegué las piezas de vellum al marco de papel de madera camuflando gotitas de Multi Medium Matte detrás de las partes doradas. Añadí un par de enamel dots en diferentes tamaños y tonos rosa y ya está!
I adhered the vellum to the wood paper frame by camouflaging tiny Multi Medium Matte glue dots behind the golden pieces. I added a couple of enamel dots in different sizes and pink shades and that's it! 


Espero que os animéis a participar en nuestro primer reto tarjetero, porque aunque de momento el/la ganador/a no tendrá premio, seguro que si participa suficiente gente, en futuras ediciones lo tendrá... ¡Gracias por vuestra visita y feliz lunes!
I hope that you will participate in our first card challenge, because even though there currently is no prize for the winner, if enough people participate, I'm sure that in future editions, there will be one...
Thanks for your visit and have a great Monday!

miércoles, 5 de agosto de 2015

Una tarjeta geométrica - A geometrical card

Últimamente uso poco papel estampado en mis proyectos... prefiero crear mis propios fondos con plantillas, troqueles, sellos o tintas Distress. Por eso el reto de tarjetas de Yoy Scrap de agosto en el que nos piden una tarjeta usando papeles con motivos geométricos y la temática de vacaciones me pareció todo un desafío...
Lately I've been using very little patterned paper in my creations... I prefer to create my own backgrounds using stencils, dies, stamps or Distress inks. That's why I found the August card challenge at Yoy Scrap, in which you have to use geometrical patterned paper and a vacation theme, especially challenging...


En mi taller econtré un papel con estampado geométrico muy discreto en blanco y gris del set "Something wonderful" de Teresa Collins que cubrí con una hoja de papel de cebolla para hacerlo todavía más discreto y para poder crear este diseño de rombos troquelados encima.
In my craft room I found a discrete geometrical pattern in white and gray from the collection "Something wonderful" by Teresa Collins that I covered with a sheet of vellum to make it even more discrete and to be able to create this design with diamonds on top of it.


Coloqué la hoja de papel de cebolla encima de una cuadrícula para que los rombos me quedaran rectos y los fui pegando con cinta de doble cara sin ningún patrón en mente...
I temporarely adhered the piece of vellum to a grid to be able to glue the diamonds on straight with no particular pattern in mind...


Usé esta bonita chapa de Yoy Scrap y un sello de Lora Bailora para escribir "Hola vacaciones" aunque me temo que este verano me quedaré sin ellas... menos mal que tengo las tardes y los fines de semanas libres para poder disfrutar del buen tiempo que estamos teniendo ^_^
I used this pretty badge from Yoy Scrap and a stamp by Lora Bailora to spell out "Hello holidays" although I'm afraid this summer I won't have any... luckily I have the afternoons and weekends off to be able to enjoy the good weather that we're having ^_^


Me gusta mucho el efecto de las diferentes texturas y grosores de las cartulinas que usé... Dos de los rombos son de cartulina cubierta con foil dorado que me sobró de un anterior proyecto. También usé unos pocos enamel dots para atraer la vista hacia el diseño geométrico de la pieza central de la tarjeta.
I like the effect of the different textures and thickness of the cardstock that I used... I used some gold-foiled cardstock that was left over from a previous project for two of the diamonds. I also used some enamel dots to draw the eye to the geometrical pattern of the central piece of the card.


No me queda más que desearos unas felices vacaciones y un buen verano a todo el mundo y a animaros a presentaros a este divertido reto que se acaba el 20 de agosto. ¡Hasta la próxima!
All that's left for me to do is to wish you a happy holiday and a good summer and to encourage you to participate in this fun challenge that ends on August 20. See you next time!

miércoles, 10 de junio de 2015

Tarjeta art decó con foil - Art deco style card with foil

Aunque estoy al tanto de las tendencias en el scrap, no siempre las sigo... este era el caso del "foiling". En un principio no me llamaba nada la atención, pero gracias al reto nº 51 de 3flowers, propuesto por Mariola, me hice con una pequeña cantidad de foil dorado y me puse a experimentar... Aquí tenéis el resultado:
Even though I'm up to date with the latest tendencies in scrapbooking, I don't always follow them... That was the case with foiling. At first it didn't catch my attention at all, but thanks to challenge #51 at 3flowers, proposed by Mariola, I bought a small amount of gold foil and started experimenting... Here's the result:  
 

El tema lo elegí porque me encanta el art decó y porque mi idea era combinar el reto de 3flowers con uno CAS de palabra clave: "vintage", pero llegué demasiado tarde para este último.
I chose the theme because I love art deco and because my idea was to combine the challenge at 3flowers with a vintage-themed CAS challenge, but I was too late. 


Os aseguro que la tarjeta es más bonita en la realidad, pero es muy difícil fotografiar el dorado brillante del foil con una cámara digital básica como la mía... 
I assure you that the card is more beautiful in real life but it's very difficult to capture the shiny gold foil with a basic digital camera like mine...


Me inspiré en el sencillo diseño geométrico y en la paleta de colores de esta preciosa taza y plato de los años 30:
I was inspired by the simple geometrical design and palette of this beautiful Thirties cup and saucer: 


Para crear mi tarjeta usé este troquel de arco iris...
I used this rainbow die to create my card...


y uno de los troqueles del set "Feathers and Arrows" de Die-namics. Adivinad cuál ;)
and one of the dies of the "Feathers and Arrows" set by Die-namics. Guess which one ;) 


A continuación os explicaré parte del proceso aunque si queréis ver un tutorial más completo sobre el "incrustado", una de mis técnicas favoritas, podéis hacer clic AQUÍ.
Next I'll explain parts of the process although if you want to see a detailed tutorial on the inlay technique, one of my favourites, clic HERE.

1. Empecé cortando la forma del arco iris (el negativo del troquel) en la que incrustaría las franjas blancas y negras:
1. I started by diecutting the shape of the rainbow (the negative part of the die) in which I would inlay the black and white stripes:


2. Pegué un rectángulo de papel de impresora cubierto de cinta de doble cara por detrás del panel negro e inserté todas las piezas en el hueco. Después adherí el troquel del "tallo" de forma temporal al panel con unos trozos de cinta de carrocero.
2. I glued a rectangle of printer paper covered with double sided tape on the back side of the black panel and inserted all the pieces in the opening. Then I temporarely attached the "strip" die to the panel with pieces of painters tape.


Repetí el mismo paso tres veces más moviendo el troquel cada vez un poquito más hacia la derecha y hacia arriba... 
I repeated this step three more times, moving the die to the right and upwards each time...


3. Ahora tocaba preparar el foil... Pegué un trozo de cinta de doble cara ancha de la marca Sookwang a un trozo de cartulina negra y troquelé las cuatro tiras finas que irían incrustadas en los huecos que acababa de cortar. Después las pequé contra el lado mate del foil:
3. Now it was time for the foiling... I glued a piece of wide Sookwang tape to the back of a piece of black cardstock and die cut four thin strips that would be inlaid in the slits that I had just cut. Then I glued them to the matt side of the foil:


4. Con una plegadora de hueso froté suavemente por detrás de cada tira antes de despegarlas del foil... qué nervios!
4. With a bone folder I gently rubbed the back of each of the strips before removing them from the foil... How nerve racking!


5. Quedaron bien, así que cubrí mi base de tarjeta negra, que después cambié por una blanca, con cinta de doble cara e incrusté las finísimas tiras doradas en los huecos...
5. They turned out OK so I covered my black cardbase, which I then switched to a white one, with double-sided tape and inlaid the thin golden strips...


6. Por último recorté una franja más ancha del trozo de cartulina con Sookwang, la cubrí con foil y monté la tarjeta. A todo esto, hasta el último momento no tenía claro dónde iría el sentimiento, pero me acordé de un set de formas troqueladas de estilo art decó que me regaló mi hermana Luisa hace tiempo y usé uno de los círculos que traía:
6. Lastly I cut a wider strip out of the cardstock with Sookwang, covered it with foil and assembled the card. Until the last minute I didn't know where I would place the sentiment, but I remembered a set of art deco die cuts that my sister Luisa had given me and used one of the circles from it:


Espero que os haya gustado mi "sencilla" tarjeta ^_^ ¡Hasta la próxima!
I hope you liked my "simple" card ^_^ See you next time!