Mostrando entradas con la etiqueta 2017. Mostrar todas las entradas

viernes, 22 de septiembre de 2017

Una tarjeta sencilla para MFT - A Clean and Simple card for My Favorite Things

Hoy os muestro una tarjeta CAS con sorpresa para el reto 2017 Card Design Superstar: Clean and Simple Genius. Mi espacio blanco en este caso es negro y mi tarjeta no lleva ni adornos ni muchos elementos...
Today I'm showing you a CAS card with a surprise feature that I made for the 2017 Card Design Superstar: Clean and Simple Genius. My white space in this case is black and my card has no embellishments and very few elements...


Estaréis pensando: "ni siquiera lleva un mensaje". Pero cuando tiramos de la luna...
You're probably thinking: "it doesn't even have a sentiment". But if you pull at the moon...


...aparece el mensaje "eres mi sol" y la noche se convierte en amanecer! Se trata de una tarjeta slider especial, ya que todo el panel se desliza.
...the sentiment "You're the sunshine in my life" appears and the night turns into dawn! It's a special slider card since the whole panel slides.


He usado el troquel Die-namics NY Skyline en dos alturas para crear la silueta de esta mítica ciudad. Para que pareciesen edificios diferentes, recorté algunas repisas y chimeneas, sobre todo modifiqué al Empire State Building... 
I used the Die-namics NY Skyline in two rows to create the silhouette of this great city. In order to make them look like different buildings, I  cut a few towers and ledges off. I especially modified the Empire State Building.


Entinté el borde de las siluetas y la luna, del set de troqueles Die-namics LJD Spooky Sweets, con tinta plateada. El sentimiento, del set de sellos Soak up the Fun está embossado en plata sobre ese cielo entintado con tintas Distress en papel de acuarela.
I inked the edges of the skylines and the moon, from the set Die-namics LJD Spooky Sweets, with silver ink. I also embossed the sentiment from the stamp set Soak up the Fun in silver on the waterpaper panel, that I had previously inked with Distress inks.

Os voy a revelar el truco del mecanismo, sin entrar en muchos detalles: 
Here' a brief look at the mechanism:


Corté un panel rectangular 1,2cm más corto que la base de mi tarjeta y usé uno de los banners del set de troqueles Die-namics Blueprints 28 para cortar dos ranuras paralelas en el mismo. 
I cut a rectangular panel, half an inch shorter than my cardbase and used one of the banners from the Die-namics Blueprints 28 to cut two parallel grooves in it.


También troquelé dos rectángulos cosidos con el troquel Die-namics Essential Cover-Up Vertical y adherí dos trozos de palito de helado en uno de ellos. ¡Encajaban perfectamente en las ranuras del anterior panel! 
I also cut two rectangles with the Die-namics Essential Cover-Up Vertical die and adhered two pieces of popsicle sticks to one of them. They fit perfectly in the grooves of the previous panel!


Hice el siguiente sandwich de abajo a arriba: base de tarjeta + rectángulo cosido con los palitos + panel con las ranuras (adherido a la base de la tarjeta con almohadillas) + 2º rectángulo cosido + panel de acuarela.
I stacked the elements in the following manner: card base + rectangle with the popsicle sticks + panel with the grooves (glued to the cardbase with foam adhesive) + second rectangle + watercolor panel.

Adherí el skyline directamente a la base de la tarjeta con almohadillas adhesivas en el extremo inferior para que no interfiriese con el mecanismo y listo.
I put a strip of foam adhesive on the lower end of the cardbase and attached the skyline to it, so that it wouldn't interfere with the mecanism and voilá.


Os dejo con un pequeño gif del movimiento y un ¡hasta la próxima!
Here's a gif of my card so that you can see it in action... Until next time!


martes, 19 de septiembre de 2017

A triple interactive Birthday card for the My Favorite Things "Card Design Superstar Challenge"

Nota para mis seguidoras de habla española: Volveré muy pronto con otra versión del vídeo y de la entrada, para que no os perdáis ningún paso. ^_^

Hi there, I'm a big fan of My Favorite Things products, but their annual Card Design Superstar Challenge always catches me off guard... not this year! I've made a triple interactive card for the Innovation Master category. I hope you like it!


I made the card for my nephew and godson Nico, using mainly the Die-namics Castle set and the BB Magical Dragons stamp set, but also many unexpected MFT products which you can see in my video tutorial (there's also a list at the end of this post):


I had to edit the video quite a lot so that it wouldn't be super long... if you feel like making the card and are uncertain about any of the steps, feel free to comment. I'll be glad to help!


For example, I forgot to mention that the sliding panel of the second mechanism (that makes the Dino open its mouth) is attached to the base with the same brad that goes through the first band-aid shape in the right column...  


The first mechanism, is a rotating disk that allows three different fairy tale characters to look out through the window... 


My favorite mechanism is the second one... when you pull the tab, a message (from the retired "Super Boy" stamp set) is revealed and the T-rex opens its mouth! It ate the present and the dragon looks so confused, lol!


Here's the card with the third interactive element, a hidden sliding tower, in full view. As I said in the video, my nephew Nico loves cows, so I had to add one to his Birthday card. The stamp, from the BB Whole Herd set, is also easy to color on gray cardstock... 


I paper pieced the balloons -which I stamped on thin red, blue and yellow cardstock and shaded with Copic markers- to the cow stamp. 


I hope you liked my triple interactive card... it's not quick to make but I bet any kid or MFT fan would love to receive one... ^_^


Here's a list of all the My Favorite Things products that I used. I'll be back very soon with another card!

lunes, 26 de junio de 2017

Una tarjeta cumpleañera masculina para Paper Smooches - A masculine Birthday card for Paper Smooches

A pesar de no haber publicado mucho este mes, he creado unas cuantas tarjetas, tanto para profesoras como para amigos. Hoy os muestro una sencilla tarjeta que hice para mi amigo Juan, que estuvo de cumple el sábado...
Even though I haven't published many entries this month, I've made quite a few cards, both for teachers, as for friends. Today I'm here with a simple card that I made for my friend Juan, whose Birthday was on Saturday...


Utilicé troqueles del set Dots and Dashes de Paper Smooches y tijeras para crear unas tiras de cartulina texturizada de colores alegres, que adherí a una base de tarjeta de color kraft.
I used dies from the set Dots and Dashes by Paper Smooches and scissors to cut some colourful strips out of textured cardstock, that I adhred to a kraft cardbase.


Probé a colocar las tiras rectas con la ayuda de una regla, pero el resultado era demasiado serio y al final decidí pegarlas de manera irregular (menos mal que usé hojas adhesivas Stick-it).
At first I adhered the strips straight with the help of a ruler, but the result was too serious and I decided to do glue them in a more irregular manner (luckily I used Stick-it adhesive sheets). 


Adherí dos de las tiras más cerca, la una de la otra, para poner el sentimiento, del set Birthday Words, encima. El último toque fueron unos enamel dots del mismo color que las tiras y listo. 
I put two of the strips together to be able to adhere the sentiment, die-cut with a die from the set Birthday Words, on top of them.

Aprovecho para participar en el reto de junio de Paper Smooches, cuya temática es: "hombres". Mirad que imagen más divertida han preparado para la ocasión:
I'm entering this card to the Paper Smooches June Challenge, which features "men". Isn't their challenge pic just awesome?


Os dejo con una última foto de mi tarjeta y os deseo una feliz semana, sobre todo para la gente que ya está disfrutando de sus vacaciones. ¡Hasta pronto!
Here's a last picture of my card. I wish you a great week, especially if your on vacation. Until next time!


lunes, 3 de abril de 2017

Tarjeta primaveral para La Pareja Creativa - A springtime card for LPC

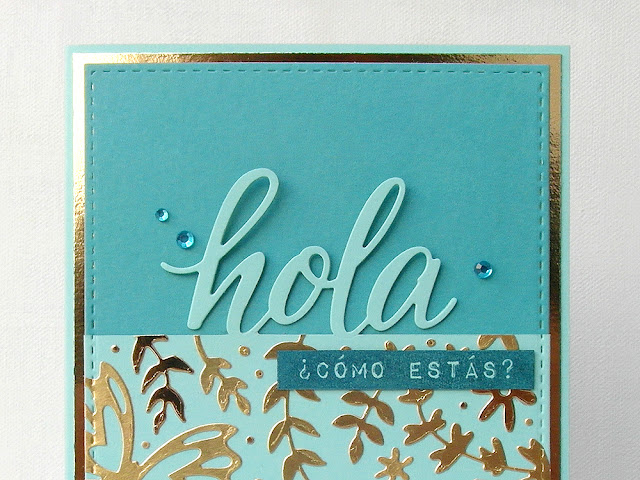
¡Buenos días! Empiezo la primera semana de abril con mucha energía y con un proyecto para el reto mensual de La Pareja Creativa. He combinado dos tonos de azul con dos diferentes dorados (mate y brillante) para crear esta elegante tarjeta primaveral...


... inspirada en la imagen del reto:


Me parece un conjunto de fotos muy bonito y para todos los gustos... esas flores, esos azules y dorados, las texturas naturales, la repetición... Se me ocurren un montón de proyectos y ¡me muero de ganas de ver los vuestros!, así que espero que os animéis a participar. 


Volviendo a mi tarjeta, para el panel principal usé uno de los Rectángulos Cosidos A6 y el troquel Hola 2, que troquelé parcialmente en cartulina de alto gramaje ("Mermaid" de Lawn Fawn). Usé la misma cartulina para la base de la tarjeta y un trozo de cartulina "Ombre Robin's Egg" de Bazzil para la tira superior del panel.


Decoré el panel con flores del set Decora con flores y mariposas del set Mariposas-troqueles en dos tonos de cartulina dorada. Para facilitar la tarea de adherirlas, usé laminas de papel adhesivo Stick-it por detrás. El sentimiento "cómo estás" es un sello del set "Label Love Spanish" de la marca Altenew. Como último detalle, unos brillantes para atraer la mirada hacia el sentimiento principal. 


Os dejo con una última imagen de mi tarjeta y os invito a ver los proyectos de mis geniales compañeras de La Pareja Creativa. ¡Hasta pronto!