Mostrando entradas con la etiqueta paper smooches. Mostrar todas las entradas

viernes, 20 de octubre de 2017

Amigo Invisible Creativo 2017 - Creative Secret Santa 2017

Por cuarto año consecutivo, Gemma del blog Guardiana de Momentos, ha vuelto a organizar el  divertido evento tarjetero Amigo Invisible Creativo, en el que cada participante preparaba dos lotes de material, uno para enviar a su amigo invisible y el otro para hacer una tarjeta. También recibía un lote de otro amigo invisible, con el que creaba una segunda tarjeta. ¡Dos lotes idénticos suelen resultar en dos tarjetas totalmente diferentes!
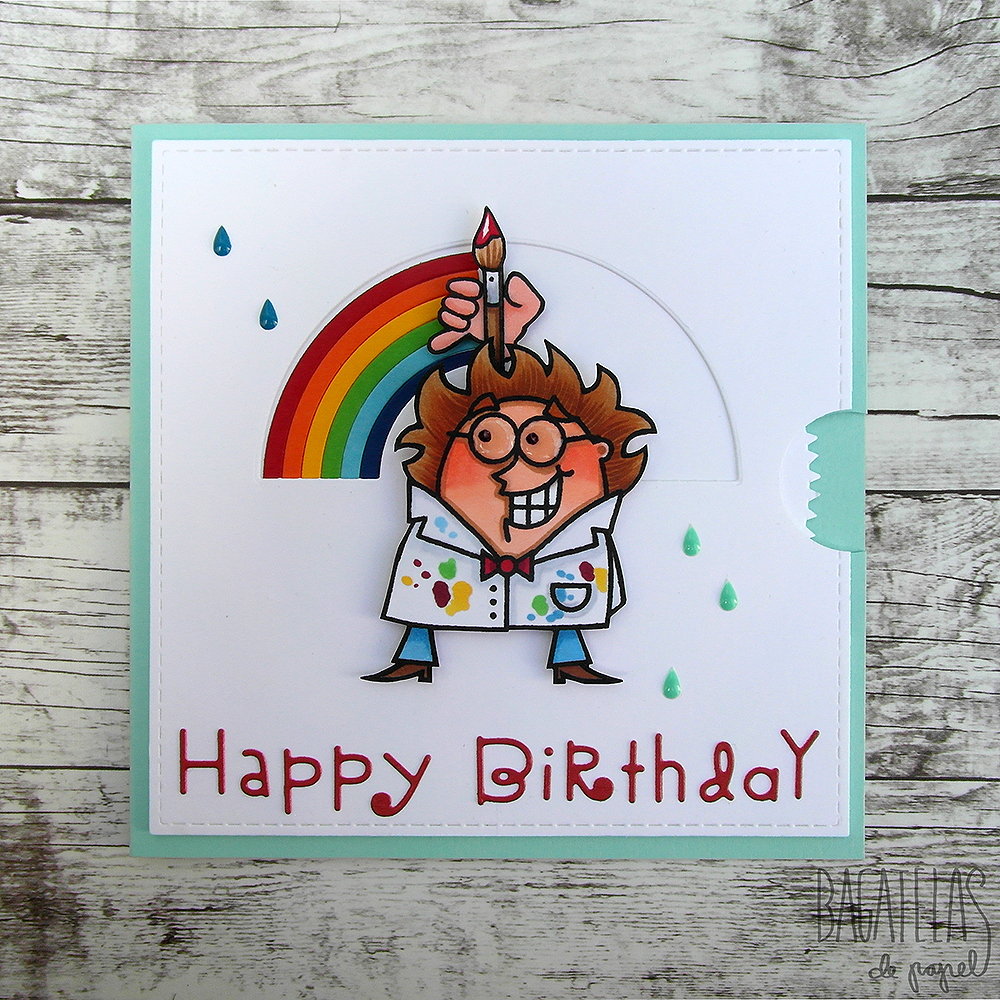
For the fourth consecutive year, Gemma from the Blog Guardiana de Momentos, has organized a fun cardmaking event called Creative Secret Santa, in which each participant had to prepare two cardmaking kits, one for herself (all girls this year) and one for her Secret Santa friend. She would also receive another kit in order to make a second card. ¡Two identical kits usually result in two totally different cards!

Este año me tocó mandarle un lote a Nerea Marsanz, una talentosa tarjetera a la que sigo en las redes y una de las organizadoras del evento tarjetero Cardmaking Madrid, al que asistiré en noviembre.
This year I had to send a kit to Nerea Marsanz, a talented cardmaker who I follow on social media. She is also one of the organizers of the Cardmaking Madrid event, which I will attend in November.

Esta es la tarjeta que creé con mi lote de materiales, que veréis enseguida:
Here's the card that I made with my kit, which you can find below):

Creo que a Nerea le gustó el lote, todo menos el corazón de madera XL de Lawn Fawn. A mí también me costó incluirlo, pero finalmente lo cubrí con varias capas de embossing y lo convertí en globo...
I think Nerea liked her kit, everything except the large wooden heart by Lawn Fawn. I had a hard time including it as well, but ended up covering it with multiple layers of embossing powder and turning it into a balloon...


El lote consistía en unos papeles estampados de la preciosa colección "Cute Girl" de Crate Paper, un trozo de cartulina de alto gramaje de Simon Says Stamp, cuatro corazones troquelados con adhesivo Stick-it por detrás (cuentan como un sólo elemento, je je je), cinco enamel dots en colores a juego, el mencionado corazón de madera y ese sello de osito de la marca My Favorite Things.
The kit included a couple of patterned papers from Crate Paper's lovely "Cute Girl" collection, a piece of aqua-colored heavyweight cardstock, four die-cut hearts with double sided adhesive on the back, five matching enamel dots, the before-mentioned wooden heart and a bear stamp by My Favorite Things.


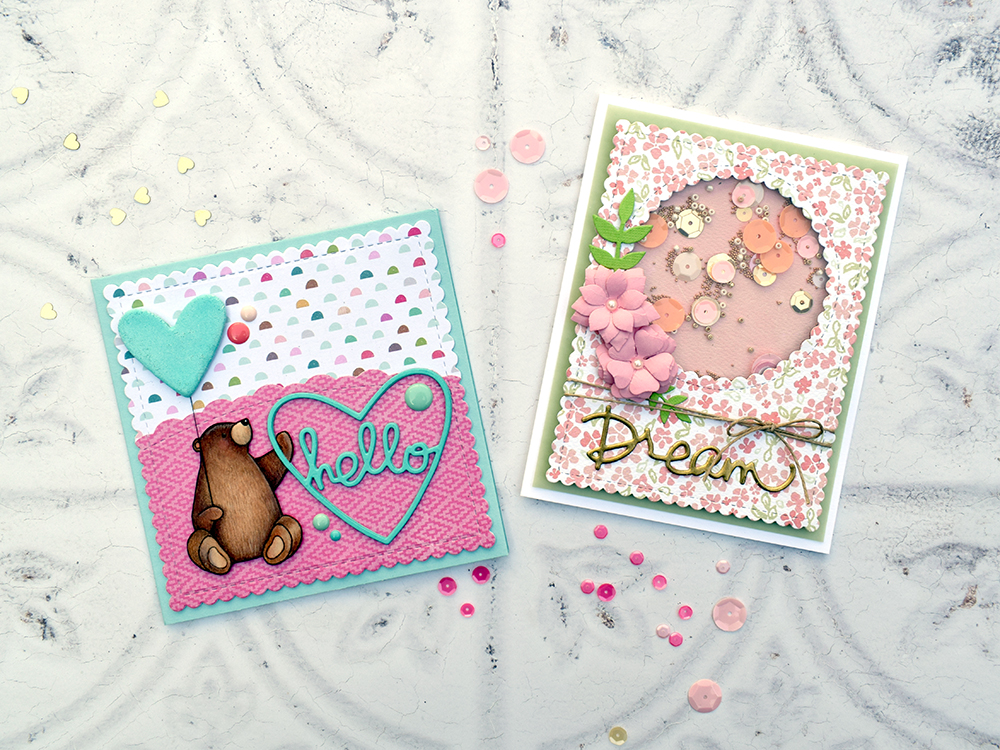
Yo superpuse los cuatro corazones, cortados con un troquel de Paper Smooches y coloqué al oso, que coloreé con rotuladores Copic, sujetándolo.
I layered the four hearts, cut with a Paper Smooches die and attached it to the bear's paw.

Vamos con la segunda parte del amigo invisible creativo... Recibí un lote precioso con muchísimas cosas de Teresa Gimenez (@teresalerosa en IG) a la que no conocía anteriormente.
Now on to the second part of the Secret Santa... I received a beautiful kit filled with stuff from Teresa Gimenez (@teresalerosa on IG), a complete stranger to me. 


Se curró el packaging en plan flipbook y no me pudo gustar más... eso sí, siguiendo las instrucciones de Gemma, para la tarjeta sólo elegí los cinco elementos de la última foto. ¡Teresa usó todos! Me muero de ganas de ver su tarjeta. Aquí está la mía, una romántica tarjeta shaker:
She turned her kit into a flipbook which I loved! However, following Gemma's instructions, I only chose five elements for my card. Teresa used them all and I can't wait to see her card! Here's mine, a romantic shaker card:


Ji ji ji, no es muy de mi estilo con tanta flor, pero me gusta. Usé un troquel de Mama Elephant para cortar el papel floreado y añadí más lentejuelas y esas hojas verdes, cortadas con un troquel de Die-namics.
It's not 100% me with so many flowers, but I like it. I used a die by Mama Elephant to cut the flowery paper and added more sequins and those green leaves, cut with a Die-namics die.


Añadí una capa de embossing dorado a la palabra "Dream", ya que el fucsia resaltaba demasiado para mi gusto... Esas flores, creadas por Teresa son preciosas, ¿verdad?
I also added a layer of gold embossing to the word "Dream" since I didn't like it in fuchsia... Those paper flowers, made by Teresa, are beautiful, aren't they?


Me apetecía que las dos tarjetas tuvieran algo en común y por eso usé troqueles de borde festoneado en ambas.
I wanted my cards to have something in common, so I used dies with a scalloped edge for both of them.

Gracias Gemma, por montar de nuevo este tinglado tan divertido. Me voy corriendo a tu blog y después a visitar a los demás blogs participantes... ¡Un abrazo grande a Nerea y a Teresa!
Thanks Gemma, for organizing this fun event one more. I'm off to your blog, and then to visit the blogs of the rest of the participants. A big hug to my secret friends, Nerea and Teresa!


lunes, 26 de junio de 2017

Una tarjeta cumpleañera masculina para Paper Smooches - A masculine Birthday card for Paper Smooches

A pesar de no haber publicado mucho este mes, he creado unas cuantas tarjetas, tanto para profesoras como para amigos. Hoy os muestro una sencilla tarjeta que hice para mi amigo Juan, que estuvo de cumple el sábado...
Even though I haven't published many entries this month, I've made quite a few cards, both for teachers, as for friends. Today I'm here with a simple card that I made for my friend Juan, whose Birthday was on Saturday...


Utilicé troqueles del set Dots and Dashes de Paper Smooches y tijeras para crear unas tiras de cartulina texturizada de colores alegres, que adherí a una base de tarjeta de color kraft.
I used dies from the set Dots and Dashes by Paper Smooches and scissors to cut some colourful strips out of textured cardstock, that I adhred to a kraft cardbase.


Probé a colocar las tiras rectas con la ayuda de una regla, pero el resultado era demasiado serio y al final decidí pegarlas de manera irregular (menos mal que usé hojas adhesivas Stick-it).
At first I adhered the strips straight with the help of a ruler, but the result was too serious and I decided to do glue them in a more irregular manner (luckily I used Stick-it adhesive sheets). 


Adherí dos de las tiras más cerca, la una de la otra, para poner el sentimiento, del set Birthday Words, encima. El último toque fueron unos enamel dots del mismo color que las tiras y listo. 
I put two of the strips together to be able to adhere the sentiment, die-cut with a die from the set Birthday Words, on top of them.

Aprovecho para participar en el reto de junio de Paper Smooches, cuya temática es: "hombres". Mirad que imagen más divertida han preparado para la ocasión:
I'm entering this card to the Paper Smooches June Challenge, which features "men". Isn't their challenge pic just awesome?


Os dejo con una última foto de mi tarjeta y os deseo una feliz semana, sobre todo para la gente que ya está disfrutando de sus vacaciones. ¡Hasta pronto!
Here's a last picture of my card. I wish you a great week, especially if your on vacation. Until next time!


lunes, 24 de abril de 2017

Tarjeta cumpleañera interactiva - An interactive Birthday card

Este año el dicho "en abril, aguas mil" no se está cumpliendo aquí en Galicia, ya que está siendo el abril más seco de la historia. Aún así me inspiré en el reto de Paper Smooches, "April Showers", para crearle esta divertida tarjeta cumpleañera a una querida amiga scrapera.
This year the month of April has been very dry here in Galicia, but nevertheless, I was inspired by the "April Showers" Paper Smooches challenge to create this fun, interactive Birthday card for a dear crafty friend.


Con algo de estampación parcial, convertí el científico loco del set de sellos "Great Chemistry" en un entusiasmado pintor en pleno proceso creativo.
Thanks to some partial stamping, I transformed the crazy professor from the stamp set "Great Chemistry" into a flustered, brush-wielding painter. 

En este vídeo clip podéis ver cómo se acciona la tarjeta y descubrir qué es lo que está pintando ese artista loco...
In this video clip you can see how the card works and what our crazy artist is painting...


Ji ji ji, ¿qué os ha parecido? A pesar de que no fui capaz de alinear perfectamente el pincel con el arcoíris (no quise acortar el brazo más), me gusta mucho el efecto.... casi "da el pego" ;)
Ha ha ha, what do you think? Even though I wasn't able to perfectly align the brush with the rainbow (I didn't want to make the rotating arm any shorter), I like the effect...

Aquí tenéis la secuencia en fotos:
Here you can see the sequence in pictures:


El mecanismo es realmente sencillo... Utilicé el troquel "Rainbow", también de Paper Smooches, para troquelar una ventana en el panel y para cortar las tiras que forman el arcoíris. Tanto el brazo como el disco están sujetos con un encuadernador (brad) al panel. El brazo está adherido al disco dentado con almohadillas adhesivas de tal manera que al girarlo, los dos elementos se mueven a la par.
The mechanism is really simple. I used the "Rainbow" die, also by Paper Smooches, for cutting a window out of the card panel, and for the rainbow itself. Both the arm and the disc are attached to the card panel with a small brad. The arm is also glued to the pinked disc with foam adhesive so that they can rotate together.


El divertido personaje, coloreado con rotuladores Copic, está pegado con almohadillas adhesivas aunque no lleva ninguna detrás de la cabeza para que el brazo pueda girar libremente.
The fun character, colored with Copic markers, is glued to the card panel with foam adhesive. I didn't put any behind his head so that the arm can rotate freely.


Eso es todo por hoy. Aquí tenéis de nuevo el enlace al reto. Todavía os quedan unos días para participar, así que ¡adelante!
That's all for today. Here's the link to the challenge once more. You still have a couple of days to participate, so go for it!

lunes, 9 de enero de 2017

Tarjeta "cozy" para Paper Smooches - A cozy card for Paper Smooches

Tenía muchas ganas de estrenar el divertido set de troqueles Cat Icon Dies de Paper Smooches y por fin lo he hecho con esta tarjeta para su reto de enero:
I've been wanting to use the fun Cat Icon Dies from Paper Smooches for a while now, and I've finally managed to do so in this card for their January Challenge:


El reto consiste en crear un proyecto inspirado en la palabra "cozy" (acogedor, cómodo, calentito...) y en esta foto:
The challenge consists in making a project inspired by the word "cozy" and this lovely picture:


Mi pequeña escena con esa taza de café (del set Coffee and Tea Dies) y el gato sentado sobre su cojín (una de las frutas del set Fruit People Dies) favorito delante de la ventana, es muy tranquila y acogedora a pesar de la paleta de tonos fríos...
I think the little scene that I created with the mug (from the set Coffee and Tea Dies) and the sweet cat sitting on its cushion (cut with one of the dies from the Fruit People Dies) in front of the window, is very cozy, in spite of the cold colour palette...


A través de la ventana (de Mama Elephant) se puede ver como cae la nieve, dibujada con un boli de gel blanco. El papel pintado de la pared es de un set de papeles navideños muy discretos y bonitos llamado "Silent Night" de la marca First Edition.
Through the window (a Mama Elephant die) you can see some falling snow, drawn with a white gel pen. The wallpaper is from a set of discrete and beautiful Christmas-themed papers called "Silent Night" by First Edition.


Cree el sentimiento "Tú eres mi lugar feliz" estampando parcialmente sellos de dos sets; Get outta town y Space cadet. Usé rotuladores Copic para crear sombras en las formas troqueladas y unos toques de Glossy Accents para rematar la tarjeta.
I made the sentiment by partially embossing stamps from two sets: Get outta town and Space cadet in platinum. I gave the die cut elements some volume by shadowing them with Copic markers and added a few touches of Glossy Accents to finish the card.


Aunque soy más de colores fuertes, estoy bastante contenta con esta tarjetita delicada... espero que a vosotros también os guste. ¡Hasta pronto!
Although I love strong colours, I'm quite happy with this delicate card... I hope you like it too. See you soon!

viernes, 16 de diciembre de 2016

Renos interactivos graciosos - Funny interactive reindeer

Hoy me paso por aquí muy rapidito para enseñaros un par de tarjetas interactivas que hice con el gracioso set de troqueles "Reindeer" de Paper Smooches...
Today I wanted to stop by really quickly to show you a couple of interactive cards that I made using the "Reindeer" die set by Paper Smooches...


Podemos adivinar que cuando se tira del corazón, aparecerá un mensaje en el bocadillo, pero la tarjeta tiene un elemento sorpresa...
We can totally guess that a message will appear in the speech bubble when the heart tab is pulled, but the card has a surprise element...


Ja ja ja... ¿qué os ha parecido? Este reno hablador tiene la lengua muy larga ;) Vamos a verlo de cerca.
Ha ha ha, what did you think? This reindeer sure has a sharp (and long) tongue ;) Let's have a closer look.


He aprovechado un sencillo mecanismo slider para mostrar un mensaje oculto, pero también para introducir un elemento gracioso.
I used a very simple slider mechanism to show a hidden sentiment (Merry Christmas), but also to introduce a funny element.


La lengua está cortada con uno de los troqueles del set "Tooth Fairy", también de Paper Smooches. Creo que se trata de una especie de banner, pero no lo tengo muy claro:
I cut the tongue using one of the dies from the Paper Smooches "Tooth Fairy" set. I think the shape is a sort of banner, but I'm not sure:


He sacado fotos del paso a paso y si os interesa, cuando tenga algo de tiempo, prepararé un tutorial... De momento os dejo un gif animado de la tarjeta y el enlace al reto de diciembre de Paper Smooches en el que participo.
I took pictures of the process, so I could prepare a tutorial for you, if you're interested... For the moment, here's an animated gif and the link to the Paper Smooches December Challenge in which I participate with this creation.


El titular de este blog está en plural porque preparé una segunda tarjeta de renos muy sencilla, pero que también tiene su gracia...
I made a second, simpler card that is also quite funny...


 ...y con esto y un bizcocho, ¡hasta mañana a las ocho!
...that's all for today, folks! Have a great weekend!

sábado, 15 de octubre de 2016

Tarjeta de otoño interactiva - Interactive autumn card

Ya sabéis que últimamente no he parado de hacer tarjetas interactivas y hoy os muestro una más que espero que os guste...
Lately I've been making quite a few interactive cards. I hope you like my latest creation...


Como siempre he usado un mecanismo muy simple, se trata de una tarjeta "slider" pero esta vez el panel deslizante es de acetato. Vamos a verla en acción...
As always, I've used a very simple mechanism. This is actually a slider card with a twist, since the sliding panel is made of acetate. Let's see it in action...


Cuando deslizamos el panel, las hojas se "caen" desvelando el sentimiento oculto: "You're awesome" (eres genial) y cubriendo a ese pollito tan mono. 
When we slide the panel, the leaves "fall" revealing the hidden sentiment and covering the cute little chick.


Nunca se me hubiese ocurrido usar estos colores para una tarjeta otoñal, pero me inspiré en los siguientes retos de octubre y me encanta el resultado...
I would have never thought of using purple tones for an autumn card, but I was inspired by the following October challenges and I love the result...


El reto de Seven Hills Crafts nos ofrece tres paletas preciosas. Obviamente me inspiré en la primera y además usé los siguientes productos de Paper Smooches, a la venta en su tienda online y en la de Paper SmoochesLeaves 1 Dies (las hojas), set de sellos Space Cadet (parte del sentimiento), set de sellos Cute Fruit (parte del sentimiento) y set de sellos Chubby Chums (el pollito).
The monthly challenge at Seven Hills Crafts offers us three beautiful palettes of which I chose the first one. I also used the above-mentioned Paper Smooches products, sold at their online shop as well as in the Paper Smooches online shop.


El reto de Paper Smooches: Fall Color Story nos invita a jugar con su paleta de 8 colores. Yo usé cinco gracias a un pack de cartulinas texturizadas de Do Crafts - Paper Mania (Premium Textured Cardstock) que tengo.
The challenge at the Paper Smooches blog invites us to play with eight lovely colours. I used five thanks to a Do Crafts - Paper Mania textured cardstock selection that I have.


En esta foto podemos apreciar mejor las diferentes texturas... el marco de cartulina kraft con textura de madera, cortado con troqueles de La Pareja Creativa, las hojas (entintadas con tintas Distress) y el sentimiento embossado en platino.
In this close-up we can see all of the different textures that I used... the kraft frame with wood texture cut with LPC dies, the leaves (inked with Distress Inks) and the platinum embossed sentiment.


Os dejo con una última imagen de mi tarjeta... ¡Buen fin de semana!
Here's a last picture of my card... Have a great weekend!

martes, 7 de julio de 2015

Mi primera tarjeta para el reto solidario de 3flowers

Hoy vuelvo con una breve entrada para mostraros la primera tarjeta que he hecho para el reto solidario de 3flowers...

Os resumo de qué va la cosa, aunque lo mejor es que visitéis el blog de 3flowers retos de tarjetas para tener todos los detalles y para inspiraros por las preciosas tarjetas que ha creado el DT:

Hay un grupo de chicas que se dedican a hacer almohadas en forma de corazón para regalárselas a las mujeres que han pasado recientemente por una mastectomía con el fin de aliviarles el postoperatorio. Ellas recaudan tarjetas para que los corazones no lleguen solos y además en estas tarjetas van las instrucciones de uso por lo que tienen que ser de 14x14 cm y llevar el mensaje de apoyo por fuera.

Aquí está la mía:


Aunque la idea para la tarjeta la tengo desde que mi amiga Pilar Torres me habló de esta iniciativa hace unas semanas, no tenía claro el mensaje hasta hace poco... Espero que la ciencia avance y que esta maldita enfermedad tenga sus días contados!

Con esta tarjeta también participo en el reto de julio de Mama Elephant cuyo tema es el arcoiris...

Hoy no me apetece escribir nada más, pero si queréis saber algo sobre las técnicas o materiales que he usado dejad un comentario y os contestaré enseguida... ¡Hasta la próxima! 

martes, 23 de junio de 2015

Sácale el máximo partido a tus troqueles - Make the most of your dies

Uf, ya han pasado 13 días desde mi última entrada... desde que empecé a trabajar fuera de casa, parece que el tiempo no me llega a nada. Para compensaros he preparado una entrada muy completa en la que os enseño que los troqueles, especialmente los troqueles finos (wafer thin dies) son mucho más versátiles de lo que pueden parecer a primera vista. Aquí tenéis un ejemplo. ¿Reconocéis el troquel que he utilizado para crear el disco de vinilo de esta tarjeta?
Oh no, it's been 13 days since my last blog entry... it seems like I have no spare time ever since I started working outside of the home. To make up for this, I have prepared a special entry to show you that dies, especially wafer-thin dies, can be a lot more versatile than they seem at first glance. Here's an example. Do you recognise the die that I have used to cut the vinyl disk for this card?


O para cortar los arcos blancos y negros de esta otra tarjeta para el reciente reto de foil de 3flowers?
Or to cut the black and white archs for this other card that I made for the recent challenge at 3flowers?


Aquí ya queda clarísimo...
Here's the answer...


...que se trata de mi querido troquel de arco iris de Paper Smooches:
...I used my beloved rainbow die from Paper Smooches:


Ya entendéis por donde van los tiros de esta entrada, verdad? Como he mencionado en alguna ocasión, este curso escolar que se acaba de terminar, he tenido la suerte de poder dar clases extra-escolares de manualidades a niños de entre 2 y 8 años. Para muchas de las clases cortaba formas básicas con mi fiel Big Shot que aprovechábamos para crear todo tipo de animales y figuras. A continuación os muestro algunos de nuestros proyectos más originales (perdonad la mala calidad de las fotos):
I guess you can tell where I'm going with this, right? As I've mentioned a couple of times, I was lucky enough to work as an arts and crafts teacher for 2 to 8 year-olds this last school year. For many of the classes, I would cut shapes with my faithful Big shot and we would use them to create all kinds of animals and figures. Next I'll show you some of  the most original ones (sorry about the bad quality of the pictures):


Algunos de los proyectos como los robots y los reyes magos son de "fabricación propia" y otros son encontrados online usando las palabras de búsqueda: "paper punch art".
Some of the projects, like the robots and the three wise men are my own ideas and some I found online using the key words: "paper punch art".

A continuación vamos a ver más formas para aprovechar nuestros troqueles, así que quédate un ratito más...
Next we'll look at more ways to take advantage of our dies, so please stay a while longer...

¿Qué tienen en común estos dos troqueles (el lazo y el "hello")?
What do these two dies (the bow and the "hello") have in common?


Ni idea, verdad? Pues fijaros en el espacio negativo...en las piezas que normalmente descartamos:
No idea, right? Take a closer look at the negative space... at the pieces that are normally discarded:


¡Estas piezas también se pueden aprovechar! Por ejemplo para crear gotas de lluvia:
Why not use these pieces as well? For example to create raindrops:


Me entra la risa pensando que estuve a punto de comprar un troquel para cortar gotas como estas... Por cierto, si no tenemos un troquel de nubes lo sustituimos por uno con un óvalo o un círculo con ondas:
Thinking that I almost bought a die set to be able to cut drops like these, makes me laugh... By the way, if we don't have a die that cuts clouds, we can always use a scalloped circle or oval:


Vamos a ver otro ejemplo parecido...
Let's look at another similar example...


Este troquel de Echo Park Paper corta un diamante que es una monada, pero también lo podemos aprovechar para crear... banderines! Fijaros qué bien quedan:
This die by Echo Park Paper cuts a beautiful diamond shape, but we can also use it to make... banners! Don't these look great:


Mi troquel de bicicleta de Die-namics...
My bicycle Die-namics die...

...corta unos banderines más pequeños ideales para un proyecto pequeño como una etiqueta:
...cuts small banners that are ideal to for a smaller project like a tag:


Otra manera de usar las formas troqueladas de un modo creativo es modificándolas con pequeños cortes (fijaros en las caras de los conejos de antes...son corazones a los que les corté las puntas y que pegamos al revés) Aquí tenéis otro ejemplo:
Another way to use die-cuts in a creative way is by modifying them with small cuts (if you look at the faces of the bunnies from before... they are made with hearts. I just cut off the tips and we glued them upside down) Here's another example:


He realizado un sencillo corte para convertir el gracioso bigote en unos bonitos labios. El brillo del labio es simplemente una de las gotas de antes.
As you can see, I made a simple cut to turn the fun moustache into beautiful lips. The shine effect is just one of the drops from before.

Aquí tenéis un lindo gatito...
Here's a sweet cat... 


...creado con este troquel (además de un pequeño corazón y dos piezas cortadas con la letra "B"):
...made with this die (in addition to a small heart and two pieces left over from cutting the letter "B"):


...usando la técnica del corte parcial que explico en ESTE tutorial.
...using the partial die-cutting technique that I explain in THIS tutorial.

Por último os dejo este encantador robot...
Finally, here's a cute robot...


...cortado con el set de botellas de laboratorio de Paper Smooches:
...made with the "Chemistry bottle set" by Paper Smooches:


Espero haberos inspirado para sacar vuestros troqueles, experimentar y descubrir todo su potencial... fijaros especialmente en los troqueles de letras y en los que cortan muchas piezas pequeñas como las borlas, etc. Si te apetece, no dudes en compartir esta información con tus amigos scraperos ^_^ ¡Hasta la próxima!
I hope I've inspired you to take out your dies, experiment and discover their full potential... pay special attention to the ABC dies and to those that cut many small pieces such as doilies, etc. Feel free to share this information with your crafty friends ^_^  See you next time!