Mostrando entradas con la etiqueta copic. Mostrar todas las entradas

lunes, 2 de octubre de 2017

Una dulce tarjeta slider para La Pareja Creativa - A sweet slider card for LPC

¡Hola! Empiezo el mes de octubre con mucha energía y una tarjeta para el reto mensual de La Pareja Creativa. Esta vez Tina nos pide que creemos un proyecto interactivo y yo hice esta dulce tarjeta slider para felicitar a una amiga scrapera por su cumple...
Hi there! I'm starting October with lots of energy and a card for the monthly challenge at La Pareja Creativa. This time Tina asks us to make an interactive project, so I made this sweet slider card for a crafty friend's Birthday...


Tenía muchas ganas de estrenar algunos de los nuevos productos de La Pareja Creativa, como esos ositos tan adorables del set de sellos Osos Amigos. Quise retarme a crear una escena nocturna, así que los coloree en tonos oscuros, para acompañar al cielo estrellado del set de troqueles Noche Estrellada.
I was dying to try LPC's new products, like the adorable bears from the set Friendly Bears. I wanted to create a night time scene, so I colored them in dark tones that also suited the starry sky, cut with the Starry Night dies.


Como podéis ver en el gif animado, las estrellas se iluminan al tirar de la solapa... Usé este mismo efecto (lo llamo "Chibitronics lowcost", ji ji ji) para encender las luces de las casas en ESTA tarjeta navideña, que os mostré en el blog de La Pareja Creativa el año pasado.
As you can see from the animated gif, the stars light up, when you pull the tag... I used this same effect (I call it "Lowcost Chibitronics" ha ha ha) to turn on the house lights in THIS Christmas card that I showed you on LPC's blog last year.


El efecto se consigue con una simple tira de cartulina amarilla, adherida al panel slider. Una de las flechas del nuevo set de troqueles Flechas, me vino fenomenal para la solapita que cree con el troquel más pequeño del set Círculos Cosidos.
The effect is achieved with a simple strip of yellow cardstock glued to the slider panel. One of the arrows from the new die set Arrows, was perfect for the tag that I created with the smallest die from the set Stitched Circles.


Para el sentimiento usé el nuevo troquel Felicidades 2, ¡que me encanta! Por último añadí un par de flores troqueladas con el set Flores Navideñas (unos troqueles muy versátiles) en el mismo tono que la bufanda de uno de los ositos.
My sentiment was cut with the new die Felicidades 2, which I love! As a last detail, I added a couple of flowers cut with the set Christmas Flowers (a very versatile set of dies) in the same color as the bear's scarf.

Podéis ver un paso a paso de esta tarjeta en el siguiente vídeo:
Here's a step by step video tutorial of the card:


No os olvidéis de pasaros por el blog de La Pareja Creativa para ver los proyectos de mis talentosas compañeras y si venís de allí, ¡muchas gracias por la visita! ¡Hasta la próxima! ^_^
Don't forget to visit La Pareja Creativa's blog to check out the projects of my talented Design Team colleagues. Thanks for your visit! I'll be back soon... ^_^

jueves, 18 de mayo de 2017

Tarjeta sirenitas - Mermaid card

Ayer fue el Día de las Letras Gallegas y aproveché el festivo para crear una divertida tarjeta con el nuevo set de sellos de My Favorite Things, "Mermazing".
Yesterday we celebrated our Galician culture here in north-western Spain and I took advantage of the bank holiday by making this fun card using the new "Mermazing" stamp set by My Favorite Things.


Al ver la expresión de asombro de una de las sirenas, se me ocurrió crear esta escena, con una especie de submarino y unos ocupantes igual de sorprendidos... Son los superhéroes de los sets "You're super" y "Super boy". Mi hijo Matías siempre se reconoce en ese niño, ji ji ji.
When I saw the surprised expression of one of the mermaids, I came up with the idea of creating an underwater scene with a submarine and some equally surprised passengers. I used the superheroes from the stamp sets "You're super" and "Super boy". My son Matias always recognizes himself in the boy, ha ha ha.


Para crear el submarino usé un troquel de círculo grande, cartulina gris, tinta plateada, un trozo de acetato y un troquel de portillo de un set de Die-namics llamado "Let's get nautical". Aunque apenas se aprecia en las fotos, las colas de las sirenas llevan una capa de Wink of Stella para darles brillo.
To create the submarine, I just used a large circle die, some gray cardstock, silver ink, a piece of acetate and a porthole die from the "Let's get nautical" set by Die-namics. Even though you can hardly tell by the pictures, I added some glitter to the tails with clear Wink of Stella.


El coral fue cortado con un troquel del set "Coral reef" de Avery Elle y el resto de elementos son del set de sellos de las divertidas sirenas. Espero que os haya gustado, aunque podría haber trabajado las imágenes un pelin más ;) Aún así, aprovecharé para presentarme a los retos de Colouring in Scrapland y Copic Marker España con el tema de "Anything goes". ¡Prometo currarmelo más la próxima vez! ^_^
The coral was cut with an Avery Elle die set called "Coral reef" and the rest of the elements are from the before-mentioned mermaid stamp set. I hope you like the card, although I admit that I could have done a better job at coloring. Even so, I want to participate in the "Anything goes" challenges at Colouring in Scrapland and Copic Marker Spain. I promise to improve my coloring next time! ^_^

martes, 15 de noviembre de 2016

La exploding box más bonita del mundo - The prettiest exploding box in the world

Hola! Me hace especial ilusión mostraros mi último proyecto por lo mucho que le ha gustado a mi hijo. El pobre lleva bastante tiempo pidiéndome un robot y por fin le he hecho uno... a ver qué os parece...
Hi there! I'm super excited to show you my latest projects, because my son loved it! The poor guy has been asking me for a robot and I finally made him one... I hope you like it.

  
...y ahora os diréis: "...a Laura se le ha ido la pinza, sino ¿a qué viene el título de esta entrada?" A ver si el siguiente vídeo lo aclara:
...and now you're probably asking yourself... what does the title of this blog post has to do with anything? I hope the following video makes it clear:


¡Como podéis ver, el robot es en realidad una exploding box! La verdad es que Matías me pilló in fraganti trabajando en el "Mariobot" (lo bautizó en cuanto lo vio je je je) por lo que ya no fue una sorpresa. Pero él no tenía ni idea de lo que ocultaba la carcasa... ¡Me encanta la reacción que tuvo al descubrirlo!
As you can see, the robot is actually an exploding box! Matias caught me working on the "Mariobot" (he named it as soon as he saw it, lol), so it wasn't really a surprise. But he had no idea that there was more to it... I love his reaction when he opened it! 

Aquí ya está más calmado viendo los detalles de cerca...
Here he is checking out all the details...


Mi idea era hacer un paso a paso, pero hubiese sido interminable, así que comentaré brevemente algunas cosas.
I wanted to make a step by step tutorial, but it would have been endless, so I'll just mention a few things.


En su día había empezado a crear una exploding box totalmente diferente para el reto de mayo de Up & Scrap "La exploding box más bonita del mundo". Era muy minimalista... blanca con acetato y "vegetación" y una sorpresa al tirar de la tapa (¡una cascada de lentejuelas de colores!), pero nunca la terminé.
A while ago I had actually started to make a totally different type of exploding box for Up&Scrap's May challenge: The "Prettiest exploding box in the world". It was very minimalistic... white with a lot of leaves and flowers and a surprise interactive feature when opening the lid (a cascade of sequins!), but I never finished it.

Hace unos días, viendo la animación "Robots" por enésima vez, se me ocurrió que podría hacer un dos por uno y me puse a recopilar cosas "robóticas" que tenía por casa... Cree la estructura exterior y partes de la estructura interior con cartón prensado (chipboard) para que fuera bien resistente.
A couple of days ago, watching the animation film "Robots" for the nth time, I came up with the exploding box idea and started looking for stuff that I could use around the house... I constructed the exterior and parts of the interior with chipboard, to make it sturdy.


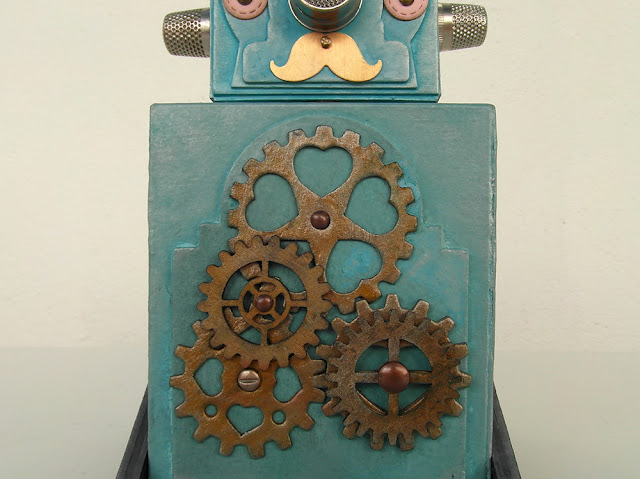
La cara está formada por formas troqueladas y superpuestas, un filtro del grifo, dos dedales, un bigote de latón (de mis días de artesana), tres brads, un par de enamels negros y un tubito de plástico de la caja de Legos de mis peques.
The face is made out of different die cuts, a faucet filter, two thimbles, a brass moustache (from my days as a jewelry crafter), three brads, a couple of black enamel dots and a plastic Lego tube.


Las ruedas dentadas más grandes son de chipboard, cortadas con el troquel Bigz "Love gears" y pintadas con acrílico y después embadurnadas con tintas de pigmento metalizadas de la marca Colorbox. Añadí unos brads de metal antiguo para darle más realismo al conjunto.
I used a Bigz die called "Love gears" to cut out the largest cogwheels out of chipboard and then I painted them with black acrylic paint and inked them with Colorbox pigment inks. I added a couple of antique metal brads to give the ensemble a more realistic touch.


Las piernas son en realidad las tapas de una caja de caramelos (otro troquel Bigz de los que cortan materiales gruesos). Superpuse tres capas y las pinté con pinturas acrílicas.
The legs are actually the lids of a candy jar (another Bigz die). I layered three of each and painted them with acrylic paints.


Para el interior usé el set de sellos "Bionic Bots" de My Favorite Things, que compré hace tiempo, pero que apenas había usado... Los estampé con tinta Memento Tuxedo Black  y coloree con rotuladores Copic. En la peli, los robots tenían un aire retro muy chulo, aunque estaban bastante destartalados. Los míos están limpios y relucientes, jejeje.
For the interior I used the stamp set "Bionic Bots" by My Favorite Things, that I bought a while ago, but had hardly used... I stamped them with Memento Tuxedo Black ink and colored them with Copic markers. In the movies, the robots had a cool worn retro feel to them. Mine are clean and brand new, ha ha ha.


El corazón central fue cortado con otro troquel Bigz llamado "Heart, stems and leaves" que transformé para que pareciese de metal. Corté las divertidas herramientas con el set "Tool charms" de Die-namics en papel plateado y cartulina Kraft.
The heart in the middle was die cut with another Bigz die called "Heart, stems and leaves". I transformed it to look like metal. I die cut the tools using the "Tool charms Die-namics" in silver and kraft cardstock.  


Sustituí las antenas del robot de la derecha por unos alfileres y añadí un banner con el nombre de mi hijo y un mini bocadillo con un corazón al robot amarillo. Las mini tijeras son de Waffle Flower.
I replaced the original paper antennas with some pins and added a banner with the name of my son and a mini speech bubble (by Waffle Flower) with a heart to the yellow robot. The mini scissors are also by Waffle Flower.


Todos los robots están adheridos a tiras de acetato que están insertadas en la estructura de la caja y pegadas por debajo con Glossy Accents y celo.
I adhered all the bots with thick acetate strips that I inserted in the structure of the box (I glued them with Glossy Accents and tape, just in case).

Pues eso es todo... espero que os haya gustado. A Matías sí le ha parecido "la exploding box más bonita del mundo. ¡Hasta la próxima!
And that's about it... I hope you liked it. Matias sure thought it was the "prettiest exploding box in the world". Until next time!

miércoles, 20 de julio de 2016

10 pingüinos para dos retos - 10 penguins for two challenges

No quería perderme la oportunidad de celebrar los diez años de existencia de una de mis marcas favoritas, My Favorite Things y hoy os muestro la tarjeta que he preparado para la ocasión:
I didn't want to miss the opportunity to celebrate the 10th Birthday of one of my favorite brands, My Favorite Things and today I'm showing you the card that I made for this special occasion.


En su reto cumpleañero nos piden que hagamos un proyecto teniendo en cuenta el número diez y por eso he incluido 10 pingüinos del set "Penguins in paradise" en mi tarjeta. ¿No os parecen adorables?
In their bonus challenge, they are asking for projects featuring the number ten in some way and that's why I included 10 penguins from the "Penguins in paradise" set in my card. Aren't they adorable?


Como podéis ver he enmascarado bastante para crear esta escena de una sola capa (+el globo). Estampé los elementos con tinta Memento negra y coloree todo con rotuladores Copic. Al fondo le di un tratamiento de textura para darle aspecto de acuarela.
As you can see I did quite a lot of masking to create this one-layer-scene (+the balloon). I stamped all of the elements with black Memento ink and colored everything with Copic markers. I added some texture to the backfround to give it a watercolor look.


Apenas se aprecia en la foto, pero añadí un poco de Glossy Accents a los ojos, picos y patas de las criaturas. Aprovecho para presentarme también al reto de Copic Marker Spain de todo vale. ¡Hasta pronto!
You can hardly tell in the picture, but I added some Glossy Accents to the eyes, beaks and feet of the critters. I'm also participating in Copic Marker Spain's everything goes challenge. See you soon!

viernes, 24 de junio de 2016

Tarjeta cafetera para dos retos - Coffee themed card for two challenges

Hola, ya estoy de vuelta para mostraros una divertida tarjeta que hice para el Summer Coffee Lovers Blog Hop y el Wednesday Sketch Challenge - Sketch 286 de My Favorite Things. 
Hi there, I'm back with a fun card that I made for the Summer Coffee Lovers Blog Hop and Wednesday Sketch Challenge - Sketch 286 at My Favorite Things.


¿Os suena ese osito? Es el oso polar del chulísimo set "Cool Day" de MFT Stamps que he modificado un pelín para que pudiera irse de vacaciones, je je je...
Do you recognize the bear? It's the polar bear from the awesome set "Cool Day" by MFT Stamps that I altered a bit so that he could go on a vacation, ha ha ha...


Aquí tenéis unas fotos del proceso. Estampé parcialmente el oso y añadí algunos detalles dibujando con un rotulador Multiliner de Copic:
Here are some pics of the process. I partially stamped the bear and added some hand-drawn details with a fine tip Copic Multiliner pen:


También usé sellos del set "Penguins in Paradise" para mi tarjeta, aunque cambié el helado del pingüino por una taza de café...
I also used stamps from the set "Penguins in Paradise" for my card, although I switched the penguin's popsicle for a mug of coffee...


Coloree todo con rotuladores Copic y añadí unos toques de Glossy Accents en los ojos, nariz y pico de los animales. El panel de color arena está adherido con volumen sobre la base de la tarjeta azul.
I colored everything with Copic markers and added a few dots of Glossy Accents on the eyes, nose and beak of the animals. The sand-colored panel was adhered with fun foam on the light blue card base.


El sentimiento es de un set de sellos de Lawn Fawn y el sencillo pero interesante sketch de My Favorite Things que seguí es este:
The sentiment is from a stamp set by Lawn Fawn and here's the simple yet interesting sketch by My Favorite Things that I followed:


Todavía estáis a tiempo para participar en los dos retos, aunque el Summer Coffee Lovers Blog Hop acaba dentro de unas 16 horas. 
There is still time to participate in both challenges, although the Summer Coffee Lovers Blog Hop ends in 16 hours.


¡Hasta pronto!
See you soon! 


miércoles, 11 de mayo de 2016

Tarjeta diorama Lawn Fawn - Lawn Fawn diorama card

Hace un mes hice mi primera tarjeta diorama para el cumpleaños de una amiga y me quedé con ganas de más, así que me puse manos a la obra e hice una segunda versión, esta vez usando animalitos de la colección de sellos "Critters in the jungle" de Lawn Fawn.
A month ago, I made my first diorama card for a friend's Birthday. I was so happy with the result that I wanted to make another one, this time using Lawn Fawn's "Critters in the jungle" stamp set.


También usé unos cuantos troqueles de la misma marca, como la palabra "hello" y los cordones del set de troqueles "Party Balloons" (para las lianas) por lo que presento esta tarjeta a su reto mensual "Calling all critters" que se acaba hoy.
I also used a couple of dies by the same brand, like the word "hello" and the strings from the die set "Party Balloons" (for the vines). That's why I'm participating in their monthly challenge "Calling all critters" that ends today.


Vamos a ver una imagen de los detalles...
Let's have a closer look...


Estampé los sellos con tinta Memento "Tuxedo black" y los coloree con rotuladores Copic, después los recorté con las tijeras. El mono daba mucho juego con esa cola enroscada así que incluí dos en la escena...
I used Memento's "Tuxedo black" ink for stamping the images, which I coloured with Copic Markers and then fussy cut. The monkey was so funny with its rolled up tail, that I included two in the scene...


Me encanta este modelo de diorama, porque se puede enviar en un sobre. AQUÍ tenéis el enlace al tutorial de The Little Green Box que adapté a las dimensiones de mi tarjeta. Se me olvidó sacarle una foto a la parte de atrás, en la que añadí una solapa con un cierre imantado que esconde el mensaje.
I love this type of pop-up diorama because it is totally mailable. HERE'S the link to the tutorial by The Little Green Box, which I adapted to the dimensions of my card. I forgot to take a picture of the back where I added a little flap with a tiny magnet to hide my message. 


Eso es todo por hoy. El reto de Lawnscaping se acaba dentro de 19 horas, así que apurad si queréis participar. Os dejo con una última foto de mi diorama. ¡Hasta pronto!
That's all for today. This Lawnscaping challenge ends in less than 19 hours, so hurry up if you want to participate. Here's a last look at my project. See you soon!


viernes, 19 de febrero de 2016

Cómic scrapero - A scrappy comic

Please click HERE for a version in English.

Hoy os muestro un proyecto bastante curioso, cuya idea nació después de leer los requisitos para el reto de febrero de Up & Scrap: "Estampa aquí, estampa allá, colorealo, colorealo". Me apetecía usar los sellos y las tintas para crear algo diferente... algo que nunca antes había hecho con material de scrap: ¡un cómic! Vamos a verlo y después os cuento como lo hice...


Lo enmarqué y ahora está decorando mi scraproom, pero para poder apreciar todos los detalles, he tomado el resto de las fotos sin el marco. Vamos a verlo más de cerca...


La historia la inventé y dibujé hace muchos años y pensé que la podía resumir (era de tres páginas!) en una sola página, usando mayoritariamente sellos del set "Space Cadet" de Paper Smooches (en total usé sellos de 6 sets diferentes) y algo de dibujo a mano.

Empecé con un boceto en el que estampaba los sellos, sin enmascarar ni nada, y jugaba con los espacios para ver que todo encajaba... Adherí temporalmente algunos elementos (los monstruitos y planetas) que mi amiga scrapera Elsa me había mandado, ya coloreados y recortados, el año pasado.


Fui bastante fiel al boceto inicial...dividí mi cartulina de alto gramaje de la marca Neenah en diferentes recuadros, a lápiz, y decidí que trabajaría en dos de las imágenes más complicadas por separado (el primer recuadro y la nube). 

Esto me permitía usar mi estampador de sellos casero para estampar sellos complicados, como el de los edificios de abajo (del set "You're super" de Mft stamps) que necesitó varias estampaciones superpuestas. Completé la escena a mano usando un lápiz y un rotulador con tinta de Memento negra, para poder colorear todo con mis rotuladores Copic.


Poco a poco fui estampando y coloreando, algunas veces también era necesario enmascarar algunas de las escenas para entintar con tintas Distress, superponer figuras o para dejar espacios en blanco...


Fue bastante más laborioso de lo que me había imaginado en un principio, pero creo que el resultado valió la pena. Los graciosos bocadillos de esta escena son del set "Small talk" de Mama Elephant...


El aspirador, uno de los protagonistas de esta historia, es del set "Squeaky clean" de Paper Smooches...


La escena más importante y complicada del cómic fue sin duda la secuencia en el que la corteza de la tierra es aspirada... espero que se entienda, a pesar de lo absurda que es, jajaja.


Bueno, pues eso es todo... espero que os animéis a participar en este reto porque es muy original y el premio es una pasada! Os invito a pasaros por el blog de Up & Scrap para ver todos los detalles y las propuestas de las/los demás concursantes. ¡Buen fin de semana y un beso extra fuerte para mi amiga Sonia, que está de cumple hoy!


miércoles, 25 de noviembre de 2015

Otra tarjeta de monos - Another monkey card

El otro día estrené un precioso set de sellos de Waffle flower e hice esta tarjeta shaker. Me quedé con ganas de más, así que inspirándome en el sketch del reto de noviembre de la misma marca hice esta segunda tarjeta:
The other day I used a beautiful stamp set by Waffle Flower for the first time and made this shaker card. I wanted to work with the stamps some more, so I drew inspiration from the november challenge sketch by the same brand to make a second card:


Fui bastante fiel al sketch aunque cambié los círculos por troquelados parciales de los tres monos... qué simpáticos son! 
I was quite true to the sketch although I changed the circles for three partially die cut monkeys... Aren't they fun?

Para el fondo estampé las piñas y plátanos del mismo set de sellos, "Willie and friends" sobre papel de acuarela con tinta muy clara para conseguir un efecto natural (sin contorno) y los coloree con rotuladores Copic. Después los cubrí con papel de enmascarar y trabajé el fondo con tintas Distress y la técnica de "Ink smooshing". 
For the background I stamped the pineapples and bananas from the same set "Willie and friends" on watercolour paper with light ink in order to achieve a natural looking no-outline colouring with Copic markers. Then I covered them with masking paper and worked on the background with Distress inks and the "ink smooshing" technique.


Para que no resaltase demasiado, lo cubrí con un bonito trozo de vellum con triangulitos dorados de la colección "Wonder" de Crate Paper.
So that it wouldn't stand out too much, I covered it with a piece of beautiful vellum with gold triangles from Crate Paper's "Wonder" collection.

Es difícil mostrar el brillo en una fotografía... aquí se aprecia un poco mejor:
It's difficult to capture the shine in a picture... here you can see it a little bit better:


La tira de washi tape también lleva dorado y me gusta el toque elegante que le da a la tarjeta...
The strip of washitape also has gold in it and I love the touch of elegance that it gives the card...


También usé máscaras para estampar los complementos de los monitos, que coloreé con rotuladores Copic y adorné con un par de enamel dots.
I also used masks to stamp the accessories of the monkeys, which I coloured with Copic markers and embellished with a couple of enamel dots.


Este mono en concreto tiene una cara bastante enigmática... ¿que le estará pasando por la cabeza? Seguramente estará pensando en plátanos, je je ^_^
This monkey has such an enigmatic face... I wonder what it's thinking about... probably about bananas, ha ha ^_^


Esta mona tiene unos ojos muy expresivos como los dibujos japoneses... los cubrí con una capa de Glossy Accents para darles volumen y brillo. El sentimiento es de un set de sellos de Mama Elephant embosado en blanco sobre un bocadillo de madera, previamente entintado con tinta negra.
This monkey has really expressive eyes, like a Japanese cartoon character... I covered them with a layer of Glossy Accents to give them volume and shine. The sentiment is from a stamp set by Mama Elephant which I embossed on a previously inked wood veneer speech bubble. 

Con esta tarjeta también participo en el reto "Hoy jugamos al 3 en raya" de Locas por el Scrap eligiendo la combinación: sellos, acuarelas y vellum de la siguiente tabla:
With this card I also participate in the tic-tac-toe challenge at Locas por el Scrap with the combination: stamps, watercolour and vellum. 


Gracias por llegar hasta aquí! Pronto estaré de vuelta con otro proyecto...¡feliz miércoles!
Thanks for reading until the end! I'll be back soon with another project... happy Wednesday!